Pages

Monday, April 29, 2013

Quilt Blocks Puzzle Paper Box Assembly Tutorial

Create this set of 3d puzzle blocks to provide hours of pattern play. This tutorial is for the box that builds the pattern. A tutorial for the blocks tray can also be found on this blog.

The puzzle tray as shown will require tray pieces (6) plus 16 digital box shapes cut from sturdy card stock. Tray file is included in the box and top decorative shapes file available for purchase.


ASSEMBLY:
1. Fold on all sides and tab perforations, folding toward card stock toward backside

Align and glue in place the inner tabs to the inner short walls.


2. Align and attach tabs on the same wall to the notched-out front panel.


3A. Fold down side wall flaps. Apply glue and insert flaps into box. 


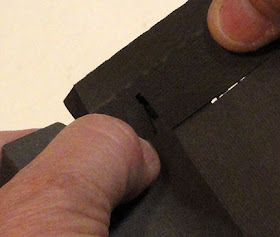
3B. Insert fingers through notch window to help apply pressure as side walls are being glued.


4A.  Apply glue to face side of final end tab


4B. Insert tab into slot. Apply enough pressure to help tab adhere.


The final steps to prepare the blocks for play is to cut the decoration square and shaped pieces, assemble these together, then glue to the box upper and/or lower sides. Specific directions for these can be found in the shape descriptions in the online store, or in the tutorials for specific patterns elsewhere in this blog.


Quilt Blocks Puzzle Tray Construction Tutorial


Create this tray to use with the Quilt Blocks paper boxes for puzzle pattern play.


Here are the main pieces. Cut from heavy weight cardstock for durability. The large squares is the slotted base. Match each "wall" piece with its symbol to the corresponding side edges of the base square.

The single symbol cutout sides are assembled first.


1. Fold short tabs back toward backside of cardstock. Fold long opposite tab toward backside. Fold along long perforation rows. Repeat for each of four "wall" pieces.


2. Work from front side of base. Insert tabs of one side piece into slots. 


3. Turn assembly over to work from backside. Pull tabs through fully and lay flat next to base square edges.  Tabs should be folding toward outside edges of square. Apply adhesive to tabs backside surface. Press to attach and glue securely.
4. From front side, fold wall piece perpendicular to base front, then fold at each perforation row so that long tab perforations align parallel to base square cut edge.

5. Apply adhesive to long tab back side. Position long tab so that back square cut edge fits snugly along wall perforation. Apply pressure all along edge by pressing top and bottom surfaces of wall to secure. 

Use a thick book or equivalent object to provide an edge to apply pressure near the targeted edge being glued.

Repeat for the opposite side (single symbol).


 6. Next prepare the final two side walls by folding the INSIDE end tab piece toward the front side as shown
7. Insert short tabs into slots, turn to assembly over, then glue as for first pair of sides as shown in Step 3. (However, this time the wall piece cannot be laid flat.)


 8. Unfold and insert INNER end tab into adjacent slot on previously joined wall piece.
9. Apply glue face of tab then apply pressure to attache tab to inside of wall. Use a pencil inserted into wall cavity to apply pressure. Make sure that the two walls being "joined" by tab are snuggly touching at the corner.


10. Fold back end tabs on first walls. 


Apply glue to two placed on wall that is already in place: A) corner top surface . . 


and B) outside corner tab.


11. Fold wall around to backside and hold corners to square up snuggly and allow glue to secure.  Repeat for all four corners.


12. Apply glue to long tab of wall, position perforation snuggly to base square edge as before (Step 5). 


Also apply even pressure along edge by pressing top and bottom of wall surface and moving fingers as glue cures.


Repeat for final wall.


13. Apply adhesive evenly across backing square back side. Position on back of assembled tray and work pressure across evenly.


Now your Quilt Block Puzzle tray
is ready to use with sixteen cardstock blocks
and decorative patchwork shapes.
Find a tutorial to assemble the boxes on this blogspot.


Quilter's Puzzle Blocks Triangles Patterns


The Quilter's Puzzle Blocks Triangles digital cutting design available from Snapdragon Snippets in the Silhouette America online store can provide some fun pattern play for children and adults. A paper tray (sold separately) holds sixteen paper "blocks" that have colored triangles on solid cream squares on the front and the back surfaces. These can be re-arranged to create many traditional quilt blocks. You can copy the block designs shown here on this post, or come up with original designs of your own.

Find the "Crooked Road" (Drunkard's Path) variation available through Silhouette America, and find the patterns in a post that follows this one. Then watch for additional patterns in the near future. 


To create this set, glue a triangle to background square, then a square to the box top (or bottom). Color suggestion: cut 2 triangles from each of 4 paper or fabric prints in two color groups. For greater variety of designs, also cut and 1 extra box, 14 plain “background” and 4 colored squares, and 1 additional triangle from 5 prints to attach to BACKSIDE of blocks. Find the tray and box tutorials elsewhere on this blog.

This block is called "Twisting Star".


This block is called "Zig Zag".


This block is called "Double Z".


This block is called the "Boston Star".


This block is called "Cake Stand".


This block is called "Evening Star".


This block is called "Flying Dutchman".


This block is called "Thousand Pyramids".


This block is called "Square in A Square".


This block is called "Square in A Star".


I hope you (and your little people) have fun testing your imagination

using these fun traditional patchwork designs. My grandson Aiden, a kindergartner, helped me "road test" this puzzle set. The pattern play provided him lots of entertainment time (he had blocks from two patterns to experiment with. His smile in this picture shows he was having fun.


Here is one of the patterns that he came up with using just the triangle blocks. Should have known a young imagination could do even better than years of experience in the "patchwork business". 

And one more that Aiden "discovered" while playing. It probably has a name in the patchwork compendium - something like "Square in a Square".

I think Aiden's creations are wonderful!


I would suggest making your puzzle box and tray set with your own color choices,
then setting up your laptop or desktop computer opened to this blog post
and "challenging" a youngster to match the designs they can see, one by one.


Quilt Block Puzzle Crooked Path Designs

The Quilter's Block Puzzle paper digital cutting design available by Snapdragon Snippets through Silhouette America's online store can provide some fun pattern play for adults and children. A tray holds 16 paper "blocks" that have colorful patchwork patterns cut and adhered to the top (and for this pattern, the back, too). The blocks can be re-arranged into various patterns that recreate traditional patterns. Following are a few for the "Crooked Mile". Copy these 8 patterns with your cut and assembled set, Can you make more original fun patterns?


 This block is called "Drunkard's Path". Note that we made a mistake in the top right corner block. It should be turned clockwise two positions. To make this set, cut 2 shape sets (1 set = quarter-circle shape and "L" shape) from 8 different prints. Also cut 32 background squares from 8 different white prints. Glue shapes with plain squares, then glue each of these "patches" to FRONT and BACK of blocks. Find tray and block construction tutorials on this blog site.


This block pattern is called "Jockey Caps".


 This block is called "Seplechre" or "Summer Pavilion".


 This block is called "Farm Furrows".


 This block is called "Whirligig" or "Toy Jacks".


This block is called "Snowballs"


This block is called "Beach Balls".


This block is called "Winding Way".


This block is called "Seagulls". (Can you visualize the four birds in the corners flying around in a circle with wing tips touching at the block's center?)

Friday, April 26, 2013

May On the Docket Paper Quilt Display


 The "On the Docket" monthly quilt block series is now being offered through Silhouette America's online store. These two photos show a couple more ways to display the paper quilts.

First, the May On the Docket - "Mother's Apron" quilt block is shown with painted clothes pins affixing it to the top "rail" of a 6x12 scroll top wire table top hanger by Ackfeld Wire. Check your local specialty craft store or visit their online store.


Next, the quilt is attached with tiny but powerful magnets hidden on back tabs to a standing metal marquee frame. This one is a bit fancier.

A small, dressed-up bulletin board (painted with decor fabric covering the cork) is another good option.

Watch the Snapdragon Snippets offerings on Silhouette America's online store for more monthly series quilt blocks and related designs, including the "Dozen Squares" simpler quilt blocks for each month.