Pages

Sunday, May 31, 2015

Cowboy 3d Hat Construction Tutorial

Realistic replica cowboy hat has recessed contours 
on front crown sides and top. 
Front decoration includes a shell shaped 
medallion and side flourishes. 
A fun decorative piece, this hat 
can be embellished for Fourth of July, rodeo theme party, 
part of cowboy Christmas tree decor, and more. 
One version shows front embellished with feathers cluster 
behind the medallion, with studs attached over hole punches. 


ASSEMBLY
1. Identify and cut the shapes:
A main crown shape
B crown top contour inset
C right side contour inset
D left side contour inset
E brim
F back rim half
G front rim half
H hat band front half
I hat band back half
J front decoration shapes


2. (No image) Prepare the crown main shape by folding on perforations: a) fold front and back portions vertical perforations slightly back to form the crown into tube shape; b) fold the top inset opening  crown lines down, tabs upward; c) fold side inset contour lines up. (See more detail about folding by studying images as construction proceeds.)

3. Prepare the top inset shape by folding on perf lines as shown here.


4. Position the top insert into the crown top opening with wide and narrow ends corresponding to opening wide and narrow ends. 

Align insert straight ends at end tab perforation lines, center, 
and glue one end . . . 


. . . then align, adjust and attach the other end.


5. Push the contour into place as tabs on both insert and crown opening are positioned and adjusted to over-lap or slide under appropriate edges to arrange as shown in the image.


From the backside apply adhesive under the tabs, then re-position and hold each in place until insert is secure along all seams.


6. Adjust crown to bring back panel upper angled edge to line up with straight edge over tab and at perforation line. 

Repeat for second upper angle seam.


7. Prepare side contour insets by folding tabs upward slightly.

Position left or right side into the side opening so that the tiny symbol cutouts correspond (circle punches shown here).


8. Slide the top tab under the straight edge of the opening, align edge at perf line and attach in place.


9. Bend the side straight edges of crown opening into place to correspond to the inset side angle perforation line, and glue tab in place underneath.

Repeat for the second side edge of insert and crown opening.

Complete the joining of both left and right insets.


10. Fold the crown to align the front upper angle straight edge into place at the contour edge perforation line and glue in place.


Repeat for both left and right sides.


11. Bring side straight edge into alignment with opposite side tab perforation line, then join while at the same time aligning and joining the top of the crown side panel edge to the bottom inset tab.

Repeat for both sides of the crown assembly.


12. Prepare the brim by attaching the rim halves to the upper (face) surface of the brim.

NOTE that there is a tiny hash cut at the center back of the brim and rim pieces.


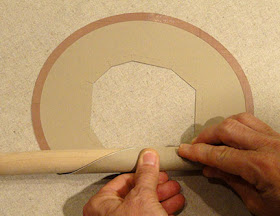
13. Before rim attachment adhesive is completely dry when it will be more pliable, add some curl to the sides of the brim for the realistic cowboy hat appearance.

One way to do this is to use a fairly good size diameter dowel or broomstick handle, or equivalent, then begin at brim edge to slowly and carefully roll the brim around the dowel. Repeat, adding slightly more pressure, and holding in place longer to increase the curl to the desired shape.


14. Fold the opening tabs upward.


15. Slide the crown in place over the brim opening, with the tabs inside the crown.


Line up the center front tab with the center front crown panel, adjust for centering, 
then . . .


. . . glue tab in place and apply pressure until secure.

16. Line up and attach the center back tab in similar fashion. Line up each remaining brim tab with corresponding edges of crown and glue in place.


17. Prepare the hat band shapes by bending back slightly on each of the vertical perforation lines.

(NOTE the longer band half is front band.)


18. Overlap the side edges with front band on top, and attach by inserting a brad fastener through punch holes on both sides.


19. Orient the hat band so that band front/back corresponds with front and back of hat assembly. Slip band over the crown and slide down fully into place.


Apply a little adhesive between band and crown front and back, and otherwise as desired. (Band will fit snugly without adhesive.)


20. Assemble front decoration shell concho medallion and side swirls sections.

21. Center and attach shell concho on front panel of hat band. Attach side swirls by placing each on the front side panels of hatband, pushing in behind shell medallion as far as possible to that they give the appearance of being connected.


Apply pressure to the back portion of swirl flourish to help it follow the crown contour and attach completely.


Here is the completed 3d cowboy hat.

If you wish to add embellishments, 
such as the feathers cluster pictured in the thumbnail, 
you may wish to add some curl to the concho medallion
to accommodate the bulk of the embellishment
prior to attaching it in place.

Attach feathers at center front
over hat band,
then apply adhesive to the underside
of medallion where it will contact the hat band
or crown, then glue in place.
(NOTE: it may be helpful to use
hot glue to attach feather-style embellishments
and medallion edges.

Here is the finished, feather-embellished hat.


Thursday, May 28, 2015

Bridal Couple Faux Clothes Peg Marquee

Simple bride and groom in the form of a "clothespin" 
embrace as the front panel of this tent-style marquee 
"tube" that stands to hold the two-layer decorative 3x2 card 
(or prepare your own printed cards) in top slot. 
Stands approx. 6" tall. 
Place on wedding breakfast or rehearsal luncheon 
or bridal dinner tables to designate intended occupants. 
Or include with the guests signature book 
with the names of bride and groom. 

ASSEMBLY:
1. Identify and cut the shapes.
A marquee stand
B figures base shape (shows through as eye slashes)
C groom shirt shape with tie band and bow
D groom head
E groom jacket with "arm" spring shape
F bride dress
G bride face with cheek circle, necklace beads
H marquee overlay
I marquee rectangle


2. Prepare the stand shape by folding back on all perforation lines.


3. Assembly the bride and groom on the base shape. Add the spring shape as "arm".

Assemble the marquee overlay on the rectangle base (including printed information as desired).


4. Attach the bride and groom decor shape on the stand front, inset slightly from the top and bottom edges and perforations, and matching the neck opening edges exactly.


5. Form the stand into a tube shape to bring the side straight edge to overlap the back edge tab to the tab perforation line, and glue in place.


It may be helpful to insert a rod tool such as a standard schoolhouse pencil behind the seam area to provide a press-against surface.


Insert the marquee tag in the slots at the sides top for display.


Here is the completed marquee project.


Friday, May 22, 2015

Fishing Tackle 3d Box Assembly Guide

Introducing a 3d fishing tackle box replica
that you will enjoy building and using as a gift box
or as a vignette display element.
Lid and base are built as separate boxes, then connected
with the side bar hinges with brad fasteners.
Front has a bracket latch, connected to the lid,
that fits over the latch nib that is built as a separate mini box
and attached to the base in a small window.

Box panels are decorated with offset accent shapes, 
including base bottom shape that includes a fish silhouette cut out. 
Final detail is the "great catch" letters cutout and layered tag. 

****CUT FILE CORRECTION NOTICE***

If you purchased and downloaded this cut file
from Silhouette America in the first few days of release
(May 22 - May 26, 2015)
you may find that the Lid top accent shape
does NOT include the handle punch holes.
To remedy this, you may:
A. re-download the corrected file on May 27 or thereafter
B. use a sharp point instrument such as an awl
to poke holes to match the Lid roof holes
once the accent shape has been attached.

ASSEMBLY:
1. Identify and cut the shapes:
A. box base with front, back, side overlays
B base side extensions
C box base bottom overlay
D box lid with overlays
E handle
F hinge bars
G latch bracket
H latch nib
I two-layered tag with words cutout


2. Prepare the box lid by bending all panels and tabs back on perforation lines. 

3. Center and attach top, front, back and side accent shapes as shown, taking care to align punch holes. Shapes are offset inside the panel boundaries by approx. .12 inches.


3. Prepare the box base in similar fashion, bending and attaching accent shapes as shown.


4. Prepare the two side attachment shapes by bending long and short pair tabs back.

Attach one to each side edge of box base shape by overlapping box straight "tab" edge over the side attachment tab to align at perforation line. Make sure that the side edges of the attachment and the box base all line up accurately.


5. Prepare the nib shape by bending back on all perforation lines, except  bend edge tabs outward.

6. Bend the non-tab straight edges of end panels to line up with the adjacent tab perf lines and attach, for all four corners, to create . . .


. . . a tiny open-top box as shown here.


Edge tabs should still bend outward.


7. Push the nib into place in the small window on the front upper portion of the box BASE. The nib has a slight slant, the taller end of which should be positioned at the top of the box opening. 

Glue the nib tabs in place on the inside of the box.


8. Fold the box base to bring the side edges in line with the tab perf lines of the back or front edges, respectively. Repeat for all four corners.


9. While the punch holes are still accessible at this point of the construction, position one of the hinge bars on each side, with one end hole lining up with box base hole punch.

Insert brad fastener and bend prongs back to secure on the inside of box base.


10. Fold the side extension to the inside of the box base and insert the small tabs into the corresponding slots on the bottom of box. (It may be helpful to use a tool such as a spatula, nail file, or weeding hook to assist with insertion.)


11. Bend the tabs toward the center of the box bottom and glue in place.

It may be helpful, after the initial grab of the tabs adhesive, to place the box bottom-down on flat surface and apply finger pressure from the inside in the area where the tabs are attaching.


12. Center and attach the box bottom accent shape (to conceal the tabs construction.)

Again, it will be helpful to place the box bottom-down on a flat surface and apply overall finger pressure from the inside of the box to secure the accent shape completely.


13. Prepare to fold the base box upper panel (includes finger-access cutout window) into position. Apply glue to face surface of front tab, and on top of the narrow side platforms created by the side extensions (see step 10). Insert the tab and secure the panel on all edges to be attached.

It will be helpful to insert fingers through the cutout window to apply pressure to the tab and panel surfaces to achieve accurate and secure seams.


14. Bend the LID panel front straight edges up to align with the side tab perf lines to form the box tray, and glue in place. (Repeat for all four corners.)


15. Prepare the handle shape by bending end tabs upward slightly, and adding curl between the end tabs.

Add curl by pulling the shape between fingers and thumb while applying pressure, in an arcing motion.


16. Position the handle on top of the LID with punch holes aligned precisely, and glue end tabs in place, then . . . 


. . . insert and secure brad fasteners in holes.


17. Bend the LID lower panel into position to prepare to insert tabs, apply adhesive to the face surfaces of tabs, then insert behind box tray edges and secure in place.

It will be helpful . . .


. . . to insert fingers through the cutout window to apply pressure to the tab and panel surfaces to achieve accurate and secure seams.

18.  Position the LID in relation to the BASE as shown to line up the remaining latch bar hole with the hole of the LID, then insert brad fastener to attach latch bar to LID.


Reach inside the lid through the finger access window to bend brad prongs back.

Repeat for both ends of lid.


19. Move the LID into position by carefully rotating it to the top of the BASE. (This is a snug attachment, so take it easy.)


20. With the LID and BASE stacked and aligned, position the latch bracket over the nib so that the "point" aims downward, nib is within the bottom of the window, as shown.

Then, without allowing the bracket shape to shift . . .


. . . apply adhesive under the top half only of the bracket. Apply pressure to attach the bracket top half to the front of the LID shape.

This will allow the bracket to slip off the nib to open the box, and then slip back over the nib to close it.


21. Prepare the tag by layering the smaller shape offset within the edge of the larger, with punch holes lined up. Glue the words cutout in place.

Attach to handle with twine or other tie of your choice.


Your Fishing Tackle Box is now complete!

If you wish, to assist the LID from falling too far
off the back as the tackle box is opened,
consider punching holes to attach brad fasteners pair 
in the back base panel
approx. 1" in from each side
and below the back edge of the LID when it is 
perpendicular to the BASE bottom
(approx. 1.125" up).