Pages

Thursday, November 30, 2017

Gingerbread Icing Treat Box

Cut this quick-assembly gift box to hold 
treats or small gifts. 
Box top includes a circle window 
to back with clear acetate. 
On the front, layer the teardrop and scallop layers as lid decoration. 
Bottom is shaped for fold-in and latch closure. 
Measures approx. 4" wide x 4" long x 1.5" deep when closed. 

ASSEMBLY: 1.  Identify and cut the shapes:
A box lid/back/side
B box side/front
C lid underlay contrast show-thru panel
D clear vinyl or acetate panel for window
E window opening "icing" trim ring
F window opening "icing" trim mask ring
(this over-lays E to form a finer squiggle ring)
G side panel "icing" overlays (3)
(NOTE the front thumb-hole icing is not shown)
2. Prepare the box sections by bending back
on all perforations for lid, flap, walls, tabs, etc.
3. Join the two sections at one side seam
by overlapping the straight side edge at
the corresponding side seam tab to the perf
line and glue in place.
4. Position and attach the lid icing ring around
the window circle cutout with circle edges aligned
as precisely as possible.
5. Position and attach the icing accents
for sides, back and front panels.
6. Position and attach the window icing mask ring
so that circle opening edges align as precisely
as possible. This decreases the width of
the icing strip attached in step 5.
7. Position and attach the clear panel
behind the opening in the contrast underlay panel.
Consider using a double-stick tape such as
the Kool Tak shown here to attach clear panel.
8. With the contrast panel face side up, position
it under the lid so that the circle window edges
align as precisely as possible, and attach in place.
9. Form the box assembly into a tube to bring
the final side seams together, and join
as with first side seam.
NOTE that this seam can have finger pressure
applied while the box is in a flattened form.
10. To close the bottom of the box,
first fold the front flange into position,
then . . . 
. . . bend the sides into position, and finally . . . 
. . . bend the back into position . . . 
. . . flexing the other panel positions to allow
the tab to insert into the slot.
Un-flex the flanges so that bottom is flat.
11. Close the lid into position by tucking
the rounded flap behind the front panel.

Here is the completed, filled treat box.

Monday, November 27, 2017

Pine Cone Chunky 3D Ornament


Thirteen "slice" layers of scale petals spaced  
along the center stem create this large, 
chunky ornament which measures 
approx. 6.5" tall x 4" diameter. 
Multiple layers glued together add 
dimension and strength. 
Stem includes hole punch for hanging. 


ASSEMBLY:  1. Identify and cut the shapes:
Stem: cut 7 shapes to layer into sturdy stack
Scale ring shapes A-M: cut 5 of each
to layer into sturdy stacks
2. Position and attach all of the Stem shapes,
one by one, into a stack, with edges
precisely aligned, including punch hole.
NOTE the center dash lines which will
be used to adjust the rings at their
most accurate levels.
3. NOTE that each of the rings includes
a letter cut near center that will be used to
identify each separate piece as they are
assembled into stacks, and also later so
that rings can be added in appropriate order
onto stem.
4. Position and attach the first two rings,
taking care to align ALL edges, and
particularly paying attention to the center
stem opening. Then add the remaining
three in similar manner until all 5 are stacked.
As the layers are added, shape the ring by bending
the scale extensions downward, before the adhesive
dries. NOTE that the tip edges will naturally 
splay a bit. Use an abundance of finger pressure
over the entire surface of the ring, but particularly
at the scale tips and edges.
5. Repeat the layering assembly process
for all rings A-M.
6. Begin with ring M to insert step narrow end
through ring center opening, then slide it into place
at the bottom-most guide mark on stem.
Apply a line of adhesive across stem width
at the line where M ring will be attached,
on both faces, and on side edges, then
slide M ring down fully into position at the line.
Adjust the ring so that it is squared up, or
perpendicular to the stem.
7. Next, slide L onto the stem, apply adhesive
at the next guide line on stem, and . . .
 . . . slide
L into position in the same fashion.
8. Continue in reverse-alpha order to add
and attach the remaining rings K-A. 
Adjust the rings as needed before allowing
all joints adhesive to firm and dry hard.
9. Add a twine loop through hang hole,
and a length of ribbon as desired.

If desired, frost the tips with textured
paint (SnowTEX brand was used on model).


Santa Head Block 3D Box

Fashioned after a decorated wood block cutout, 
the lid and base fit snugly together. 
Face assembly is easy, with base and 
other component silhouettes to build upon. 
Measures approx. 5" wide x 7.75" tall x 1.5" deep. 

ASSEMBLY:  1. Identify and cut the shapes:
A box lid main shape
B hat area boxing strip
C face side boxing strip  
D face side & bottom boxing strip
E box base main shape
F base hat area boxing strip
G base face side boxing strip
H base face side & bottom boxing strip
2. This block box is similar to the "Uncle Sam 3D Box"
assembly. Please follow this LINK to view
the box assembly for that project,
referring to steps 2-9, 11 (the Santa box
does not have edge rim tabs).
This illustration will identify where the symbols
on the boxing strips will be to indicate
which ends join, etc.
3. Identify and cut the lid accent shapes
that create the Santa head.
NOTE that the rosy NOSE shape should
have 2-3 circles cut, in order to fill in the opening
and raise the nose above the level of the mustache.
ALTERNATIVE: use a painted mushroom wood cap
for Santa's nose like that for Uncle Sam box.
4. Pre-assemble accent shapes into units:
A) beard onto lower part of face/head silhouette
(if you want to ink the cheek areas, do that
prior to joining these two together);
B) holly berry circle onto holly base;
C) hat fur trim onto lower portion of hat base;
D) eye white circles behind black pupil shapes;
E) nose multiples into a stack;
F) stars layered with holes matches.
5. Complete the head accent assembly
by positioning and attaching all shapes:
hat above face; holly unit onto hat;
mustache below nose protrusion.
NOTE: nose and eyes will be placed into 
their respective windows eventually (shown
here as information only), but this cannot happen
until the face assembly is attached to lid in step 7.
6. Thread twine through star holes
and tie knot and bow.
7. Position (centered, with roughly even offset 
all around) and attach the head assembly
onto the LID. Position and attach eyes
an nose.
8. Position and attach star at top of hat,
joining surfaces that touch.
9. Fit the LID over the BASE to complete
the box, check Step 24 for the Uncle Sam box
for information about gluing the boxing
together so that the box will NOT open.

Here he is finished.


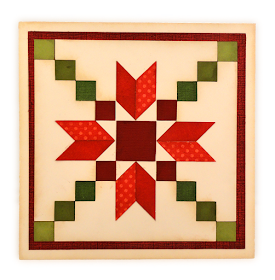
Star Stepping Stones Quilt Card

Traditional quilt block features 
a layered center star with "diamond" points 
extending away, "stepping stone" squares 
cascading on the diagonals. 
Card front layer includes cutouts to accept 
the small squares and provide registration 
for center star. Measures approx. 6x6 when closed. 

ASSEMBLY: 1. Identify and cut the shapes:
A card front panel   B card back panel
C stepping stones cutout overlay
D front accent panel (shows as narrow border)
E center star (positioning guide - cut to match C)
F center square and 4 stone squares
G stepping stones  - four sets of 3
H left "diamond" star points
I right "diamond" star points
2. Position stepping stones cutout overlay
onto front of accent panel, with stepping stone
cutouts, offset with narrow border all around,
and attach panel.
3. Position and attach the center star
with corner angle cuts aligned with
corresponding square cut edges.
NOTICE that the star matches the overlay
"background" and thus disappears, acting
as a positioning guide for the "diamond" 
star points at the valley between its points.
4. Position and attach the center (largest) square
at the middle of the star.
5. Position the stepping stone squares into
the cutout positions, including at the top
open corners.
The sample uses three gradated greens,
darkest toward the center, lightest at corners.
6. Position the "diamond" star point pairs -
one left, one right - above the "disappearing" star
shape, taking care that the center edges
match up (this may involve adjusting positions
of diamond lower edges along the star shape).
7. Attach the card front to the card back
at the top edge an tab flange.

Here is the completed card.

Pine Sprigs A7 Card

Versatile easel-style card with front window overlays 
measures approx. 5x7 inches when closed. 
Two-layered pine sprigs take the focus, straight at center, 
gently curved at sides. 
(Delicate cutting design: sharp blade is essential.) 
Punch holes in underlay bottom layers offers 
a place to tie twine or narrow ribbon 
around glued-in-place sprig stems. 
Shaped banner holds "greetings" word cut, 
with two punch holes for mini grommets or brads accent.


ASSEMBLY: 1. Identify and cut the shapes:
A card front   B card back
C card frames base, plaque, greetings
D frame bottom layer
E frame top layer
F sprigs: top & bottom layers for left, right,
and center
2. Prepare the frame by layering the top
and bottom layers with outer edges, punch holes
 that match up exactly..
3. Prepare the sentiment plaque by
centering the "greetings" word cut on
the plaque shape.
4. Prepare the left, center and right sprigs
by layering the least-full needles shape of each
over the fuller needles shape,
and gluing the stems together.
5. Position the plaque assembly over the frame
assembly, and gluing in place.
Add the mini brads or eyelets at punch holes.
6. Position, center, the frame assembly
onto the frame base shape.
7. Position the sprigs stems over the frames
base, with stems between the tie punch holes
as shown, and glue stems in place.
8. Thread a length of twine or narrow ribbon
through the frames base punch holes
and tie a knot and bow.
9. Position and attach the frames/plaque/sprigs
assembly over the card front, centered,
with offset all around.
10. Attach card front to card back at tab.
Here's the finished card.