Pages

Saturday, September 25, 2021

Angled Sides 3D Box

Simple “square” footprint belies the complex 
visual interest conveyed by this interesting container 
composed of lid and base. 
One-piece cut shapes are embellished with rounded
 corner offset accent shapes to mix and match. 
Create an alternate version by stacking scalloped circles 
for a platform – then add plain circle accent. 
Box is designed as companion container to act as 
pedestal for the “Box Swan 3D Tray” for 
a show-stopping ensemble for Twelve Days of Christmas 
giving (or other worthy occasion!). 
Box top or bottom panel measures approx. 2.25” square; 
center perimeter measures approx. 3.25” square; 
container height measures approx. 3.625”. 

ASSEMBLY: 1. Identify and cut the shapes:
A lid main shape
B lid top accent square 
C lid large triangle accents (4)
D lid isosc triangle accents (4)
E lid inner reinforcement frame
F optional scalloped circle platform top (1 shown red)
and interior (2-3 shown beige)
G optional scalloped circle bottom with registration 
square window cut out
H base main shape
I base floor reinforcement square (2)
J base isosc triangle accents (4)
K base large triangle accents (3)
2. Prepare the main lid shape by bending back on
ALL perforations for square top panel, side triangle
panels, long tab flanges and short end tabs.
3. Position and attach the top square accent square
with narrow offset margin all around, centering it
within the square space defined by perforation lines.
Also position and attach the lid accent triangles
and isosceles triangles within their respective panels
as defines by perforation lines or cut edges.
4. Bend the side panels into position, one at a time,
to bring straight edge of one to overlap the adjacent
tab flange edge to perforation line, and glue in place.
5. Bend the short wall edges into position to
overlap straight edge across tab to perf line,
and glue in place.
6. Repeat steps 4-5 for remaining 3 seams
to complete the lid dome.
7. Prepare the lid interior reinforcement frame by
bending back the four edge flanges.
8. Apply adhesive to the outward surface of each
of the four flanges, then insert the frame into the lid
interior and . . . 
. . . push gently into position so that the perforation
crease fits snugly into the corners where angled
walls begin.
Insert fingertips to press the flanges against
the inside surface of the lid until each is secure.
9. Begin base assembly by bending on perforation lines
in manner similar to lid as shown in step 2. 
Stack and glue together the optional base bottom
reinforcement squares.
10. Position and attach the reinforcement square stack
onto the inside bottom panel, within the area
defined by the perforation lines.  Press the entire assembly 
under a heavy flat weight until glue dries.
11. Follow the second half of step 3 to position and attach
 the accent 
triangles onto their respective panels with 
narrow offset margins all around. 
NOTE that the base main shape has small 
semi-circle "bites" in the long flanges
as a means of identifying it as base.
12. Follow step 4-6 to join the long angled and short
end seams to complete the base dome.
13. To close the box, fit the lid rim over the base rim
and gently push together until the base rim
stops when it touches the lid's interior
reinforcement frame structure. NOTE that the two
components fit snugly together.
14. If desired, prepare the top platform by layering
the interior and top (whole) platform scalloped circle
shapes one by one, taking care to rotate for
precise scalloped edges alignment, until all
are attached in a stack.
15. Position and attach the bottom layer with
outer cut edges rotated for precise alignment.
Press the stack under a flat heavy object such as
a thick book (possibly with something else heavy
on top) until the glue is completely dry, to avoid
curling or warping of the glued-up stack.
(Drying may require hours or overnight.)
16. Position and attach the accent whole circle
if using exclusively with the angled sides box. 
Then . . . 
. . . apply glue to the underside of the platform assembly
within the square alignment area, then position on top
of the lid, with lid top panel fitting within square window.
(When the circles platform is used, the box's top square
accent shape can be eliminated.)
17. If pairing the angled sides box with the swan tray
for a combination project, replace the whole accent
circle with the triangle platform/circle assembly,
to position and attach it to scalloped circles stack.
Then, once the circle platform assembly is attached
to top of box's lid, position and attach the swan 
to the triangle riser, and proceed with embellishment
and other decoration . . .
. . . as can be seen here in this image of the decorated
swan and box ensemble.

Swan Figure Tray

Diminutive and elegant with triangle base, 
swan form and number 7 tag can represent 
the “Seven Swans Swimming” 
for Twelve Days of Christmas giving, 
or other gifting occasions. 
(Top view is shown here.)
Tray form can hold goodies as a favor box or 
place card holder. Design features mask accent overlays, 
double wing layers, extra side “tail feathers” inserts, 
slightly curved back panel that attaches to inside 
of side panel to form a tray. 
(Back view is shown here.)
Included in the file is a plain edge disc base, 
with triangle platform to provide a “riser” – a stage
around which embellishment feathers and purchased flowers 
can add additional flair - especially when placed atop 
the separate design “Box 3D Geometric Sides” 
as a combination container.
Swan measures approx. 3.75” long x 2.25” wide 
x 3.5” tall; base disc measures approx. 3.75” diam. 

ASSEMBLY: 1. Identify and cut the shapes:
A main swan hull (sides, triangle base, 
back joined panels)
B & C left and right side under-lays for tail feathers
D & E left and right upper and lower wing overlays
F & G face mask accent overlays
H optional base interior reinforcement panel
I opt. disc to hold riser "stage"
J opt. riser "stage" boxing and triangle platform
2. Prepare the main hull shape by bending back
on all perforation lines for triangle panel, tail tabs,
and bending forward for lower neck and head
perforation lines.
3. Position and attach left and right interior "underlays"
for extra back tail feather details, taking care that . . .
. . . bottom-most tail feather edges align, AND that
the bottom straight edge aligns slightly above
the hull triangle perforation line, so that the hull can
properly bend into position.
If possible, place this assembly under a flat heavy
object such as a thick book while the panels
are being glued in place and glue allowed to dry.
4. Pre-bend the wing layers at front perf lines.
5. Position and attach each over wing on top of
each larger base wing, aligning the matched upper
cut edges where they correspond. Press under
flat weight until dried.
6. Position and attach the optional triangle base
reinforcement panel within perforation lines,
if desired - advisable if the swan will be used
as a container.
Also arrange the three large curl feathers so that
they overlap front to back (shortest over middle,
over front).
7. Carefully add some forward curl to the back tail
panel, taking care that the side tabs do not tear.
Use a rod tool such as this wooden dowel to
draw across the tail panel, as shown.
8. Locate the curved dash guide lines on the inside
face at tail end of underlays, bend sides and tail
panels into final "container" formation, then . . . 
. . . bend tabs inward and apply glue to the outward
surface of tabs. Position the tail behind the side panels
with the curve side edge matching the curve dash lines . . .
. . . then reach inside the mail hull compartment
to press the tabs in place to attach tail in position.
Repeat the positioning and attaching of tail edge
tabs for both sides.
NOTE that the top side tail "feather" extensions
should poke through the opening between largest
feather curls when in proper position.
9. Apply glue to backside of one swan head/neck area,
then press the two layers together with edges
aligned as precisely as possible, and hold/press
until fully attached.
10. Position and attach each wing assembly onto
appropriate swan side panel, matching upper cut 
edges and lining up the wing tip perforations with neck
perforation line.
11. Position and attach the face mask over
the corresponding lower portion of head and beak
of main hull.
Here is the completed swan tray.
12. Prepare the number tag (for use when using
the swan as a gift in the Twelve Days of Christmas
sequence) by laying and attaching the cut out number
on top of the tag base.
13. If the swan tray will be part of the combination 
project with swan atop round platform of
 "Box 3D Geometric Sides", consider preparing
the triangle platform to raise swan a bit and provide
a margin to attaching feathers or other embellishments.
Prepare the platform shape by bending back on
triangle attached edge, upper tabs, and short wall
perforations, and forward on bottom tab/flanges.

14. Form the walls of platform into a triangle frame
with end tab tucked under, and complete the short
side seam.
15. Bend the upper tabs inward, and the top
triangle panel down to adjust and arrange, attach
underside of platform to two flanges.
16. Align the circle with triangle cut out over the platform
then slide into position . . .
. . . and press triangle edges down completely to
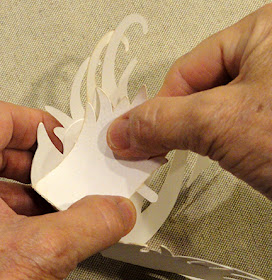
rest at tabs perforations . . . 
. . . then bend tabs outward and glue in place
to underside of circle.
17.  Apply adhesive to platform top surface, then
position and attach the base panel of swan
on top - hold in place until secure.
17. Position the platform/triangle centered 
on top of the scalloped circle (shown here without swan
glued on top of platform) of the geometric box, 
and glue in place.
18. Apply adhesive to the top square panel of
geometric box, then position the layered scalloped
circle platform so that square cutout guide fits
precisely on top of the box top panel.
Here is the geometric box with scalloped circles
platform on top - shown with swan on platform
and decorated with no. 7 tag tied onto neck with twine,
and with white feather, paper roses, buds
and berries added as embellishments.