This four-panel accordion card has
"Grad" word cut
and offset with mortar board hat shapes,
accent panel
on card front, bottom strip money pocket
attached behind on front interior
panel.
"Congrats" word cut panel is attached to
offset interior back
panel, with top-flange tab back panel
that attaches behind Congrats panel.
Unique and full of interest, this card makes
gift giving extra easy.
Card
measures approx. 5x7 when accordion-folded.
ASSEMBLY: 1. Identify and cut the shapes:
A main card front with inner front panel
B front accent panel
C "Grad" word cut with offset for word and hat
D grad cap shape
E money pocket
F interior front panel base (includes offset of "congrats")
G interior front panel overlay (includes "congrats")
H message panel I card back panel with top flange
upward into position, with side tabs folded inward . . .
portion of main front panel, with the pocket fold
parallel to the long cut edge, centered.
onto the assembly as shown.
(or stud) at the grad cap punch hole,
and bend brad prongs back behind hat.
Insert paper cash gift in the money panel
as shown.
Here the completed four-panel layout is shown.
A main card front with inner front panel
B front accent panel
C "Grad" word cut with offset for word and hat
D grad cap shape
E money pocket
F interior front panel base (includes offset of "congrats")
G interior front panel overlay (includes "congrats")
H message panel I card back panel with top flange
2. Prepare the card front by bending back along
horizontal center perforation line.
3. Position and attach the shaped accent
front panel onto card front (lower half)
4. Position and attach the "Grad" word cut onto
the offset shape with hat. Then position and attach
this assembly onto card front accent.
5. Prepare the money holder panel by bending
back on all perforation lines.
6. Fold the "pocket" lower panel upward into position, with side tabs folded inward . . .
. . . tuck side tabs between layers and glue in place
to opposite panel backside only.
7. Position money pocket as shown on the backportion of main front panel, with the pocket fold
parallel to the long cut edge, centered.
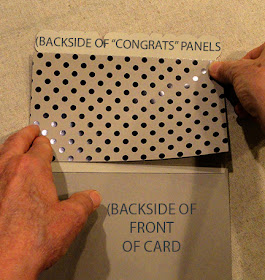
8. Prepare the "congrats" base panel by
bending forward along flange tab perforation line.
Layer the "congrats" accent panel over the front
of the base panel, with side edges matched,
and with the upper corners aligned as indicated
by the pointing finger.
9. Position and attach the message panelonto the assembly as shown.
10. Position the bottom of the front two-panel
assembly over the flange on the bottom of
the "congrats" panel assembly, adjust for
side-to-side alignment and glue overlapping
surfaces together.
11. Prepare the back panel by bending back
the top flange tab on the perforation line.
12. Position the back panel onto the backside
of the "congrats" panel assembly, and align
into position so that the top perf fold ends
are positioned even with the "corners" at ends
(see step 8 where pointing finger indicates corners),
and glue flange in position.
13. Position and attach a brad button accent(or stud) at the grad cap punch hole,
and bend brad prongs back behind hat.
14. Position the grad cap either exactly over
the corresponding cap outline on word cut offset,
OR offset slightly, and glue in place.
The card assembly is complete.Insert paper cash gift in the money panel
as shown.
Here the completed four-panel layout is shown.
Fold in accordion style as shown to fit into
a 5x7 envelope for mailing or giving.
Add additional studs and embellishments
as desired.


This did not import into Design Space properly. Usually I will just center all of the pieces of the card and then set the width or height to the appropriate size so that all other pieces will size accordingly. It doesn’t work with this card because the “base” is not going to be the appropriate size to use, as it has the folding pieces. I hope this makes sense. Is there a way you can tell me what to say is all the pieces to if they are stacked? Or, do you have the sizes for each individual piece? Thank you.
ReplyDeleteOur company customer service does not provide advice for importing our designs into Design Space. This is an issue that you will need to take up with Silhouette America's online store customer service. We have historically had issues from customers saying Design Space does not work correctly with the way we prepare our designs, but Silhouette America continues to suggest that ALL designs work across the spectrum of cutting systems and machines. So sorry for your trouble.
Delete