Flat rectangle box lid holds two medium size
classic candy canes "back to back" to suggest antlers,
with front
overlay face panel with oversize highlighted nose,
star cheeks, eye and smile
cutouts with contrast backer panel.
Top scalloped oval and plain oval overlay
label
is stacked on silhouette ears, leafy antlers,
providing a place to pen or
stamp a greeting or name.
Insert helps hold cane ends in place.
Use the "standard" medium size canes that are
approx. 7" to 7.25" long.
Box can also be filled with additional loose candies
or gift card, etc.
Use the "standard" medium size canes that are
approx. 7" to 7.25" long.
Box can also be filled with additional loose candies
or gift card, etc.
Measures approx.
5.25" tall x 3.25" wide
x .625" deep when closed.
x .625" deep when closed.
ASSEMBLY: 1. Identify and cut the shapes:
A main box hull
NOTE: a substitute hull shape is also provided
without cane openings in case you wish
to make a version that doesn't use them
B front face overlay
C bottom insert to hold cane bottoms
D star "cheek" shapes
E nose contrast underlay F nose
G ear-medallion base
H antler base I & J medallion base and contrast rim
K canes center wrap band
so that plain side edge overlaps opposite flange tab
to perf line, and glue side to side flange.
4. Prepare top closure by bending side
tabs inward, bottom flap over so that
flap tucks into box, and . . .
. . . . glue flap in place (unless using as
a more conventional treat box where top lid
will need to remain unglued to be opened;
use the optional non-cane hull shape).
of a rod-like tool such as this spatula.
6. Insert platform-end first into bottom of hull . . .
9. Layer nose and contrast underlay and
glue together.
10. Position and attach cheek stars to face panel.
Position nose unit into nose recess and attach.
. . . centering so that scallop edge is a fraction
beyond straight oval edges
(best seen from reverse side of ears unit)
and glue in place.
around canes at band to help secure
and decorate canes.
A main box hull
NOTE: a substitute hull shape is also provided
without cane openings in case you wish
to make a version that doesn't use them
B front face overlay
C bottom insert to hold cane bottoms
D star "cheek" shapes
E nose contrast underlay F nose
G ear-medallion base
H antler base I & J medallion base and contrast rim
K canes center wrap band
2. Prepare the main hull shape by bending back
on all perforation lines for panels, flaps, etc.
3. Form hull into box shape in "tube" formationso that plain side edge overlaps opposite flange tab
to perf line, and glue side to side flange.
4. Prepare top closure by bending side
tabs inward, bottom flap over so that
flap tucks into box, and . . .
. . . . glue flap in place (unless using as
a more conventional treat box where top lid
will need to remain unglued to be opened;
use the optional non-cane hull shape).
5. Prepare bottom insert by bending side flanges
back (downward).
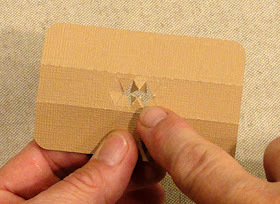
Also bend wedge tabs at cane end openings
inward, except at center opposing triangles
which are NOT tabs, and remain as part of
the top panel.
This can be done easily by inserting the shaft endof a rod-like tool such as this spatula.
6. Insert platform-end first into bottom of hull . . .
. . . and push in until side flange bottom edges
are flush with bottom hull edge.
7. Bend side tabs inward, bottom flap into position
and insert edge flange into hull.
Glue in place.
8. Position contrast face underlay behind the eyes
and mouth openings (and nose as well), and
attach in place.
glue together.
10. Position and attach cheek stars to face panel.
Position nose unit into nose recess and attach.
Position face panel, centered, on box hull
front panel, and glue in place.
11. Position and attach the inner medallion
to the scalloped medallion base.
Position and attach the antlers behind
the ears base so that the oval edges align.
12. Position medallion unit over the ears base . . . . . . centering so that scallop edge is a fraction
beyond straight oval edges
(best seen from reverse side of ears unit)
and glue in place.
13. Position antlers/ears/medallion unit,
centered, near top of face panel.
14. Position candy canes (in cello paper or without)
back to back, the wrap band around as tightly
as possible, overlap ends, and glue together.
This will help the cane hooks stay pointed outward.
15. Insert ends through lid openings and push
through hull until ends push through corresponding
insert openings and through to rest on box bottom
16. If desired, tie knot and bow with length of ribbonaround canes at band to help secure
and decorate canes.
Here is the finished reindeer candy cane box.


Just want to thank you for all the great Silhouette files and the detailed instructions for assembly. I'm into making box cards right now and purchased several of your Thanksgiving files. Without out the instructions, I would be lost. They turn out to be beautiful. I also made the Rose bouquet. Wow! That was a real big hit with my family. Thank you, thank you and keep 'em coming!!!!
ReplyDeleteNancy Jr