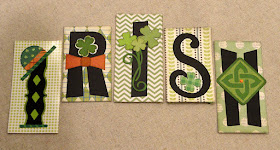
Three sizes of rectangular boxes consisting of
lids and bases create this ensemble
that may resemble wood blocks.
Vertical boxes
create stair-step look with
offset front overlays for decorated letters
that
feature bowler hat, shamrocks and Celtic square.
Horizontal box holds the
“Blessings” welded word cut
that completes the seasonal sentiment.
Measures
approx. 12.5” wide x 6.65” tall x 2” deep
when assembled and arranged.
ASSEMBLY: 1. Identify and cut the shapes:
A tall LID box main (3 for I, I & H)
B tall LID end pieces (3)
C & D tall BASE box main & end pieces (3 ea.)
E short LID box main (2 for R & S)
F short LID end pieces (2)
G & H short BASE box main & end pieces (2 ea.)
I interior support cross braces (5)
J horizontal box LID
K horizontal box BASE
L interior zigzag support strip
M, Q, T, W & Z face accent offset panels for I-R-I-S-H blocks
O, R, U, X & BB top accent offset panels for blocks
N & AA outer end panels for I & H panels"B
V decorations for middle I block
CC decorations for H block
DD "Blessings" welded word cut (don't lose the DOT)
2. Assemble the decorations for the letter panels
then "center" and attach letters to panel fronts.
3. Prepare the box LIDS, end pieces, BASES
and end pieces by bending back on all line
perforations.
4. Identify the BASE box shapes (shown here) by
finding and comparing the tiny symbol cutouts
on the end panel flanges.
Short LID = single circle; BASE = double circles
Tall LID = single squares; BASE = double squares
5. Position and attach the end pieces to correspondingtall and short LIDS and BASES.
6. Before assembling into their dimensional forms,
it may be helpful to position the offset front
panels (shown here without the attach letter - best
if letter assembly is also attached) and top panels.
Also the end panels to the leading 'I' and end 'H' LIDS.
7. Bend the side and top walls back to align
the corner seam edges, overlapping the straight
side edge over the flange tab to align at
the perforation line, and glue seam.
Repeat for all corner seams for LIDS and BASES.
8. Prepare the interior support cross brace bybending back on all edge flanges.
9. Apply adhesive to the two side and one bottom tab
and insert into the BASE at the approximate center,
adjust so that it is perpendicular, then attach flanges.
Repeat for all tall and short box BASES.
10. Apply glue to the final brace tab, and . . .
. . . along the bottom portion of the BASE side
and end panels, then . . .
. . . slide the LID over the top of the BASE (this is a very snug fit and may require a bit
of flexing) . . .
. . . push the LID and BASE fully together,
applying pressure to attach all glue-applied areas.
Repeat for each of the tall and short boxes.
11. Repeat the box-building steps for the horizontal
"Blessings" box, preparing the single box LID
and BASE by bending back on all panel and end
flange perforation lines.
12. Identify the LID shape by locating the single 'X'
symbol on an end flange, and . . .
. . . the BASE which has double 'X' symbols.13. Position (centered) the 'Blessings' word cut
on the LID of horizontal box and attach in place,
including the detached DOT shape above 'i'.
14. Build the LID and BASE by completing
corner seams of each as for the other blocks.
15. Prepare the interior support strip by bending
in zigzag form at cross-perforation lines, also
bending the edge tabs forward.
16. Apply glue to one set of edge flanges, then . . . . . . insert the strip into the BASE box as shown
with flanges touching and being attached to
what appears to be sides of the box but which
will actually be top and bottom.
Apply pressure to attach strip in place.
17. Apply glue to the "back" edges of ends and
top, bottom of BASE box, then slide the LID
over the open end and push fully into place
as with the other block boxes.
18. Complete the final assembly of the blocks
ensemble by arranging the middle blocks on top of
the horizontal box, and attaching the bottom faces
to horizontal box and side faces to each other
using a quick-grab glue such as hot-melt or FabriTac.
19. Position and attach the end blocks in thesame manner, taking care that the bottom edges
of ends and horizontal box are even to sit level
on display surface.
Here again is the straight front view
of the Irish Blessings block boxes Ensemble.


No comments:
Post a Comment