A pair of loops on each side of
center,
with slightly larger circle-punched overlay loops
create a festive bow
decoration for gifts, wreaths,
and other seasonal decor.
Double streamers form
base, with shaped “knot” wrap
center to complete the design.
For extra flare,
add the sized-to-fit “Cedar Mini Sprig”
design on top of knot.
Measures approx.
7” wide x 5” tall x 1.375” deep assembled.
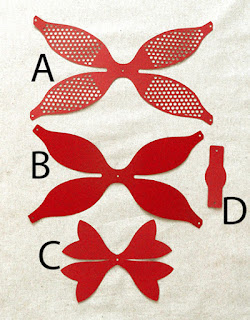
ASSEMBLY: 1. Identify and cut the shapes:
A circle-punched outer bow loops
B interior bow loops
C streamers base shape D knot wrap
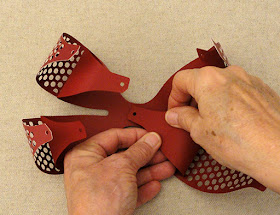
2. Prepare the interior loops shape by adding
curl to the center portions of each leaf extension
by using a rod-like tool such as this spatula tool barrel
so that the loops will smoothly curl back toward
the center. NOTE this image shows the bottom
of the shape, with the curl direction shaping
the tip ends back toward the center . . .
. . .which becomes the center FRONT.
11. Repeat for the second lower interior then outer loop,
and continue with the upper interior loops in the
same kind of order.
13. Position the loops assembly over the streamer
base, match the centers and general thrust of
bow extensions and streamers, and attach in place.
NOTE it may be helpful to use quick-grab adhesive
such as Fabri-Tack of hot melt.
15. To assemble the sprig, begin with the shapes . . .
middle portion of stems overlapped, and glue
together where they overlap.
Position and attach the boxwood twig over
the center, then . . .
. . . add the berries assembly.
A circle-punched outer bow loops
B interior bow loops
C streamers base shape D knot wrap
2. Prepare the interior loops shape by adding
curl to the center portions of each leaf extension
by using a rod-like tool such as this spatula tool barrel
so that the loops will smoothly curl back toward
the center. NOTE this image shows the bottom
of the shape, with the curl direction shaping
the tip ends back toward the center . . .
. . .which becomes the center FRONT.
3. Repeat the process for the outer loops shape,
taking care that the curl/pulling pressure does
not rip or tear.
4. Add curl to the transitional area of the knot wrap
(between the curved-edge front and the back
straight tabs. This will allow the knot to smoothly
wrap around the bow center thickness.
Here is the knot with curl.
5. Position the outer loops shape face down on
work surface, then position interior loops shape
face down on outer loops shape, line up center
circle holes and extensions at center, and attach
by gluing just around the center.
9. Carefully ease the lower first loop tip inward to
overlap and match circle holes, and glue tip in place.
10. Repeat for the first lower circle-punched outer loop.11. Repeat for the second lower interior then outer loop,
and continue with the upper interior loops in the
same kind of order.
13. Position the loops assembly over the streamer
base, match the centers and general thrust of
bow extensions and streamers, and attach in place.
NOTE it may be helpful to use quick-grab adhesive
such as Fabri-Tack of hot melt.
14. Position the knot wrap over the center of
the bow assembly, then . . .
. . . wrap ends around to back, match punch circles
(or adjust snugness of the wrap to your own
preference), then attach ends to backside of base.
Here is the completed bow (with upper loops
overlapping lower loops - thumbnail photos
show the bow upside top downward).
. . . assemble the berries unit by attaching
the single berries onto the tri-berry base.
Stack the left & right two-branch top cedar twig shapes
on top of the coordinated longer base, match
the stem ends, and glue where they overlap.
Layer the left hook onto the right hook twigs withmiddle portion of stems overlapped, and glue
together where they overlap.
Position and attach the boxwood twig over
the center, then . . .
. . . add the berries assembly.
16. Position and attach the sprig over the center
of the knot.
Here is the finished bow.


Beautiful ❤️
ReplyDelete