Designed as custom-sized gift box for
“Witch Hat 3D Easel Card”, but suitable as container
“Witch Hat 3D Easel Card”, but suitable as container
for other purposes. Triangle panels
with fold-under edges
extend from square “tray” to meet as middle peak,
imitating the witch hat point it is designed to enclose.
Decorate walls with
rounded corner triangle and
rectangle accents. Closure “latch” is a hollow,
built-up layers bracket shape that “snugs” the peaks together,
with a
cut-to-length bamboo skewer (approx .125” diam.)
inserted through panel holes
to secure it.
Measures approx. 5.125” square at base x 4.75” tall at peak
with
1.25” tall tray.
Embellish with seasonal shapes,
including layered “Lock Plate and
Dimensional Key”.
ASSEMBLY: 1. Identify and cut the shapes:
A box tray with (4) side wall accent rectangles
B front, back pyramid wall shapes
C side pyramid wall shapes (2; include latch hole)
D pyramid point support 'box'
E & F front/back, side accent rectangles (2 ea.)
G tray bottom reinforcement (or interior accent)
H latch medallion (1 each of the four layers shown
in cut file: top an bottom layers DO NOT include cut-in
numbers to show order, but when compared, the bottom
layer's square window opening will be larger)
2. Prepare the sides and front, back pyramid point walls shapes
by bending back at lower and side perforation lines.
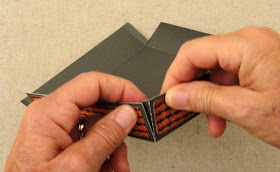
3. Bend the upper triangle flanges to the backand glue in place.
placed on top of each pyramid wall during the drying
process to help flatten the panel, and to avoid warping
or curling. (A fabric covered weight machine bar is shown;
a large heavy book will also work well.)
4. Position and attach the pyramid point offset accents,
matching the panel with or without the latch stick holes.
Press under flat weight until thoroughly dry.
5. Prepare the tray shape by bending back on all
perforation lines around base square, at corner tabs.
6. Position and attach the accent rectangles, offset(exterior bottom); also position and attach the interior
edge over opposite tab to align at perforation line,
and join corner seam. Complete all four corner seams.
9. Apply glue to the front of the wall portion of
9. Apply glue to the front of the wall portion of
the first (front) pyramid point panel, then tuck it
into place behind the front tray wall and push . . .
. . . push down completely until bottom edge rests
against bottom of tray. Wall section perforation line
should align slightly above the side wall top edge.
Tip the box assembly on its side to apply fingertip pressure
all along the side panels to assure thorough adherence.
Repeat for all four pyramid points, alternating the walls
with and without the latch holes.
10. Prepare the points support/reinforcement 'box' shape
by bending back on all perforations.
11. Bend the triangle walls portion into a tiny pyramid
and tuck the side tab behind the opposite straight edge
to complete side seam.
12. Bend the base tabs inward behind verical,
apply glue to the tab faces,
then bend the base upward to tuck the tabs into
the box to join behind walls.
13. Position the support box behind the FRONT point,
aligning the edges as precisely as possible with
pyramid point edges, and glue in place.
14. Layer the medallion shapes and join together,
taking care to align ALL outer cut edges; interior
square opening edges will bevel slightly to assist in
a snug fit around pyramid points.
NOTE: it is advised to press the glued-up stack under
a flat heavy shape until completely dried.
15. Prepare a latch pole by obtaining and cutting
a 4" length, sanding ends if necessary, and
painting or coloring as desired.
16. Close the box, bend the points together
to meet in the middle, with side and back points
resting on the support pyramid walls.
With points together, slip the latch ring over the points . . .
. . . slide it down to rest below the holes, then insert
the pole over medallion and through holes, and center across.
Here is the completed, closed box form
For further decoration, prepare the layered lock plate accent,
then position and attach, centered, to the front pyramid
wall, below the level of the latch ring.
The layered key can also be attached as embellishment,
using the latch ring hole with twine, narrow ribbon or
The witch hat 3D easel card fits perfectly inside
the tray portion of the pyramid box, shown here
being placed inside.
Here are the two projects shown together.


No comments:
Post a Comment