at top, open handle, left side fold.
Label the front with
“ROOTBEER” and “Cheers”
to create a fun card for Father’s Day,
to say congratulations
with a non-alcoholic toast,
or offer encouragement.
a standard plastic gift card.
Card measures
approx. 4.63” x 6.25” to fit A6 envelope.
Companion "Dad" tag design (one of two)
can be attached, or accompany as a gift tag.
(Assembly notes for the tags begins in Step 12.)
ASSEMBLY: 1. Identify and cut the shapes:
A card base B mug base/handle C mug overlay
D foam/bubbles overlays
E root beer cheers assembly: base, cheers, letters
F optional interior gift card holder (shown with card)
the three largest shapes by their order numbers
3. Here are the shapes to overlay in order from
#1 (bottom) to top individual bubble circles.
4. Position shape #2 on top of #1 with
edges aligned where they match up.
and glue in place.
Add shape #3 on top of assembly.
Add the next largest shape (welded five bubbles)
on the left , then . . .
. . . add the three-circle shape on left and two-circle
shape on right. Finally add the single circles.
Assist the multi-layered, glued up shape to stay flat
while the liquid adhesive is drying completely by
pressing flat with a heavy flat object such as this
muslin-covered repurposed free weight bar,
for several hours if possible.
5. Prepare the card base by folding along the left-edge
perforation.
6. Position the mug overlay onto the mug base
and attach, then . . .
. . . position and attach the mug assembly onto
the card base front, with edges offset as shown.
7. Position and attach the foam/bubbles assembled
shape onto the top of the card front, with top edge
positioned to have offset along top edges,
and to overlap the mug top edge.
8. Prepare the words assembly by positioning
and attaching the "root beer" letters onto the
base (NOTE that in the final file, the 'O's' are
hollowed out). Then . . .
. . . position and attach the 'cheers' word cut over
the base (to cover the base shape completely.
9. Position and attach the Root Beer Cheers unit
on top of the care front, in selected,
most-appropriate position. (NOTE that is a tag
is NOT attached somewhere on the right side
at or above handle, the words unit can be
vertically centered or slightly higher. With
the tag, move the words unit down as shown.)
10. If desired, position and attach the gift card
holder panel, centered inside the card.
To insert and position and card, gently lift
the side tabs and slide card into position
(before or after attaching panel to card base).
11. Consider assembling and attaching the oval
(smaller) tag for Father's Day or birthday - assembly
shown at Step 12, from "Tags Pair for Dad"
separate design. One position to attach it is to
tie with twine around the upper handle opening.
Alternate positioning is higher up by punching
an attachment hole in the farthest-left
individual bubble circle - through all layers.
DAD Tags Pair Assembly:
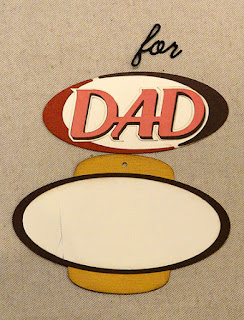
12. Identify and cut the shapes for the larger tag
at left, or the smaller oval tag, right.
(NOTE that the larger tag may be too large
to use with the Root Beer Cheers card.)
For larger tag:
13. Position and attach the three base layers . . .
. . . centering and attaching as shown here.
14. Assemble the upper "layers" . . .
. . . by attaching 'colored' front layer of
DAD welded word on top of 'shadow' DAD (top and
left edges align to leave some of shadow shape exposed),
then center the DAD layers on top of
offset contrast base shape.
Position and attach the crescent shapes at edges
of positioning oval, with narrow spaces between tips.
Complete the upper assembly by positioning and
attaching the 'DAD' unit on top of the crescent base.
15. Complete the assembly by . . .
. . . positioning the crescent oval unit on top of
the bottom assembly oval, then adding the 'for' above.
16. Assemble the smaller oval tag by layering
the 'DAD' front and shadow layers as described
in Step 14, above. Also layer and attach the oval
and offset oval base with punch holes aligned.
17. Complete the tag by centering the word unit
on top of the oval base unit.
Here is the completed card with attached oval tag.


No comments:
Post a Comment