Overlay
details on shaped card base deliver pizzazz
to this stylized fish card.
Lift
lower front edge of bottom fin and prop against
the half-oval stacked
“stop” which is glued
in place at guide marks for display.
Stamp an appropriate
message onto the interior
sentiment strip (or on the small fish silhouette
sentiment panel)
to customize this whimsical card.
Optional “You’re a keeper”
print & cut mini fish label
is included. A coordinated, sized-to-fit envelope is
also available as separate design.
Card measures approx. 6” tall x 7”
wide when closed.
Requires 12x12 card stock and cutting capacity
for largest card base shapes.
ASSEMBLY: 1. Identify and cut the shapes:
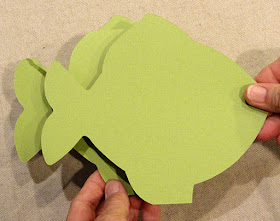
A main card base with 2 folds to create easel
B card front fish shape
C card backside fish shape
D stop shapes (3-5 to stack and glue together)
E body decoration base with upper and lower
edge trim shapes
F head overlay with 2 back edge trim shapes,
and swirl smile
G eye patch base with eye base, accent, pupil
H upper fin base with spikes overlay, bottom trim
I belly overlay
J lower fin base with spikes overlay, bottom trim
K horizontal cross-body trim
L tail base with spikes overlay, end trim
M body side fin with spikes overlay, trim
N optional sentiment label
O optional gold fish sentiment label
(shown as print & cut option with phrase)
2. Prepare the card base shape by bending on
perforation lines as shown: upper bend as "mountain"
and short bend as "valley". NOTE that shape is shown
with FACE side toward viewer.
3. Position card FRONT whole fish shape over front
(upper) fold of card base so that top half edges align,
and glue together only upward halves that line up.
This will allow the easel action.
4. Turn the card over, so front is face down,
and position, attach the backsides together.
This will create the "whole" fish shape and provide
reinforcement and strength for easel action.
5. Prepare the "stop" by stacking and attaching
the 3 to 5 shapes on top of each other with cut edges
as precisely aligned as possible.
Press under a heavy weight until dry.
6. Locate on the "inside" body face
the dash cross line and vertical end lines
that will serve as positioning guides for the stop.
Position the stop top straight edge below the cross
line, with ends of stop even with end marks,
and glue in place.
7. Assemble the head accent:
a) "gill" trim shapes at back curve edge, and
slightly forward with narrow space in between;
b) layer the eye ring on top of eye base and attach;
c) position and attach the pupil oval inside ring
center, with punch holes aligned;
d) position the eye unit over patch shape with
punch holes aligned, also align rounded edges
and "nub" tiny edge shaping near top left,
and attach;
e) position patch unit over head with punch holes
aligned, back edges conforming with gill trim edges . . .
. . . so that when the smile shape is positioned,
the swirl is parallel with patch shaped edge
as indicated, and glue all in place.
Press the glued-together head unit under a heavy
weight and allow to dry completely.
8. Prepare the other assemblies for fins, belly,
and tail as is shown here with separate shapes . . .
. . . and then with overlayed spikes and trim
glued into place.
9. Assemble the fish body unit by positioning
and attaching head unit at front with edges aligned;
belly along bottom edge, abutted behind head;
tail unit at end with trim edge abutted to belly end;
body accent trim shapes along edges,
abutted at ends to head or tail.
10. Position and attach body fin behind head assembly
with cross-body trim between fin and tail edge
where ends best allow abutted fit.
11. With card base closed so that whole fish shape
is evident, position and attach the body assembly
onto front, with even offset margins around face end,
lower back body and tail.
12. Position upper and lower fins with curved edges
abutted at body edges, offset margins even,
and attach in place.
13. To employ the easel action, lift front lower fin
bottom edge slightly upward and back to position
straight lower edge at stop inward straight edge.
14. As desired, position the sentiment panel
centered along lower body edge, below stop.
If preferred, use the gold fish shape, or the print & cut
variation.
15. To close the card, lift edge away from stop
and flatten.
In this configuration, the card will fit into
the companion fish cut out flap envelope
which is also available as a separate design download.


No comments:
Post a Comment