
White
owl figure takes the form of a large two-handled
vessel with dimensional beak, thickened eyes
vessel with dimensional beak, thickened eyes
(add dot of white acrylic paint as highlight) and brows,
four-part wings overlaid onto handles.
(NOTE layered features must bend to
follow hull shape;
under layers are split shapes.)

Maple leaf accents add a
splash of autumn color.
Subtle “feather” details are cut into hull sections
with “double cuts”.

Fill the mug with loose candy as a gift container,
with pot
pourri as a seasonal decoration, etc.
Bowl vessel measures approx. 4.375” wide
x
4.375” x 3” tall” with handles span 6.625”
when fully assembled.
ASSEMBLY: 1. Identify and cut the shapes:
bowl hull shapes: A-G (numerals 1-8 cut in tabs)
I bottom octagon ring
J handle slot and strip layers testing shapes*
K & L left and right handle sets, including
front & back tabbed shapes, with 8-9* interior
shapes as prescribed by slot & strip test
M bowl rim reinforcement ring
Eye & Eyebrow arrays (cut left & right sets):
N eye base solid circle with diag. perf line
O outer rings P outer half rings 2 sets for build up
Q eye pupil solid with 2 sets halves for build up
R solid eyebrows with 2 sets halves for build up
S bottom octagon solid (cut 4 for build up)
T left & right wing base with overlays
U left and right maple leaf accents
V dimensional beak with overlay
W left & right feet

2. To determine how many handle layers to cut
to properly fit into the bowl hull slots, prepare this
test: layer 8 or more cut strips, stack then . . .

. . . hold together and fit into the cut slot. The stack
should fit snugly. Typical textured card stock used in
projects like this one will require 8 layers; add or
subtract as your stock selection dictates.

Calculate the shapes your project will need by
designating from the determined quantity (1) layer
for the handle front, (1) layer for the handle front,
and the remainder for the interior layers (these DO NOT
include the end tabs that will fit through hull slots.

3. Layer the interior handle shapes into a stack
and glue together, taking care to align all cut edges
as precisely as possible. Use the punch hole as
an alignment guide, inserting a stylus or awl point
through hole to assist.

4. Bend the tabs on front and back shapes forward.
Layer and glue to the appropriate face of glued stack . . .

. . . taking care to align cut edges as before,
with the tab perf bends aligned at interior cut end
edges precisely as well. Then immediately . . .

. . . press under a heavy flat object such as a thick book,
possibly with something else heavy placed on top.
Allow the glued up shape to dry completely, leaving
the unit under the press for several hours or over night.
Pressing like this helps minimize warping and curling of
built up stacks assembled with liquid adhesive.
Repeat for the second handle unit.

5. Prepare the base build up stack in a similar
manner, aligning and gluing the 4 octagon solids
together with precision, then pressing under heavy
flat weight until thoroughly dried.

6. Prepare the solid eye base and ring by bending
back on the perforation lines near angled centerlines.

7. Stack and glue the half ring shapes as with other
layered for thickness units. Then . . .

Position the half ring shapes behind the full ring shape
on the corresponding half, with the slightly wider
half ring, then . . .

. . . the narrower half ring, with curved edges aligned
as precisely as possible, so that . . .

. . . a slight gap is maintained along the perforation
line of the full ring. This will allow the eye to conform
to the bowl bends. Repeat for second eye ring.
Press and allow to dry.

8. Position the ring over the whole eye base, with
perforation lines precisely aligned so that the unit
will bend together as needed, then glue in place;
press under weight. Repeat for second eye.

9. Repeat the build up process for the left and right
eye brows, stacking and gluing halves, then attaching
to backside of whole eyebrow, maintaining
the narrow bend gap. Complete 2; press and dry.

10. Repeat the process for the pupils with half eye
circle stacks positioned and attached behind eye whole
with gap maintained along whole's perf line.

11. Complete eye unit assembly by positioning
corresponding pupil stack within eye ring, taking care
that perforation lines are matched up. Press to dry.

13. Add eye highlight dot if desired by using a stylus
or equivalent tool and white/cream acrylic paint
to place neat paint dot within the highlight circle
cut into the whole pupil shapes. Allow to dry.

DIMENSIONAL BEAK
14. Prepare the 3D beak by bending back on all
perforation lines for front panel and side walls,
and narrow tabs at wall ends. Bend edge tabs back
now or wait til these are inserted into hull slots.

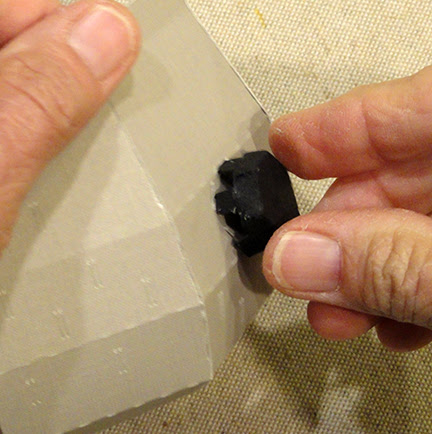
15. (Apologies that the black color of the beak for
this project will make it difficult to properly view
the positioning of the straight edges and perf marks
for the corners assembly.)
Beginning at top, bend the narrow tabs back at end
of angled side wall, then bend top and side walls back
to overlap edge across tab to perf line and join seam.
Repeat for the opposite side corner seam.

16. Repeat seam arrangement for the mid-side
corner, tab bend under straight edge which overlaps
to perf marks, then glued. Repeat for opposite side seam.

NOTE that the small scale of this assembly may make
it helpful to use a blade tool such as this spatula to
place behind the seam being joined to provide
a "press-against" surface, held until seam grabs.

17. Position and join the final seam at
center bottom . . .

. . . using blade tool to assist with the joining.

BOWL HULL ASSEMBLY
18. Locate and identify the order numbers which are
cut into the upper side tab (or bottom tab for #8).

Prepare each segment by bending the top wall forward . . .

. . . and all other wall sections and tabs back.

NOTE that care is needed as the sections are bent
so that double-cut feather detailing is not damaged.

19. Begin with segment #1, to position bottom tab
on the underside of the octagon ring "side" edge
(select one edge as starting point; it becomes side),
adjust so that the perforation seam line is precisely
aligned with ring's cut edge, and glue in place.

20. Repeat the bottom tab joining for segment #2,
taking care that segment's straight left side edge
is overlapping the tab from #1.
Allow these seams to dry.

21. Apply glue to the first (and possibly second) of
the side tabs of #1, bending #2 forward to expose
tabs as necessary.

to allow the straight edge of #2 to overlap bottom
tab of #1 to align with perforation line.
Adjust to be as precisely aligned as possible, then
apply pressure until the seam is secure.

22. Repeat the edge alignment step for the next
edge and tab as the seam is slowly joined from
bottom toward top. Hold each seam segment
and apply pressure until secure before proceeding.

23. Continue the aligning and segment joining process
until the final seam at top is completed, which will
involve a slightly forward bend to align and join.

24. Repeat the hull seam process with #3, which
is the front panel, and then with #4.

25. At this stage, the beak can be placed by
inserting the tabs into the corresponding slots
cut into the hull. Push tabs fully in, then . . .
. . . bend tabs outward/back on the inside and glue
to inside of wall. Hold tabs until fully secured.

26. Position and attach the front beak overlay.

27. Continue positioning, attaching and joining the hull
wall segments 5 & 6 in order, then position and join
#7 to the first segment (#1) that was joining to
the bottom octagon. NOTE that #7 has side edge tabs
on both side edges.

28. Segment #8 attachment is slightly different,
although bottom tab joining to ring is similar.
Tabs from both adjacent segments should be positioned
behind #8 as it is joined in place.

29. In similar manner to previously-joined segments,
begin by joining bottom-most sections, likely
completing these most easily in sets on both sides
before moving upward. Reach fingers in through
ring opening to manipulate and adjust seams.
Allow to dry.

30. Insert the upper and lower pairs of tabs into
respective slots on the side of hull, then . . .

. . . bend tabs outward on the inside of the bowl
and glue firmly in position. Repeat for second handle.

31. Position the wing unit on the corresponding
handle so that the straight inward edge aligns
flush with the hull wall, and glue in place.

NOTE that since the wing does not completely cover
the handle face, it will be necessary to assess where
the glue needs to be to join wing in place but not
be added below wing bottom edge where it would
show, then add ONLY above that area.

32. The sample owl bowl includes decorative studs
on wings over the spot where alignment punch holes
exist in the other areas of wing and handle. If you
wish to add a brad instead, or want a guide mark,
push a sharp point through the front wing overlay
prior to attaching.

33. Apply glue to backside (omit at very bottom where
the eye unit does not attach) then position over
the crest of the front segment so that . . .

. . . the straight lower inside angle edge abuts next
to the 3D beak while ridge and bend remain aligned.
Attach in place. Repeat for opposite eye unit.

34. Apply glue to backside of eyebrow pair, then
position where the center front short edges abut
between eyes, and lower curved edges hug
eye units. NOTE that the bends of eyebrows
should align with hull corner angles and extend
only slightly up into the top section near rim edge.

35. Position and attach the base build up shape.
It is recommended to use quick-grab adhesive
such as Fabri-Tack or hot melt. It may also be
helpful if there is any warping in the base ring
that might prevent even, full attachment, that
an object such as a spray paint rattle can bottom
be placed down into the bowl to apply pressure
around the ring area. Balance something else heavy
on top such as a book to help press and attach.

36. Bend the edge flanges forward around
the reinforcement ring collar. Apply glue to
the underside of flanges, then . . .

. . . carefully fit into the bowl's upper opening at rim . . .

. . . and slide down fully into place so that flange
top edges are even with bowl upper edges.
Work around the edges to adjust and reposition
until the collar begins to set in place.

37. Bend the left and right foot shapes back slightly
on perforation line. Apply adhesive to the backside
of each where it will touch the hull, then position with
the perf bend aligned over the bend angle in the hull.
Repeat for the second foot.

38. Bend each leaf accent along horizontal perf lines,
then position and attach in each hull side section
with perforation lines aligning with hull bends.

Here is the completed Owl Sugar Bowl.
It easily holds a full package of Hershey's Nuggets.

No comments:
Post a Comment