Pages

Thursday, August 30, 2012

Quilting Tutorial: Quilting Layers Prep & Setup

Completing the quilting for small or medium projects is a satisfying final step. If you plan to execute that quilting on a domestic sewing machine can be fun and done fast, too. Preparation for hand or machine quilting is very similar, and these steps will apply to both. When you want to use a  machine to do it with "'dogs down", selecting the right design, clear marking and layer preparation will make all the difference. Here are photo steps for the process using "Christmas Measure Up" design by Hearthsewn. 


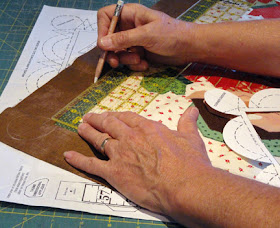
Choose a border design that is continuous, with easy curves and arches, or straight lines. The line drawing for this project's quilting can be seen here on the pattern sheet. Adjustments are considered to make the design fit, then make guide marks to ensure the plan works. Here,  3 1/2" spaced tick marks are made along the side borders, at the already-marked 1/4" echo line beyond the seamline. 
 You can use a lightbox setup to see and trace  designs. Or, make a rigid tracing template. Here, a photocopy of the pattern design has been glued to a recycled manila folder, then cut out. This design has 2 arches, a separate corner arch, and an arrow point between. The first step here is to position the template and trace the edge, aligned between guide marks. Use a temporary marking tool such as wash out marker or tailor's chalk. Trace the outer arch on all four quilt borders. Also trace the corner arch.
 For step two, trace the smaller, inner arch in all four borders. Note that the inner edge of the tracing template is a straight edge that can easily be re-aligned at the echo line (for this project). Other times a template edge might be or at the border or block seams. Whatever the design, make it work for you as much as possible. 
The third step for this design is to mark the arrow points between the arches. For this design, the side angle lines  connect to the inner arch ends at the echo line.


Layers need to be aligned and smooth, with no excess in backing, batting or quilt top. Use a floor frame (or smaller equivalent) setup to create the even tension that helps get the layers smooth. 
First, lay the quilt top flat and smooth on the floor. Set up the frame boards parallel to the edges, with a 1" gap. As you will see, the backing will be tacked to the frames, and the quilt top pinned in place to the backing.
Clamp the frame boards securely as fitted in previous step. See how the C clamps are turned "upside down" so the quilt frame sits flatter on the floor, and the screw lever is easy to access.


Spread backing, smooth, make straight and taut as it is tacked to the frame boards. Since the lengthwise grain has less stretch, a good choice is to first pull and tack the those two opposite non-selvage edges. Tacks are placed 3-4" apart. Work the excess out of the fabric without stretching. Try to achieve a consistent tension without too much tautness.  Tack the other two edges in a similar manner.


 Oversize thumb tacks make the process easier on the fingers. Even better, here is a great new tool called the Quilter's Tacker. You can see it in use in the image above. It has a magnetic end, a spring loaded mechanism, and an easy grip to snap it into place. For information, a contact number is (801) 595-1122. www.quilterstacker.com (Tell them you saw it on the "Hearthsewn" blog.)

Next, spread the batting over the tacked backing. Smooth, pull, arrange so there is no excess. For traditional hand  and machine quilting, be sure to use thin batt! This project uses the thinnest I know of, called Thermor, a poly needle punch. Another favorite is Hobbs Heirloom 80/20 cotton.
 Layer and smooth the quilt top into the frames boards "window". Take extra care and time to ensure that border edges and seams are as straight as you can make them. Once you are pleased with the lay of the top, straight pin the raw edges in place through all layers, working one edge at a time.
 Before quilting at the frame, or basting borders and interior to take away from frame for alternative quilting, thread baste where straight pins are at the edge (remove pins as basting progresses).
 For quilting away from the frame, the layers will now be basted to "lock in" their smooth, no-excess arrangement. Use a long "doll making" needle to baste with thread. The thread at left shows the "tailor's" baste stitch, as it would be made by a right handed stitcher. Large stitches are taken through all layers, parallel to the quilt's raw edges, but, unlike a running stitch that travels in a straight line, the needle is moved away from the stitcher and the parallel stitch repeated. At the top of your reach, come back toward quilt's edge  in the same manner. A herringbone formation is the result. 

Special safety pins for pin-basting are also available to secure layers. Place pins about 4" apart.


Employ the 4-5" spaced tailor baste to secure the borders, then complete the stitches in the interior of the quilt top.

When all the stitches are in place, the quilt can be removed from the frames and lap quilted, quilted in a frame, or with a home machine.

For information about proceeding with this project with machine quilting, view the Quilting Tutorial on that subject on this blogspot.
Wednesday, August 29, 2012

Quilting Tutorial: Adding A Hanging Sleeve

To hang a quilt on a wall, add a flat tube of fabric to the top of a quilt to support the quilt edge completely and help the quilt hang straight. The process is the same for large or small quilts.
Save a strip of backing fabric to make it less visible. Cut it 4-5 inches wide and the same width as the quilt top edge. Press in half. Press 1/2" in on each edge.


Attach the sleeve to exposed raw edges AFTER the binding has been applied to the front edges of the quilt, but BEFORE the binding encloses the raw edges.
Sleeve is folded lengthwise, centered along the edge, raw edges pinned even with quilt layer raw edges.


 Turn the layers over and RE-STITCH along the stitching line that attached the binding to the top edge. This picture shows single thickness binding. You can see the previous red binding stitching ahead of the presser foot.
Folded-over portion of quilt top edge shows sleeve end stitched in place (white thread). Lock stitches at ends of sleeve.
To finish sleeve application, HAND-BASTE along the fold edge (you can see needle stitching) but only through the backing and into the batting of the quilt, so it doesn't show to front side.
Also turn the binding to the back of quilt and finish as usual. Here it is pinned in place for a few inches.
Here is a closeup of the hand needle joining fold edge to backing.


In the image above, you can also see a wooden slat inserted to simulate how the sleeve will work. This setup is for "invisible" hanging. The slat protrudes one-half inch or so from each end of the sleeve, but when cut to proper length, will remain unseen behind the quilt. Small holes are drilled through the slat. Wire nails can then be used to attach slat (and quilt) to wall.


To avoid nail holes in a wall, many other styles of hanging systems are available. This sampler quilt is hung using the "Hang Ups" system of wood & thumb screw clamps. The slat in the quilt's sleeve fits between the front clamp and the back plate, then screw is tightened to hold it.  
I have "permanently" attached the clamps to the wall, finding studs for secure attachment. This allows for switching out of seasonal quilts.


Sometimes a quilt that is already bound need preparing to hang on a wall. Follow a similar process, as was done for this bed quilt. Cut, press in half and press ends in as described previously. But then, re-fold face sides together, and seam the long edges. Turn right side out, fold end creases inward. Pin in place at quilt edge next to binding. Whip-stitch at lower edge of binding, securing stitches through many layers without showing through to front. Stitch lower fold in the same manner as described above.

Friday, August 24, 2012

12 Days of Christmas Canisters Project


What surprise will we find today? This question will build the excitement as you count down to Christmas with decorated canisters. Hide a small gift, treat or activity inside to help your family through the waiting.


Save your empties through the months then decorate with Silhouette paper cutouts. For this project, protein powder cannisters were used (approx. 5 1/2" tall x 4" diameter). 

This shot shows how the decorations are arranged on the cannister.
Here you see the ingredients for this project. A complete list is given at the end of the post.

Silhouette cutouts include the 12 Days of Christmas ornaments from Snapdragon Snippets (see size and other details in the larger project post on this blog), and a scallop border. Cut other paper strips and squares with rotary tools.


Distress layered paper band edges, if desired. This project uses Distress Ink Vintage Photo and a blending tool with non-absorbent craft mat to draw color onto the paper edges. 

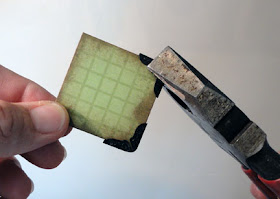
Add metal corners to a paper covered chip board square. Push corners snuggly into place, then crimp the square slightly onto board to secure.

Twelve canisters don't make a perfect pyramid! In the usual arrangement, four rows will use 10 canisters -- just add an extra on each side of the base row to include all 12!


Ingredients:
empty canisters
paper for canister cover, scallop border, 
        contrast band, numbers and squares
paper for gift name strips, cream twill tape, red eyelets
paper for 12 Days ornament cutouts
narrow red ribbon glued to plastic lid
green ribbon behind number squares.
jute string to hold  ornaments
black metal corner embellishments
glue and adhesives

Thursday, August 23, 2012

Quilting Tutorial :Celtic Vine Applique Preparation & Stitching

 Narrow Celtic-style vines are a favorite and beautiful element of hand or machine applique. The steps in this tutorial demonstrate a slick way to prepare custom sized two-edge folded vines. All you need is an iron and board with woven cover, three straight pins and your bias strip. 
Above, two quilts show the typical wavy vine (here with holly and berries) and a corner with overlapping ovals, curves and points.To the right are three more examples, including (l to r) tiny cable, traditional wavy vine, intricate floral interwoven stems.


 Step 1. Find the true bias of your fabric by folding a selvage edge to meet up with crosswise grain. Crease the fold edge as the cutting guideline. Note the diagonal line on the rotary mat which can also alternately be used:  first line up fabric with grainlines on vertical and horizontal guides.
 Step 2. Use rotary tools to cut on creased fold, then cut bias strips to selected width. The sample being used here aims at 1/4" finished vine. For this width, figure 3x that target width (finished vine will have three stacked layers of fabric). These strips are cut at slightly wider than 3/4".
NOTE: since bias will relax a bit, finished size will be closer to 3/8" when stitched.
 Step 3. Set up the straight pins channel on iron board. The two pins are about 1 1/4" apart. Each pin goes down/up down/up through cover exactly in line, taking care to create an even space under pins at center that is 1/4" wide. 

Place bias strip face down on surface.
Step 4.  Fold one raw side edge over the other toward center, then use a straight pin to gently push the pointed end of folded strip into the channel under the center of the first pin. Once point is inserted far enough, grab with fingertips and pull through a little more.


 Step 5. Coax the strip point under the second pin center channel using a straight pin in the same way as in Step 4.
 Step 6. Once point is far enough through channel, grab with fingertips and pull through an inch or so. Using both hands, move folded strip back and forth through channel to ensure strip is uniform width willing the channel, and that it will slide through freely.
 Step 7. Set iron to be hot enough without high potential for scorching. Position iron point over pins channel with strip in place. Leave iron in place while sliding strip under it and through the channel. Note that strip layers need to be hand-folded as section approaches channel to create smooth, uniform width bias vine.
 Step 8. Working fast so iron won't scorch board or fabric, continue to pull vine through, then arrange next section to slide under iron, and so forth until entire length required is pressed.
Once the vine as passed through and beyond the channel guides, turn it face side up on board and press again, this time with steam if available.

Now it is ready to prepare for a specific project. Because it is bias, it is "mold-able" and can be pressed along a temporary guideline marked on the iron surface. This will make it easier to position, pin and stitch in place.


 Stitching Celtic Vines:
Step 1. To prepare for stitching vine in place, position at a temporary traced guideline on fabric panel, pin in place, then replace pins with thread basting through vine center.
 Step 2. Thread a fine needle with color matched to vine. (For visibility, heavy red thread is used in these illustrations.) Knot thread end, insert from backside through panel, coming up at vine edge. Next, insert needle into panel only, next to vine edge and to the side of previous stitch exit position. Push needle point forward parallel to vine edge, coming up through fold of vine 1/16" to 1/8" forward from first stitch. This is the over-edge hand applique stitch.
Notice regular, short size of stitching on backside of work. Stitches are correctly made if they are parallel to the vine edge.


 Step 3. Repeat stitch along BOTH vine edges. When thread runs out, or edge is completed, push needle through to backside in the regular stitch process and pull thread flush on front. Tie off in three steps. A. Slip needle tip under nearby stitch.


 B. Pull thread through to leave a small loop. C. Pass needle through loop and pull up tight. Trim to leave a 1/4" tail.

Detail at right shows folded Celtic vine that has fine, narrow machine blanket stitching along edge. Matched color thread (brown) was used for this quilt, but clear monofilament also works well for this type of invisible machine applique. You can see the same machine stitching at holly and berrie edges.

Celtic vine strips can be used to form shapes like this heart wreath. Vine is carefully folded at bottom angle, overlapped and folded under at upper angle.
 Straight Celtic vine strips can be used as straight stems in a design like this Peony block. When vine stems need to be STRAIGHT, cut the strips on the straight of gram. When the stems or vines need to be wavy or otherwise shaped, cut the strips on the bias grain.
Even small-scale shapes, like the handles on these four inch Postage Stamp Basket blocks, can be prepared using Celtic bias strips and the method illustrated in this tutorial.


Find other tutorials
regarding quilt making skills 
and techniques in this blog.

Monday, August 20, 2012

12 Days of Christmas Corkboard Countdown Project Tutorial


Love the traditional Christmas carol? Enjoy this fun project to count off the days right before the big event. (Or the more traditional way, to count off the days after Christmas until Festival of the Kings.)  A list of materials follows the tutorial.


Start with a 24x16 corkboard then build out the edges using chair rail molding from the lumber store. (Edges depth should match up.)  Measure and cut the mitered corners carefully. 


Sand the rough edges, attach  molding sections to frame each other at the corners.

Reinforce corners by cutting and gluing pieces of wood lattice to top and bottom project edge measurements.


Corner detail with molding edge face down,
lattice strips on top flush with edges, clamped to dry.
Use a clamp at each corner until the glue is dry.

Fill seams and corners with drywall plaster, let dry, sand. Paint with a sealer, then color coats. 


Next do the math: divide cork area into 12 equal spaces: 4 squares by 3 rows. Determine exact measurements, then cut paper or fabric squares.


Use spray adhesive to attach them to the cork surface.  (Make sure you mask off and cover your work surface to protect from glue overspray first.)


Glue 1/8" wide red grosgrain ribbon over the seams, cutting ribbon ends exactly at edges.


To hide fabric raw edges, cut 1/8" wooden dowels to fit exactly with 45 degree miters at the ends . 


Paint dowels a contrast color. Glue snuggly along the edges of the cork panel.


 Now comes the fun with Silhouette. Use the Twelve Days designs from Snapdragon Snippetts, each sized between 3.5 - 4.5" in the longest dimensions. For durability, cut a pair of each from cream Bazzill heavy cardstock, join, then distress the cut edges.

Use the offset tool (set at 1/8")  in Silhouette to cut two green liner pieces. Make sure you save the hanger hole punch in the same place as the original resized ornaments. Find the tutorial for the offset process at http://www.silhouetteamerica.com/training/section8_7.aspx.


Here are all of the 12 ornaments.   Find other uses for them: gift tags, Christmas cards, wreath or garland embellishments.

Go to SilhouetteAmerica.com to find and shop for these designs.


Final details include a stencilled number on doubled fabric, stitched and edge-frayed


Finished square with card and twill ribbon strip, all elements  glued in place using Fabric-Tac. Also notice the painted green tack and ribbon, and the small gold escutcheon pin perfectly placed to allow the ornament to hang in the square.


Cut a vinyl phrase. Apply to the frame. 

Final idea: Print and cut a matched card shape and mount on the backside.  Turn each over one by one for the countdown.


For a different and simpler project idea using these ornaments, check out my other "12 Days of Christmas Canisters" Project.


LIST OF MATERIALS USED

Snapdragon Snippetts 12 Days of Christmas ornament designs
recycled cork board
chair rail unfinished wood molding
wood lattice strips
1/8" narrow dowels
squares of Christmas fabrics (cream, red, green)
rough weave brown tea-dyed fabric
cream twill tape
red 1/8" grosgrain ribbon
brown vinyl letter phrase
cream and forest green bazill heavy cardstock
brown and green regular cardstock
distress stamp (vintage photo)
painted thumb tacks, gold escutcheon pins
plaster patch compound
acryllic paint: cream, bright green, dark brown
Fabri-Tac glue, adhesive spray, wood glue