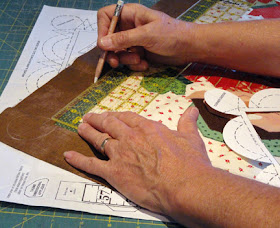
Choose a border design that is continuous, with easy curves and arches, or straight lines. The line drawing for this project's quilting can be seen here on the pattern sheet. Adjustments are considered to make the design fit, then make guide marks to ensure the plan works. Here, 3 1/2" spaced tick marks are made along the side borders, at the already-marked 1/4" echo line beyond the seamline.
You can use a lightbox setup to see and trace designs. Or, make a rigid tracing template. Here, a photocopy of the pattern design has been glued to a recycled manila folder, then cut out. This design has 2 arches, a separate corner arch, and an arrow point between. The first step here is to position the template and trace the edge, aligned between guide marks. Use a temporary marking tool such as wash out marker or tailor's chalk. Trace the outer arch on all four quilt borders. Also trace the corner arch.
For step two, trace the smaller, inner arch in all four borders. Note that the inner edge of the tracing template is a straight edge that can easily be re-aligned at the echo line (for this project). Other times a template edge might be or at the border or block seams. Whatever the design, make it work for you as much as possible.
The third step for this design is to mark the arrow points between the arches. For this design, the side angle lines connect to the inner arch ends at the echo line.
Layers need to be aligned and smooth, with no excess in backing, batting or quilt top. Use a floor frame (or smaller equivalent) setup to create the even tension that helps get the layers smooth.
First, lay the quilt top flat and smooth on the floor. Set up the frame boards parallel to the edges, with a 1" gap. As you will see, the backing will be tacked to the frames, and the quilt top pinned in place to the backing.
Oversize thumb tacks make the process easier on the fingers. Even better, here is a great new tool called the Quilter's Tacker. You can see it in use in the image above. It has a magnetic end, a spring loaded mechanism, and an easy grip to snap it into place. For information, a contact number is (801) 595-1122. www.quilterstacker.com (Tell them you saw it on the "Hearthsewn" blog.)
Next, spread the batting over the tacked backing. Smooth, pull, arrange so there is no excess. For traditional hand and machine quilting, be sure to use thin batt! This project uses the thinnest I know of, called Thermor, a poly needle punch. Another favorite is Hobbs Heirloom 80/20 cotton.
Layer and smooth the quilt top into the frames boards "window". Take extra care and time to ensure that border edges and seams are as straight as you can make them. Once you are pleased with the lay of the top, straight pin the raw edges in place through all layers, working one edge at a time.
For quilting away from the frame, the layers will now be basted to "lock in" their smooth, no-excess arrangement. Use a long "doll making" needle to baste with thread. The thread at left shows the "tailor's" baste stitch, as it would be made by a right handed stitcher. Large stitches are taken through all layers, parallel to the quilt's raw edges, but, unlike a running stitch that travels in a straight line, the needle is moved away from the stitcher and the parallel stitch repeated. At the top of your reach, come back toward quilt's edge in the same manner. A herringbone formation is the result.
Special safety pins for pin-basting are also available to secure layers. Place pins about 4" apart.
Employ the 4-5" spaced tailor baste to secure the borders, then complete the stitches in the interior of the quilt top.
When all the stitches are in place, the quilt can be removed from the frames and lap quilted, quilted in a frame, or with a home machine.
For information about proceeding with this project with machine quilting, view the Quilting Tutorial on that subject on this blogspot.


No comments:
Post a Comment