This center panel construction tutorial is for
August On the Docket mini quilt .
The pattern is "Summer On The Docket" which is available
in Salt Lake area quilt stores, or for mail order online
through the Hearthsewn website.
1. Trace the left and right flip flops onto the paper side of a scrap of freezer paper. Lay the shiny (plasticized) side of paper onto the BACK of selected fabric. Use a hot iron and several seconds of pressure to "temp fuse" the paper in place. Trim each shape 1/4" beyond the paper edge.
2. Clip seam allowance at inward curve edge area 4-5 places to permit allowance to fold back.
3. With hand needle and neutral basting thread (contrast to be seen for removal later), fold seam allowance to shape backside exactly at the paper edge. Baste 1/8" or so from the fold edge all around.
4. Lightly press shapes, if desired.
5. Mark positioning onto front side of center panel using washout temporary marker (or equivalent). Here I have prepared a template to complete the marking using the pattern layout illustration. Otherwise use a lightbox setup or window, etc.
6. Mark the strap positions onto the sides of both left and right flipflops.
7. Pin shapes in place on center panel.
8. Transfer strap center mark to fabric shapes.
9. Cut strap fabric strips according to instructions. Press in half (face side out).
10. Open strip flat, face down, and press each side to the center. This is the top side.
 11. Cut ribbon lengths to size (find a center polka dot, then cut the length with that position in the middle).
 Apply fabric glue to ribbon backside.
12. Center ribbon down middle of folded fabric strip to cover and enclose the raw edges that meet at the center.
13. Topstitch next to ribbon edge at both edges with matching thread.
14. Prepare a marking template. Crease on center and angled lines. Turn straps to face side down. Center template so that the angled lines form an upward arrow pointing to top of the strap (this may be incorrectly identified on your pattern template if purchase prior to August 2013). Mark center position, then fold and mark each of the angled line edges.
15. Position strap at centermark on flipflop, then stitch across center and lock stitches at each edge (backstitch).
16. Fold center panel to the left, strap to the right. Align strap edges, then stitch on angled marked line, locking stitches at seam ends.
NOTE the angle in relationship to the top of the flipflop to make sure you are completing yours correctly (overcoming the possible pattern error, that is).
17. Open and spread the straps toward left and right.
19. Begin at the lower spot where the two shapes touch, then stitch to the first strap position mark and stop. Leave long tails at beginning and end (to pull through to back to protect against unraveling). Begin stitching again beyond mark and stitch along both edges until all sections are complete with openings left for straps.
20. Turn work over, tug bobbin threads one by one to bring top clear thread loop to the back, then work the tail fully to the back. Knot and trim tails to 1/4" or so.
Trim excess away about 1/2" beyond the applique edge.
22. Re-tuck the strap, pin, then either restitch along applique edge with blanket stitch, or topstitch through all layers.
23. Remove basting stitching, Carefully separate the center panel fabric from the applique, cut a slit, then insert scissor tips and trim away excess center panel, leaving 1/4" seam allowance INSIDE of stitching.
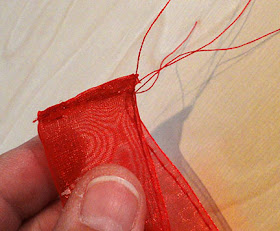
24. Prepare ribbon rosette. Cut sheer ribbon lengths, then use longest machine stitch to baste stitch near one long edge, leaving long tails to pull gathers.
25. Clean finish the short ends with a french seam or treat with Fray-Check, etc.
French seam: Place ends together with face sides of ribbon outward. Stitch across, locking at seam ends. Trim to scant 1/8". Re-fold/turn ribbon so face sides are together, enclosing raw edges. Complete a generous 1/8" seam so that stitching is just beyond trimmed raw edge, locking stitching at ends as before.
26. (Image posted soon)
Pull both BOBBIN threads to gather up the ribbon as tightly as possible. Tie ends to secure.
Complete the quilt borders, layering, and binding. Position rosette at top center of straps connection to flipflop and hand tack in place securely (try to keep backside looking as neat as possible). Attach button at center of rosette.


No comments:
Post a Comment