Display this Thanksgiving exclamation
as part of your harvest season decor.
Small boxes built as simple base and bevel-edge lid
resemble wood blocks when assembled.
Box finished size is approx. 2.25” W x 3.25” L x .875”
Three sizes in the two-row ensemble create the "arched" effect.
Follow these easy assembly steps to create
an impressive 19" wide tableau.
Cut files are available from SnapDragon Snippets
through the Silhouette America online store.
 TUTORIAL:
Step 1. Cut and identify the box and accent pieces. You will need 10 Large box sets, 2 Medium box sets, 2 Small box sets. A set includes base, lid, insert (support), face rectangle.
Also cut the letters and layered basket shapes. These are shown colored to match my project.

Each of the three sizes include symbols in the side end tab to help identify them. This image shows the circle detail of the smallest base. Largest has a triangle; middle has a star.
Identify the lids with their double row of perforations around the rectangle front shape.
BASE ASSEMBLY
Step 2. Fold all the perforations as inward (or "mountain") folds. Position the sides as a frame to show how the side flanges will attach to the rectangle back shape edges, as demonstrated here.
Step 3. Apply glue to the single left side flange. Position perf fold along rectangle straight edge. Hold in place until glue is secure.
As the gluing process for each side proceeds, you may find it helpful to turn the base (or lid) over on a smooth hard surface and apply pressure along the flange from the inside. Consider using a more defined tool (fingers may be too round) to press into angles and corners for best seal.
Step 4. Repeat the side gluing and end gluing process for base remaining edges. As this end is positioned, also have glue applied to the side end tab which is folded back and in position for the final step.
Step 5. Position and glue end tab.
LID ASSEMBLY
Step 6. Fold the lid on all perforations as inward (or "mountain") folds. This image shows the two perforations on each side piece that will form the narrow bevel edge.
Arrange the sides around the front face rectangle as was done for the base assembly.
This image shows the tiny triangular bevel "flange" that will bridge the gap between the narrow bevel faces of adjacent sides. It includes a tiny perforation along which it should be folded back.
This image shows corner detail of how the lid's bevel edges and flange edges will come together in the assembly process.
Step 7. Apply glue to the flange of the single first side of lid. Align rectangle edge along flange perforation, while at the same time . . .
This image shows the corner detail, with fingers applying pressure to bring the edges together properly as the adhesive is setting up.
Step 8. Finish the lid assembly in a similar manner to the base. Here is the completed lid.

Step 9. Attach the front rectangle accent pieces, and then the appropriate letter (or basket shapes) cut outs.
Step 10. Prepare base support by first folding center as a "mountain" fold, edge perfs as "valley" folds as shown here. Apply glue to the inner surface, then fold together and apply pressure until glue is secure.
Next apply glue to the folded-back flanges . . .
. . . then insert at center of base interior and glue in place. This support will assist in the strength of the box so that the center can't collapse under pressure.
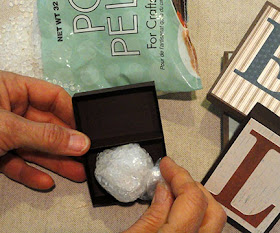
Step 11. For weight and stability, consider the optional step of inserting some material in the lower "compartment" of the base. Here I have put craft pellets in a tiny bag, tied it off, then placed it in the base. You can also pour the pellets into the compartment, then glue the base to lid securely when it is finally assembled. Dry rice, beans, or loose metal washers are other good choices as weight materials.
Step 12. Fit the lid over the base. The two are sized to fit fairly snugly.
Step 13. Apply glue between the lid and base surfaces to secure the box together.
Position the finished boxes for your ensemble.
You may also optionally glue the boxes side by side.
However, if left separate, they will be simpler to store.


No comments:
Post a Comment