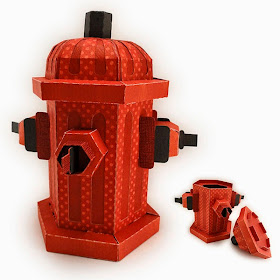
This detailed dimensional box looks like a real mini hydrant.
Got a fire fighter on your gift list,
or kids who aspire to be one?
Make this gift box composed of lid and base
that has lots of accents and add ons
and is built sturdy enough to display or re-use again.
Measures approx. 6 1/2" tall and 5 1/2" across.
CONSTRUCTION:
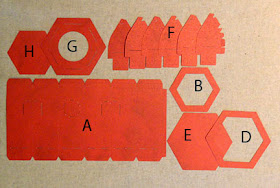
1. Identify and cut the main shapes (shown here are the basic pieces for lid and base):
A hydrant body tube
B body upper opening reinforcing hollow hex
D body lower opening rim hollow hex
E body bottom cosmetic cover hex
F lid "bonnet" wedges (3 of each of 2 kinds)
G lid lower opening hollow hex with slots
H lid lower opening cosmetic hex (optional)
2. Identify and cut the decorative shapes.
A body panel accents (fit in specific places)
B lower body rim sections (2)
C lid rim sections (2)
D lid accent pieces (6)
E lid top "nut" hex box
F body side unit base (2)
G body center unit base
H center ring
I side accents: tip fold-over inserts; side unite accent shapes
3. Position and attach each of the front panel accent shapes. NOTE that each is positioning in a SPECIFIC panel, to leave space around the slots for the accent units of sides and front to be inserted.
4. Fold the top tabs as shown (inner perf as back fold; outer perf as forward fold. Also fold the bottom tabs as forward fold.
5. Fold the body shape into a tube, overlap and glue straight edge over opposite side tab, taking care to align top and bottom, and long perforations as the seam.
6. Insert the bottom tabs through the base hollow hex shape.
7. Fold tabs back so that bend fits snugly at inner edge of hex. Glue each in place.
8. Join the two base rim segments by overlapping straight edge over tab exactly at perforation.
9. Place and glue one of the bottom edge tabs (does NOT have the tabs pair) over the outer hollow hex rim so that rim edge is snug against perforation angle.
(See next frame for gluing suggestion.)
Use a pencil or similar tool placed behind the angles of this seam to have something to push against as the two pieces are joined. Make sure the hex edge stays snugly into the rim corner.
10. Continue to work around the rim hex sides, joining each edge in sequence. Shown here is the final side to be joined in place. As this final edge is glued in place, also glue the end tab in place behind the first end edge.
Use the pencil or tool to help secure these seams.
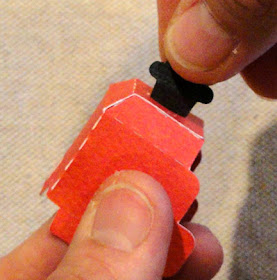
11. On the hydrant body front, insert the rim segment tabs into their corresponding slots on the body.

As the edges begin to get "locked in" as each segment's tabs are inserted into slots, it may be necessary to use a thin blade tool or tweezers as shown here, to assist getting the tab pairs into their corresponding slots.
1. Identify and cut the main shapes (shown here are the basic pieces for lid and base):
A hydrant body tube
B body upper opening reinforcing hollow hex
D body lower opening rim hollow hex
E body bottom cosmetic cover hex
F lid "bonnet" wedges (3 of each of 2 kinds)
G lid lower opening hollow hex with slots
H lid lower opening cosmetic hex (optional)
2. Identify and cut the decorative shapes.
A body panel accents (fit in specific places)
B lower body rim sections (2)
C lid rim sections (2)
D lid accent pieces (6)
E lid top "nut" hex box
F body side unit base (2)
G body center unit base
H center ring
I side accents: tip fold-over inserts; side unite accent shapes
3. Position and attach each of the front panel accent shapes. NOTE that each is positioning in a SPECIFIC panel, to leave space around the slots for the accent units of sides and front to be inserted.
4. Fold the top tabs as shown (inner perf as back fold; outer perf as forward fold. Also fold the bottom tabs as forward fold.
5. Fold the body shape into a tube, overlap and glue straight edge over opposite side tab, taking care to align top and bottom, and long perforations as the seam.
6. Insert the bottom tabs through the base hollow hex shape.
7. Fold tabs back so that bend fits snugly at inner edge of hex. Glue each in place.
8. Join the two base rim segments by overlapping straight edge over tab exactly at perforation.
9. Place and glue one of the bottom edge tabs (does NOT have the tabs pair) over the outer hollow hex rim so that rim edge is snug against perforation angle.
(See next frame for gluing suggestion.)
Use a pencil or similar tool placed behind the angles of this seam to have something to push against as the two pieces are joined. Make sure the hex edge stays snugly into the rim corner.
10. Continue to work around the rim hex sides, joining each edge in sequence. Shown here is the final side to be joined in place. As this final edge is glued in place, also glue the end tab in place behind the first end edge.
Use the pencil or tool to help secure these seams.
11. On the hydrant body front, insert the rim segment tabs into their corresponding slots on the body.

As the edges begin to get "locked in" as each segment's tabs are inserted into slots, it may be necessary to use a thin blade tool or tweezers as shown here, to assist getting the tab pairs into their corresponding slots.
12. Fold the tabs downward on the inside of the body tube and glue in place.
13. At the upper body tube opening, fold the tabs down on the inside to create a rim, then fold tab outward to form a "ledge". Glue only the rim and body surfaces together.
14. Apply glue to the ledge tabs, then position and attach the reinforcing hollow hex into the recess, adjusting the body opening so that it conforms to the hex edges. Reach inside with thumb and finger to assist these edges to bond completely.

15. Begin assembly of the lid. Identify the two different "bonnet" wedge shapes. These will be joined in alternating order of the ones with slots, and the ones without. A notch out of the upper tab of the "no-slot" pieces will allot access to the slot on adjacent pieces.
16. Bend the wedges so that segments give it a little "curl". Align the edge and tab perf of the two wedge shapes to be joined, lining up horizontal perforation line and lower edges exactly. Join one segment of the seam at a time, taking great care that each segment is joined thoroughly.
17. Add successive wedges, taking care to alternate the slot and no-slot pieces.
As the final joint needs to be completed, the dome shape will need to be flexed slightly to allow for the alignment of the edge and perf lines. Take care that previous seams do not become disconnected.
18. Insert the long tabs/flanges at dome bottom into the slots of the lid base. Slide tabs into slots completely.
19. Fold the tab/flange ends toward center on inner perf line, and upward at outer perf line (similar to rim edge of body tube).
Glue the top portion - the flange - back to back with the un-bent portion of the inserted tab shape. Also glue the end tab to the underside of the slotted hollow hex shape next to slot where tab is emerging.
20. Prepare top hex "nut" accent piece by folding end tabs slightly, top tabs and top hex (attached) back.

21. Form a tube, then glue the side tab under opposite straight edge.
22. Fold the top down and glue in place to the tabs beneath.
Use the end of a new pencil to help tabs attach to underside of the hex lid.
23. Fold three of the bottom tabs toward center of the hex nut piece, and apply glue to these so they may attach to the top surface of the done. Insert remaining tabs into the slots on the top of the lid dome.
On the inside of the dome, fold tabs back and glue in place.
24. Join the two lid rim segments end to end.
25. Position the lower long tab over the lid's hollow hex base, adjust so straight edge and rim angle are snug, then glue in place (this process is similar to the base rim assembly in steps 9 & 10).
Use a pencil tool as for base rim to help the gluing/pressing process to attach edges.
26. At the final segment of the lid rim, prepare and attach the end tab and edge at the same time.
27. Fold each upper tab of rim inward and insert tab into slot on corresponding dome wedge.
As the segments are folded, the "miter" edge at the corner angles should line up with a guide cut dash. Apply a little adhesive within the tiny corner tab to help upper surfaces of rim to attach.
28. Position and attach the "cosmetic" hexagon cover within the flange extensions, if desired. It can be left off, especially if you want to use the dome's interior space as part of the container interior volume.
29. Add a little curl to each of the lid accent wedges by folding slightly at each perforation section. Center and attach one over each wedge section.
30. Prepare side base "add on" by folding side downward from top area, end bevel and tab toward front, folding front down and overlapping straight edge at tab perforation. Essentially these shaping steps are creating four sides of a back-less and bottom-less box.
31. Fold the end extension in half, fold tabs away. Glue the two non-tab surfaces together. Re-flatten tabs. (This is similar to the center extension, step 38.)
Insert tabs into front slot.
On the inside, bend the backs back and glue in place.
33. Position and attach the two accent shapes at matching positions on the add-on's side edges.
34. Position the unit at the hydrant body tube side, slign and insert the side and upper tabs through slots.
On the tube inside, bend the tabs back and glue in place.
35. Prepare the center add-on base by folding the six sides back from the hex face, overlapping straight edge over adjacent tab perf line, and glue edge in place.
36. Prepare the ring by folding tabs inward along center perf line. Form into a tube and bring the straight end edge to overlap the tab perf line and glue in place. Inner tab should overlap the end tab that has been glued.
37. Align and insert the bottom ring tabs into the base slots. On the inside, fold the tabs inward and glue in place.
38. Prepare the center extension by folding in half, folding tabs outward, and gluing the non-tab surfaces together. Add the decorative rounded square shapes in the corresponding position.
39. Insert tabs into base slot. On inside, fold tabs outward and glue in place.
(NOTE this image shows this step without the ring in place, for better visibility.)
40. Align and insert center unit tabs with hydrant body slots. On the inside, bend tabs outward and glue in place.
41. Place lid over base and make sure lid flanges are positioned within the rim of the base.
And . . . you made it to completion!


I loved this file and it turns our really cute. Plus there is excellent directions.
ReplyDeletehow/where can i get this tutorial/svg/pattern as a cut file?
ReplyDeleteIt is available for purchase and download from SVG Attic ( https://www.silhouettedesignstore.com/view-shape/62060 )or Silhouette America's online store ( https://www.silhouettedesignstore.com/view-shape/62060 . The tutorial is elsewhere on this blog: search fire hydrant.
ReplyDelete