Unique candy cup holder doubles as a place card
at your Halloween party table setting.
Dimension created with side boxing strips that allow
the cup to sit on the table surface while rim rests at ghost face level.
Use the commonly-available food service 2 oz. sauce cup.
Oval shape included (shown here with the provided "eek!" exclamation)
to personalize each ghost with guest's name.
Open back makes assembly easier.
ASSEMBLY:
1. Identify and cut the shapes. From left to right, left side strip, platform top (bottom shape), ghost decor shape with small black eye contrast shape near top, left and bottom boxing strip, platform bottom shape and name card oval with optional "eek!" word cutout.
NOTE: the platform bottom shape was changed before release to include a downward curved extension to support the candy cup better.
2. Apply adhesive around the backside of the eye cutouts of the decor ghost shape, then position the contrast shape behind, centered over the cutouts.
3. Position the ghost shape over the platform, line up the cup hole and slot cut outs. Ghost shape will be centered so that a small margin of the platform front is exposed around the edges.
4. Prepare the boxing strips by folding on the vertical perforation lines to match the in/out corners of the platform front shape. To accomplish this, it will be helpful to position the boxing strips roughly in their finished positions. Left side strip is shown at left, and right/bottom strip also shown in position.
Also fold the upper and lower tabs inward. NOTE that the center small tab on the straight bottom segment will fold outward so that it won't interfere with the cup hole.
5. Align the left lowest segment tab with the left lowest platform edge as shown. Overlap the platform straight edge over the tab until the edge lines up at the perforation/fold. Check the top angle/perf line, and the lead edges for alignment, as well, then apply pressure and hold together until secure.
6. Prepare and join the next segment (a short one), by bending the boxing strip to the left, then overlap the tab until the platform straight edge and perf/fold lines line up. Hold until secure.
NOTE: it may be helpful to apply adhesive to more than one tab at a time as the process progresses, but don't get too far ahead.
As the edges and tabs are attached, it will be helpful to turn the assembly over on a flat surface and press the tab against the backside of the platform to assist the securing of each joint as it is completed.
7. Once the final segment of the left boxing strip is in place, overlap the straight end edge over the end tab, align and adjust, then glue in place securely.
8. Continue aligning each platform edge segment with its corresponding boxing tab, then attaching in the same process until one more segment - the bottom long section - remains.
9. The bottom segment will reach across the entire width of the platform and bypass the multi-segment, shaped ghost bottom (to simplify assembly). Apply adhesive to the tab faces that will attach to the platform backside, while at the same time folding the end tab under and applying adhesive to it.
Fold the tab into position, join the end tab and boxing edge, then adjust the bottom strip into it's naturally-adjusting position. Apply pressure to all tabs to secure each in place.
Again, it will be helpful to turn the assembly over, face down on a flat surface, to apply pressure to tabs.
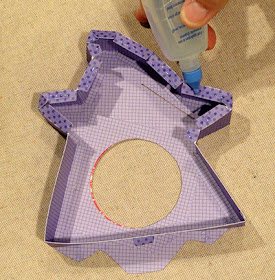
10. With assembly face down, fold the bottom edge boxing tabs inward (they extend only around area above arm extensions), and apply adhesive to each tab.
11. Quickly position the platform bottom over the boxing tabs, adjust, then reach fingers around and inside to be able to apply pressure to the platform and tabs being joined. It may be necessary to "squash" and push boxing to get edges to align correctly. Work quickly while adhesive is still fresh enough.
12. Prepare the name place card ovals for your guests, or substitute the "eek!" cutout. Glue names or "eek!" centered over the oval, slightly higher than centered, so that the bottom edge and portion can be inserted into the platform slot.

13. Place the 2 oz. cut into the cutout. It's bottom will sit on the table surface with the back platform between.
NOTE: that many fast food, deli, or other restaurants will have these "take away" cups used for sauce service available as part of your meal, or as a "freebie" if you ask politely.
Fill the cup with candy, nuts or other treat,
then place above the setting for a great table accent.


No comments:
Post a Comment