Pages

Sunday, October 25, 2015

Pumpkin with Lid 3d Box Assembly Guide

Perky little dimensional box is assembled as a hexagon base
with sturdy lid that has a projecting rim,
cubic stem, and added two-layer leaf.
Two-hole punched layered label offers place
for customization. Create one as a unique gift container,
or as autumn, Halloween or Thanksgiving decor.
Size is approx. 5.5" tall x 3.5" wide x 3.25" deep.

ASSEMBLY:
1. Identify and cut the shapes:
A lid dome wedges (6)
B lid dome base
C base hole cover
D stem "box"
E dome accent shapes
F lid rim "bump out" shapes (2)
G box (base) body with accent shapes
H box rim top hex ring
I box base hole cover
J two layer leaf
K swirl tendril
L tag two parts


2. Prepare the box base by bending back on all vertical perforations, and on all horizontal perforations except the top tab perforations - bend these forward.


3. Form the base body into a tube to bring the side straight edge to overlap the opposite tab perforation line. Apply adhesive to the tab face, overlap, adjust for top and bottom alignment, then join the seam.


4. Bend the bottom contour edges inward, one at a time, to bring the straight edges to overlap the adjacent tab perforation lines. Glue them, inward seam, then moving toward the end, to shape the bottom of the pumpkin base box.

Complete all 6 seams in this fashion.


5. Fold the bottom tabs inward to perpendicular positions.

Fold the bottom hex "ring" into position, then glue each box tab to the underside of the ring. Reach fingers into the opening to apply pressure or make adjustments.

NOTE: it may be helpful to first adjust and glue the edge opposite the connected edge, then adjust the two sides between the "connected" edges.


6. Apply glue to the hex ring face, then position, adjust and attach the opening cover with edges matching.


7. At the top of the box, apply glue to the underside of the (6) first (non tab) sections of the rim. Bend these rims into the interior of the box to attach to the backside of the box interior.

The tabs should all remain unattached, and bent perpendicular toward the center of the box cavity. (They become the attachment "shelf" for the stabilizing hex ring in the next step.)


8. Apply glue to the tab "shelf" faces, then insert and adjust the hex ring.


9. Attach the (6) main decor side shapes to each wall of the base box. Here, the punch hole wall accent shape is shown.

The accent shapes will have a little "offset" space margin all around.


Also position and attach the lower accent strips in the first trapezoid face below the main box wall.


10. To build the lid, follow this LINK to the tutorial for the fir hydrant box (the lid for the pumpkin is identical to the fire hydrant). Complete steps 15 thru 28, then return to this post to complete the project.

NOTE that the stem for the pumpkin has a slightly angled shape that is different from the hydrant top "stem".


11. Bend the lid accent shapes on the perforations, then apply glue and attach, centered, in each of the faces of the lid.


12. Position and attach the opening cover between the extensions of the flanges.


13. Layer the label tag and attach to the box with twine or narrow ribbon (and glue, if desired).

14. Layer the leaf shapes. Add curl to the tendril swirls. Attach these to the lid by gluing the top end lobe in the desired position near the stem.

15. To place the lid on the box, fit the flange extensions inside the edges of the base rim.


Here is the completed pumpkin box.

Acorn on a Stick Decor Assembly Guide

Autumn and harvest decor acorn "box"
on a stick, in medium (left) and tall sizes.
Base box has build-up platform to stabilize "stick"
(paper hex tube that wraps a 5/16" dowel cut to size).
Acorn box is built as base and lid with accent front,
and attached two-part leaf that attaches to acorn top
with attached punch tab. Acorn has bottom hex hole
to accent pole for display.
Sizes are approx. 10" and 11.75" tall.


ASSEMBLY:
1. Identify and cut the box & pole shapes:
A stand box front and top panels
B stand box sides and back
C stand box bottom
D build up to anchor post
E post hex hole cover (bottom)
F pole
G acorn box LID shape
H acorn LID boxing strip upper half
I acorn LID boxing strip lower half
J tie punch hole tabs front & back
K acorn BASE shape
L BASE boxing strip upper half
M BASE boxing strip lower half
N BASE inner pole support

2. Identify and cut the front accent shapes.

These are for the TALL version, and . . .


. . . these are for the MEDIUM version.

(Base box accent shapes are the same for either, as is the base acorn shape. Leaf shapes are mirror image of each other.)


NOTE: construction for the acorn LID and BASE, and box base is identical for both the TALL and MEDIUM "acorn on a stick" designs. The POLE construction is the same as well, except that the medium pole is shorter.


3. Prepare the boxing strips for the LID and BASE by identifying the upper strips (include triangle arrow cutout symbol or 'T' at center), then folding the tabs inward. Also fold the vertical perforations so that they follow the in/out pattern shape of the angles on the acorn edges.


4. Begin at top of LID, align top straight edge with boxing strip segment, adjust as needed to center, then attach.

5. Bend the boxing strip to align each straight edge with corresponding tab perforation line and attach edge to tab. Work along both sides until all are attached.

(Refer to "Shamrock On A Stick" , steps 3 through 6 or 9, a similar project to this one, get more detail on this boxing connection process.)


6. Attach the lower boxing LID strip by lining up the appropriate strip end to overlap the upper strip end tab to perforation line, adjust top to bottom, then glue in place.

7. Continue to bend strip, align straight edge to corresponding perforation line, and attach to attach lower boxing strip completely, including attaching second strip ends.

8. Repeat this same process for the BASE acorn shape and boxing strips.


9. Prepare the punch loop tabs by bending the bottom tabs outward.

Place the curved-top tabs back to back, then glue to attach tops, leaving bottom tabs unattached.


10. Apply glue to the bottom surfaces of the tabs, then position on the top of the acorn LID, short tab to the front, and glue in place.


11. Layer and assemble the accent shapes onto the curved edge foundation acorn.

For the TALL version, attach cap shape, checker rectangle base and checker squares shape, bottom "nut" shape, with accent strip at top.

For the MEDIUM version, refer to the completed project at beginning or end of this tutorial. That design includes same cap shape, lower "nut shape that has two accent strips to place at top edge, equi-distance below punch holes row to match top strip spacing. Behind the "nut" shape, attach the contrast strips for the punch hole "show thru" and highlight "show thru".

12. Complete the BASE box shape by preparing the interior pole support strip, bending the side tabs downward as shown.


13. Position and attach tabs to the interior side walls of the BASE box, placing the tabs in the second segment below the center top shape.


14. Fit the BASE inside the LID. NOTE that this is a snug fit by design.

Once the two are together to form the acorn "block", help them stay together by . . . 


. . . applying glue between the sides as shown, all around.


15. Prepare the base box body by bending front/top and sides/back shapes back on all perforation lines.

16. Join the straight side seam to the sides strip by overlapping at the tab perforation line, adjusting then attaching.


17. Attach the accent shapes to the assembled shape while it is flat at this stage (the sample shown here still needs to have the back accent attached), when you can apply flat pressure all over. 

Or, later, after the box is fully assembled.


18. Fold the base box so that the "side" panels form a tube, then bring the straight side edge to overlap the adjacent tab perforation line and attach.


19. Prepare the pole stabilizer "build up" stack by folding back and forth in accordion fashion, so that hex holes will line up exactly.

Apply glue to the set of "faces" on one side, then press the stack to join these edge.

Next, rotate the stack to apply glue to the remaining "faces" on the opposite side to attach all the layers of the accordion. Apply pressure until the stack is well joined.


NOTE that the box bottom has been modified to eliminate the "trap door" cuts.

20. Position and attach the stack stabilizer on the backside of the box bottom panel.


21. Attach the bottom panel to the tab on the lower edge of the box front panel.


22. Prepare the interior support panel by bending at the halfway perforation line into 'V' shape, and at end tab perforations.

23. With bottom panel bent out of the way, insert the support strip into the base box interior, pointing toward and touching the back panel, and adjust so that the side tabs touch the box inside side walls. Make sure that the support is fully into the space, then glue the tabs in place.


24. Fold the bottom panel into position and attach it to the three bottom tabs.

(This image does not show the stabilizer platform attached as it should be at this stage in assembly.)


25. Prepare pole shape by bending inward on all vertical perforation lines, including tab.


26. Form a tube to bring the long straight edge to overlap the opposite tab line, and glue in place. NOTE it may assist to insert the 5/16" dowel in as a "press against" surface to help glue the seam.


27. Insert the pole tube through the bottom hex opening, through the box and out the top hex hole. Bend the tabs of pole back (outward) and attach to the bottom of the base box.


28. Attach the accent side and top shapes to the base box.

29. Insert the 5/16" dowel through the tube until the bottom cut edge aligns flush with the bottom of the base box.


30. Mark the top of the pole tube onto the dowel length, then remove dowel and cut off excess at mark.

Re-insert the dowel into the tube, again until the bottom end is flush with the box bottom panel.

31. Position and attach the bottom hex hole cover to hide the pole tabs and the hex hole opening.


32. Slide the acorn box onto the tube, taking care to move and adjust until the top of the pole (with dowel) fits through the interior support strip hex hole and extends to the tip of the "cap".

You can apply glue to the top of the pole and the acorn bottom hex opening before inserting the pole to help attach it, if desired.


33. Layer the leaf half over the full base shape. While the glue is still pliable, add some curl to the layered shape by rolling it over a tube tool such as this spatula.


34.  Attach the leaf to the top of the acorn punch tab with twine or ribbon.  

This is the finished tall version.


Here is the medium version. 


Friday, October 23, 2015

Cornucopia Box Card Assembly Guide

Dimensional box card for the season of thanksgiving.
Folds flat for giving, unfolds into a box.
Flat size is approx. 7.125" x 8" tall.
Display size is 2.5" deep x 2.5" wide.
Bridges within the box cavity hold the
diminishing size horn rings.
Front ring has offset base, silhouette base,
and twenty tiny teardrop accent shapes.
Pair with companion four-flap, fold-over envelope 
("box card envelope ribbon slot flaps").

ASSEMBLY:
1. Identify and cut the shapes:
A main box body with tall back panel
B back panel accent shape
C & D side "fold-down" accent panels
E front panel, base banner, "Thanksgiving" cut
F bridge 5 with tail, contrast underlay
G bridge 4, mid ring 4
H bridge 3, mid ring 3
I bridge 2, mid ring 2
J rim offset, rim base, 20 teardrop accents
K second cluster base (corn, pear, peach)
L second base build up strips (4)
M first cluster base with accents
(pumpkin, grapes, apple acorn & leaf)
O side leaf accents, half leaves for left & right
P two-part tag with "Blessing"


2. Prepare the main card box base by bending back on all vertical perforation lines.


3. Form box base shape into a tube to bring the straight side edge of tall back panel to overlap the side flange. Apply glue, overlap straight edge to perforation line, adjust to line up the lower edges, and glue in place.


NOTE that the symmetry of the box shape allows the body to be laid flat to apply pressure along the seam edge, as shown.


4. Position the back panel accent shape over the inside face of the box shape, align bottom edges even, center side to side for slight interior offset, then glue in place.


5. Prepare Bridge 5 by folding the end tabs back.

6. Position the left tab against the inside face of the left interior side at the pair of vertical cut mark guides, top of edges of bridge and box side even, and glue in place.


7. Position and attach the right bridge tab to the right inside wall face, lining up the top of the tab with the top of the box side, also even with the back slot edge.


8. While the glue for two side tabs for Bridge 5 have grabbed but are still somewhat adjustable, fold the box into its flattened shape, pressing at the tab connection locations, allowing them to slightly shift as necessary.


(Perform this same folding and pressing step after each bridge is attached, when the glue is still curing.)


Here is Bridge 5 in place, box in open position.


9. Layer the horn "tail" and the contrast underlay shapes.

10. Position and attach in place on the front of Bridge 5, using the curved dash guide lines on the bridge for placement . . .


. . . and allowing the right edge of the layered shape to extend through the slot of the right wall as indicated here.


11. Prepare Bridge 4 (and also Brfidges 3 & 2) by folding tabs back.

12. Position Bridge 4 left tab against left interior box face using dash lines for positioning, lining up top of bridge with top of box side.


13. Position and attach left tab of Bridge 4 even with back edge of next available slot, top edges even.


Fold flat and press at attachment positions.


14. Position and attach ring 4 with upper/inside curved edges matched up, right edge extending through side slot as shown.


15. Position and attach Bridge 3 with ring 3, Bridge 2 with ring 2 (attach this one behind slots on both left and right sides).


(Apologies for the strange yellow color of this image; it is the same paper as seen in the next image.)

16. Prepare the front rim ring by attaching the scalloped-edge ring over the offset base, then attaching each of the teardrop accents in position around the ring.

NOTE: it may be helpful to cut the accent shapes, then leave them "unified" on the cutting mat, to remove one by one for positioning while they are organized in a way to easily identify which goes into what position on base ring. (They are not identical, though many are very similar.)


17. Position the ring over the front of the box so that the interior lower ring scallop edge matches the shape of the front panel top edge. Attach the edges that overlap.


18. Prepare the front cluster and second cluster accent shapes on their base silhouette shapes as shown here (also place individual grape circles over base). 


19. Position each of the four build up strips, one by one, onto the bottom front of the second cluster base shape. This will provide some visual depth between the two clusters, and also the rim shape (similar to attaching foam dimension squares).


20. Insert the second cluster behind the front rim/box front panel, adjusting up/down as you wish, so that top of corn/ear can still be seen. Attach build up strip to back of box front panel.


21. Layer and assemble the front "Blessing" tag and letters. NOTE that it may be helpful to use the "weeded" portion of cardstock from which it was cut when cut as a "grouped" word.

22. Prepare the front cluster by (optional) attaching foam dimension squares to the backside of the assembly . . .


.  . then "audition" positions of tag and front cluster together, with tab slightly above the bottom front edge of box, then . . . 


. . . center and attach tag and cluster (see next image) to box front.


23. Layer banner tag front and base, with "Thanksgiving" over the top.

Position and attach to the back panel approx. .125" below top edge.


24. Assemble the two pairs of leaf base and half leaf forms, then bend the upper portion of side accent/flaps downward, glue upper then lower leaf in place on both left and right side flaps.

NOTE: the side accent "flap" shapes have been modified from what is shown here, though they may look very similar.


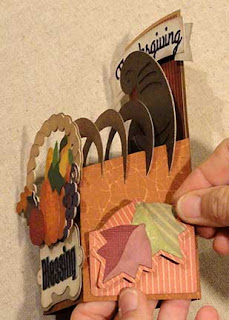
Here is the finished card open in display form.


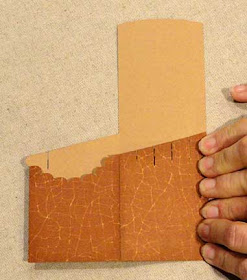
Here is the card folded flat for sending.

An envelope design, "box card envelope ribbon card flaps", is available that fits this flat form card.