Low-relief five-point Christmas star
can be used as a nativity prop,
as a floral arrangement accent,
or as the star lighting the way to
the swaddled Baby Jesus as part of the
"Believe" Blocks ensemble shown here.
Star wand measures approx. 13.25" tall.
For strength, it is suggested that a 5/16" dowel
be inserted into the tube.
ASSEMBLY:
1. Identify and cut the shapes:
A star (whole) base
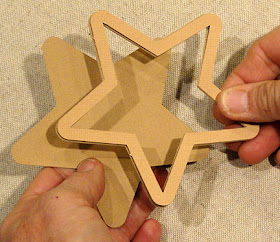
B build up frames (5)
C star dimensional center
D star wand (pole)
E wand end hex cap
F connector bracket
2. Prepare rim build up by gluing together the five rim shapes, taking care as each is attached that all inner and outer edges line up as exactly as possible.
NOTE: you may wish to use a heavy flat weight to help with the gluing process, both here and also in Step 3.
3. Position and attach build up rim onto "backside" of whole star base, taking care to line up all outer edges precisely. (The "face" of the whole star will be visible as the back of the star.)
4. Prepare the star center by folding back on all radiating perforation lines from edge to edge. Then, re-direct the folds so that the point centers remain as "mountain" folds, and the short lines between points re-configure as "valley" folds. This is what will give the star its appropriate dimensional form.
Also fold the point tabs back as shown.
5. Apply glue to the recess edge margins of the star assembly . . .
. . . then position the star center edges into the recess . . .
. . . and press edges into position so each aligns and abuts at build up rim. Continue to press edges in place until secure.
6. Prepare the wand stick shape by carefully bending back on each of the long perforation lines.
7. Form the shape into a tube to bring the straight edge to overlap the long tab perforation line, and glue in place.
NOTE: it may be helpful to use the 5/16" dowel as a "press-against" surface to help attach the edge to tab.
8. Prepare the dowel final length by sliding stick tube shape so that dowel and shape ends match, marking opposite shape end position onto dowel, then removing dowel and cutting to size.
9. Re-insert dowel fully, gluing in place. Position and attach hex cap shape on "top" of stick.
10. Prepare connector tab by bending end perforations forward and all other perforations back.
11. Position connector at top of stick, wrapping around and attaching three of the "facets" of the tab to the stick.
12. Position the stick assembly on the vertical center of the star assembly, with the tab approximately halfway up. Attach side tabs of connector to the backside of star (take care NOT to press and flatten the dimensional star on the front).
Here is the assembled star wand completed.
If you have prepared your star want as part of the "Believe Blocks" ensemble, apply glue to the bottom and 1/4" up the sides of the stick, then insert through the hex opening on top of the 'L' block, slide through strut openings and 'wiggle' or adjust to insert end into the platform hex opening.
Hold in place until secure.


No comments:
Post a Comment