Commemorate the arrival of Caspar with his gold gift chest
on "Three Kings Day" January 6th (Ephiphany).
Chest features "rounded" lid with
dimensional rim
and bracket accent shapes, base front panel bump out,
and side
dimensional handles, back hinges and front "faux" latch
(use temp
adhesive to keep box closed).
Decorate with studs and jewels as desired.
Measures approx. 4.75" wide x 4.25" tall x 3" deep.
Coordinate with the other Magi box designs:
pyramid frankincense and myrrh bottle.
ASSEMBLY: 1. Identify and cut the shapes:
A box base main shape B front panel bump out
C bump out panel front accent D dimensional handle grip
E handle (layer 2 for strength; cut 4 total)
F back hinge shapes G front latch shape
H dome lid I side lid shapes (2) J side lid accent (2)
K dome lid accent bars (6) L dome lid inner support
M dome under lid N lid build up rims
2. Prepare the main chest base shape by bending back
on all perforation lines.
3. Bend sides back away from bottom. Bring straight edge of
front to overlap the adjacent tab perforation line,
and attach to complete seam.
Repeat to complete remaining 3 corner seams.
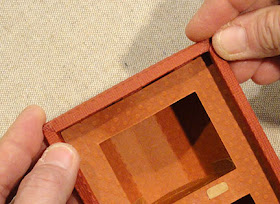
4. Fold the rim tabs to the inside and glue in place.
5. Bend the two handle grip dimensional shapes
back on all perforation lines.
6. Prepare the handles by layering a pair of shapes(as desired for durability and strength; or use single shapes).
Bend end connection tabs forward slightly.
7. Wrap the grip around the handle assembly to form a tube,
with straight end edge overlapping end tab,
and glue edge to tab.
8. Position and attach handles on chest base
sides using mini brads as shown, or
glue in place and cover punch holes with
jewels or studs, etc.
9. Prepare the front panel bump out by bending back on
all perforation lines, except edge flange lines,
which should be folded forward.
10. Bend edge panels back to bring end straight edge
to overlap the small triangle tab perforation line,
and glue in place. Repeat for remaining three corners.
Here is the completed bump out panel.
11. Position and attach the decorative panel to
bump out panel.
12. Insert bump out through front window opening
from the chest's inside, push through to seat the
edge flanges flush behind the front panel, and glue in place.
long perforation lines, also bending edge tabs back.
14. Position and attach side arch shapes to
center dome shape, beginning at top center edge.
Position and attach side top straight edge segment
at center tab. When secure, move toward each end,
positioning and attaching tabs to edge segments,
until all are attached. Repeat for second side arch.
15. Prepare the dome support shape by bending
at center perforation line, also bending all tabs back.
16. Insert center support tabs through slots at center of
under lid shape . . .
. . . then bend each back and glue in place.17. Glue the support semicircular sections together
back to back, with top tabs bent outward as shown.
Apply glue to the tabs . . .
. . . then insert under lid assembly into the dome assembly,
center with tabs touching backside of dome . . .
to secure.
perforation lines and end tabs.
NOTE that top tabs do not bend but remain rigid
to form a ledge to attach to backside of under lid shape
(see step 21).
19. Insert tabs of one long segment into corresponding slots
on front or back of dome lid assembly.
Tabs should extend into the dome assembly cavity,
and remain under the under lid shape.
to insert tabs into side end slots,
taking care to form miter arrangement of
overlapping edges at corner.
21. Apply glue to the underside of the rim tabs for
both segments that have been positioned
(move the under lid shape out of the way slightly to do this)
then reposition the under lid so that it will attach
at the glue-applied tab surfaces.
22. Join the second rim shape by inserting theend tab under the straight edge end of the
rim attached to the dome assembly,
and gluing in place.
23. Repeat the bending of rim shapes to insert tabs,
for long and short segments, then attach remaining ends
by inserting end tab under opposite straight edge
and attaching in place.
24. At corners on the bottom of the rim assembly,
the miter overlap arrangement should also be made,
with angled long edge overlapping straight extension
of shorter sides. Apply a dab of glue under angled edge
of a pair of corner miters . . .
. . . then apply pressure inward from both corners
while also pressing the overlapped layers
to secure the corners. (This seam helps the rim assembly
to keep its shape, and fit onto the chest base.)
25. Position and attach the accent arch shapes
on the dome sides, matching punch holes.
26. Bend the dome accent bands slightly at
the two perforation points. Position on dome
with one at center (match punch holes) and one
to each side. Repeat for both sides of dome.
27. Prepare to attach latches and hinges by placing lid
onto base and pushing into position fully.
At center front, lightly mark a tick on the bottom surface
of the rim to show where latch will be centered.
On the back, also lightly mark ticks on the rim bottom face
to line up with the latch punch holes.
28. Remove lid. Position latch behind rim,
centered at tick mark, with perf line at inner rim edge,
and glue in place.

29. At lid back, line up hinges in similar manner
at tick marks, and glue in place.
30. Replace lid onto base, then insert and secure
hinges with glue and mini brads (or studs).
Here is the completed chest.
Decorate with jewels, gold stud rows, etc. as desired.


I love this set!
ReplyDelete