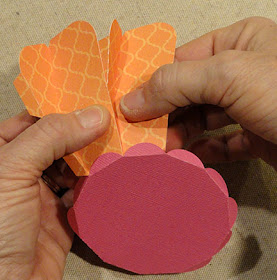
Join 12 pre-folded "swirl" sections
together
and to scalloped base, add tube candle
with 2d layered flame through
the center
for a unique birthday cash or loose sweets box.
Interior base
provides anchor for candle.
Optional swirl overlays imply fancy frosting.
Tie
optional tag to candle shaft.
Measures approx. 3" x 3" x 2.25"
tall
(candle shaft is approx 3.5" tall).
ASSEMBLY: 1. Identify and cut the shapes:
A main box swirl section (12)
B scallop base
C "frosting" accent shape (12)
D candle shaft tube E flame base F flame overays
G candle support accordion shape
H candle stand base
I tag with ring reinforcement
vertical folds near "center" - fold left over right half,
(right side to right side), creasing top and
bottom halves separately
behind one of the scallops aligned with scallop's perf line.
Glue in place.
5. Also glue the main shape's bottom tab
to the bottom of the scallop base.
in the same manner . . .
10. Complete the closure spiral,
then assist the completed form by pinching at the
outer corner to encourage tight spiral.
candle stand base, taking care to line up
the hexagon cutouts of each.
hex opening in the candle base,
then bend back and glue in place.
20. Position and glue the candle base
on the inside of the main box swirl assembly
and scallop base, taking care to line up
the edges appropriately.
21. Close the box swirls around the candle shaft.
Prepare and attach the tag, if desired.
A main box swirl section (12)
B scallop base
C "frosting" accent shape (12)
D candle shaft tube E flame base F flame overays
G candle support accordion shape
H candle stand base
I tag with ring reinforcement
2. Crease the main box swirl shapes following
the information on this diagram,
and the illustrations which follow:
(right side to right side), creasing top and
bottom halves separately
side tabs - fold back
top half - fold back on horizontal folds
(note that the create lines DO NOT stay lined up
as it is being folded)
bottom tab - fold back . . .
then unfold the shape to prepare to attach to base.
3. Prepare the base scallop circle by bending back
all of the edge tabs to perpendicular.
4. Position and center the first main shape bottom tab linebehind one of the scallops aligned with scallop's perf line.
Glue in place.
5. Also glue the main shape's bottom tab
to the bottom of the scallop base.
6. Position and attach the second main shape in
similar fashion to the right (clockwise) of the first shape.
Take care to nudge the second shape's base toward
the first shape as necessary to ensure that it stays
centered with it's scallop.
7. Adjust the two shapes so that the plain cut edge
of the first shape overlaps and lines up
at the lower tab perforation
line of the second, and glue in place.
Next, adjust the upper section straight edge
and corresponding tab perforation line so they
overlap and align, and glue in place.
8. Continue to add the main shapes to the scallop basein the same manner . . .
. . . until the 12th shape is added in place.
Complete the final seam between the first and final
main swirl shape straight lower & upper edges
and corresponding tab perforation lines.
You may want to try a "test" closure of the box
by gently pushing in the section center vertical
perforation folds toward the center while allowing
the outer rounded glued edges to spiral as shown.
9. Position and attach the "frosting" accent shapes
onto the upper facet of each swirl shape.
NOTE that the straight left and lower edges
are slightly offset within the perforation lines.
then assist the completed form by pinching at the
outer corner to encourage tight spiral.
11. Prepare the candle support shape by
bending in accordion formation.
Glue the faces that touch together on both sides
to create a stack, taking care to ensure
that the hexagon cutout edges line up
as precisely as possible.
12. Position and glue on place on the front of thecandle stand base, taking care to line up
the hexagon cutouts of each.
13. Prepare the flame base shape by bending back
and gluing upper portions (above end post tabs)
together. Make sure end post tabs remain unattached.
14. Position and attach the appropriate
overlay onto the flame base front and back.
15. Prepare the candle shaft by bending back
on vertical perforation lines and tab line.
Also bend the top hexagon "lid" and tabs back,
and bottom tabs back.
16. Form the shaft into a tube to bring the
straight edge to overlap the opposite tab to perforation
line, and glue in place.
It may be helpful to insert a tool such as a pencil
or 5/16" diam. dowel as a "press against" surface.
17. Insert the flame end tabs through the
lid slot, bend back and glue to the lid backside.
18. Bend the lid back into the top of the
tube, with the tab bent back at perpendicular,
apply glue to tab face, then tuck into the
tube and hold in place until secure.
19. Insert the bottom end tabs through thehex opening in the candle base,
then bend back and glue in place.
20. Position and glue the candle base
on the inside of the main box swirl assembly
and scallop base, taking care to line up
the edges appropriately.
Prepare and attach the tag, if desired.


A very sweet cupcake themed box.
ReplyDelete