Whimsical alien with swirl tummy,
fancy shoes,
curlique antennae, visor helmet and
detailed layered stun gun decorate
this
shaped lid and base gift box.
Measures approx. 4.3" x 7" x .75".
ASSEMBLY: 1. Identify and cut the shapes:
A LID front shape
B-E LID boxing strips (top, right, bottom, left)
F BASE bottom shape
G-J BASE boxing strips (top, right, bottom, left)
K optional gift card insert
L top divider for base
M mid insert support for base
N bottom divider for base
O silhouette for building alien
P body shape
Q feet silhouette base, with shoe shapes
R antennae accent shapes
S helmet, underlay, eye shapes, nose
T tummy circle with swirl accent
U ray gun base and assembly shapes
NOT SHOWN: insert triangle support strut
2. Identify and prepare the LID boxing strips.
Each strip has mitered base tabs that attach to the
LID main shape, rim edge tabs that fold back,
and symbols on the ends of the base tabs
to help identify the strip that attaches there.
Here, the pointing finger identifies the tiny circle
symbol on the right end of the TOP lid strip.
This illustration shows the location of the
strip seams and the symbols
that correspond.
(BASE symbols are the same, just double.)
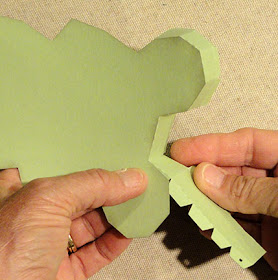
3. Prepare the LID boxing strips by
bending base tabs back,
bending rim tabs back,
and bending cross perforations
back or forward according to the
angles to which they correspond.
One way to do this is to arrange
the strips around the main shape
to see which direction the segments
should bend.
4. Prepare the BASE boxing strips
in the same manner.
5. Position and glue the top strip base edge center
perf edge at the center edge of the main shape
(NOTE that the box front "main" shape
and boxing strip is face outward .)
6. Bend the strip to align the shape's edge with
the next segment tab perf edge, and attach in place.
Continue to position and attach tabs until
all tabs are attached, working toward the left end . . .
. . . and toward the right end.
As the strip attachment progresses, it may be
helpful to turn the assembly face down on a flat
smooth surface and apply finger pressure to
the backside of the tabs area being attached.
7. Identify, position and attach the end tab
of the next boxing strip (right side with circle punch
symbol shown here) to the already-attached
boxing strip end.
Then continue to attach strip is the manner
described above. Join next strip(s) as shown.
8. Before the final one or two boxing segments
are attached, position and attach the final
tab behind the beginning straight edge of
top strip, then complete the attachment
of the remaining tabs.
9. Prepare the compartment dividers for the BASE
by bending the end tabs in opposite directions
as shown here.
10. Apply glue to the ends of the tabs . . .
. . . then position at the appropriate position
(upper shown in place in this photo,
lower shown just above foot area) with one
tab positioned on each side of the corner,
and glue in place to the BASE wall.
11. Prepare the center support strut
by bending the end tabs back.
Position at the center angle and attach
end tabs at the corner angle.
12. Prepare the optional gift card insert
by bending the end tabs up, side support strips
back (down), and strip ends forward.
13. On the backside of the insert, bring the
side support strips together at the center
and . . .
. . . attach the end tabs together.
14. Prepare the triangle support strut
by bending at perf lines into a triangle shape,
and bending tabs outward.
Apply glue to tabs underside, then
position above the attached support strut
on the underside of the insert.
15. To place the insert into the base,
feed the end tabs into the support slots at
top and bottom.,
16. Apply glue to the upper surface
of the end tabs, then . . .
. . . bend tabs upward and apply finger tip pressure
to attach to the end support.
Repeat for bottom tabs and support.
17. Slide the gift card under the end semi circle
tabs.
18. Prepare the alien accents:
layer eyes; layer shoes onto legs.
19. Position and attach body, antennae,
leg units, tummy circle with swirl onto
base silhouette, matching
edges that should align.
20. Attach helmet underlay to helmet
backside.
21. Position and attach helmet unit over
head of body/silhouette shape.
22. Assemble the ray gun shapes
onto the base gun shape . . .
. . . then position and attach over the
alien assembly to match the silhouette
edges that indicate where run should go.
23. Position and attach the assembled alien
unit on the LID with roughly even offset
margin around edges.
24. Close the box by fitting LID over the
base.
Here is the completed box.


No comments:
Post a Comment