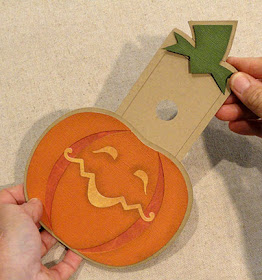
Grinning Jack has crescent layers front
with top
layer recesses or shapes to allow
smile and crinkle eyes to fit in.
Built up
layers front and back allow for a hidden gift card
holder with stem at top to
slide inside.
Measures approx. 5.75" wide x 5.875" tall when closed.
ASSEMBLY: 1. Identify and cut the shapes:
A main card back panel B main card front panel ("F" cut)
C main card build up shapes (5)
D slider back E slider build up (3)
F stem back build up G stem front build up
NOT SHOWN: stem accent build up shapes (5)
H stem accent front
I accent front base (show-thru)
J crescent accent bases
K crescent, eyes and smile accent fronts
onto the main card assembly, with even
offset margin of main card showing all around.
stem build up shapes onto the assembly,
aligning the edges that correspond.
13. Position and join the stem accent shapes
into a stack, all edges aligned.
lower edges overlapping above the surface
of the crescent accents.
A main card back panel B main card front panel ("F" cut)
C main card build up shapes (5)
D slider back E slider build up (3)
F stem back build up G stem front build up
NOT SHOWN: stem accent build up shapes (5)
H stem accent front
I accent front base (show-thru)
J crescent accent bases
K crescent, eyes and smile accent fronts
2. Assemble the main build up shapes by layering
one by one and attaching together, taking care
to line up all cut edges as precisely as possible
as each is joined into the stack.
NOTE: it will be helpful to press these under
a flat weight during the drying process to
minimize or eliminate curling and warping.
3. Position and attach the backside of the buildup
assembly on the backside of the main card back shape,
taking care to line up the edges that correspond
as precisely as possible (continue this attention
to edge alignment throughout).
4. Position and attach the main card front
over the buildup/back assembly.
5. Position the side accent crescent base shapes
onto the front of the accent base (show thru) shape,
lining up curved outer edges, and attaching in place.
Position and attach the center "crescent" in place
evenly centered between the side crescents.
6. Position and attach the top side crescent shapes
over the previous accent assembly. Then . . .
. . . position the upper front accent in place over
the middle crescent base, position and attach smile
tucked snugly into the corresponding cut edge
of the upper middle crescent, then
position and attach the lower portion.
Doing the assembly in this order will assist
in ease of fit of the smile.
Position and attach the eye accents into
their respective depressions.
8. Position and attach the accent front assemblyonto the main card assembly, with even
offset margin of main card showing all around.
9. Prepare the slider build up by aligning
and attaching the three window shapes
in the same manner as the main card
build up, taking care to line up cut edges.
10. Position and attach the build up over the
backside of the slider base.
12. Position the front and backstem build up shapes onto the assembly,
aligning the edges that correspond.
13. Position and join the stem accent shapes
into a stack, all edges aligned.
14. Position and attach the stem stack to the
slider assembly, lining up the lower edges
with the bottom edges of the slider stem build up,
and offsetting evenly at other edges.
14. Position and attach the surfaces that touch
of the accent stem onto the stem accent build up.
NOTE: this stacked stem build up will allow
the stem of edges of the slider to
slide into place with clearance for the top of
the jack o'lantern accent build up.
15. Complete final assembly of the hidden gift card
holder by inserting the bottom of the slider into
the channel of the pumpkin assembly . . .
. . . and slide into place with the stem accentlower edges overlapping above the surface
of the crescent accents.
While the slider is in "open" position,
insert card into slider recess,
then re-close the card.
Here is the completed Jack O'Lantern
with stem and slider in closed position.


No comments:
Post a Comment