Five
"patch" dimensional point panels are built using
Each
"patch" is then fit into position on the slot base,
inserting tab
pairs into corresponding slot pairs
and lining up needle holes on edge flanges.
Star rim is fit over assembly, then soft twine
or perle cotton
is laced through lined-up needle holes.
Use one of two back bracket
styles to finish as
a wand (dowel) or hanging (ribbon, shown with bead).
Ornament measures just
smaller than
4.5" wide x 4.25" tall when finished.
ASSEMBLY: 1. Identify and cut the shapes:
A main star base (with needle holes, slots)
B raised star points (5)
C stitching rim (non-punches alternate
shape is available in the cut file also)
D star back cover.
E twine loop back bracket
F dowel want back bracket
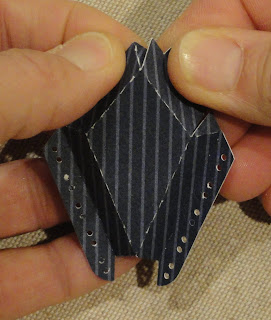
2. Prepare the raised point shape by
bending back on all angle and wedge tab
perforation lines, bending forward on
needle hole top side flanges,
slot tabs.
3. Bend the "side/boxing" panels backto align bottom seam edge with
corresponding wedge tab perforation line
and glue in place.
Complete side seams in similar manner.
Also complete the point (top) seam in similar
manner. NOTE it may prove helpful . . .
. . . to use a thin blade tool such as the spatula
shown here inserted behind the top point seam
to help provide a press-against surface.
Complete all 5 raised star points in this manner.
4. Position the raised star unit over one arm
of the star and insert the bottom tabs into slots.
On backside, gently work tabs through completely,press tabs toward each other, and glue in place.
5. On front side, adjust the positioning of
flanges so that needle holes of both layers
line up. This may be easy done . . .
. . . by poking a darning needle of appropriate gauge
through the holes to adjust,
then glue flanges in place.
6. Continue to position remaining star points
and insert tabs through slots, noting
that adjacent units will share slots,
until all are in position.
7. Position the rim over the raised points(needle hole version shown here;
alternate non-punched rim also available
if stitching is not desired, which will cover
the punch holes) . . .
. . . and press down to fit the rim snugly
around the star points and flat against
the flanges and base star,
and glue in place.
LACING:
8. Cut a 30-36" length of contrast perle cotton (shown)
or soft narrow gauge twine, floss, etc., and
thread through a blunt needle with the smallest
shank size that will allow stitching media to
be inserted through eye.
Secure the tail on the backside of star assembly
with a small piece of cello tape.
9. Insert needle through bottom hole of one star
arm, and push through to the front,
drawing twine through completely.
10. On front, insert the needle into the next hole,
push through and pull thread through fully
(here and throughout) to complete the first stitch.
11. Continue the up/down sequence to completestitching all around star.
12. When final stitch is complete, needle and
thread will end up on the back.
Trim excess to approx. 3/4" tail,
and secure on backside with cello tape.
13. Position and glue back star cover in place
to hide construction.
14. Prepare the bracket of choice to hang or
hold star.
LEFT - Wand style bracket: bend ends forward
RIGHT - Hanging style bracket: bend
in half, then bend ends forward; glue touching
surfaces together.
For WAND style, position and attach on the back,centered over guide perforation marks,
gluing only the center flat portion.
Use a 1/4" dowel cut to desired size,
painted if desired, with ends inserted through
circle openings of bracket, with shaft
also glued in place securely.
For HANGER style, position the bracket
behind the TOP point, center and glue
the flat lower portion in place.
Thread soft ribbon or twine through holes
and tie ends decoratively.
Here is the sample star in hanging style,
with rayon ribbon threaded with wooden bead
with bow and streamer ends.


No comments:
Post a Comment