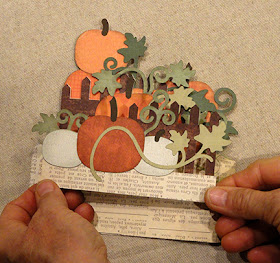
Dimensional card-in-a-box folds flat for sending
or giving,
opens into a rectangle form with bracket-edge flaps
on front and
sides. Two bridges which span across the box interior
plus box inside front and
back hold a harvest of pumpkins
layered disc below
hold word cuts that state "gather in" .
Measures approx.
5" wide x 3" deep x 2.5" tall when opened.
Oversize Envelope for
Box Card also available.
ASSEMBLY: 1. Identify and cut the shapes:
A box main shape front and left side
with flap accents
B box main shape back and right side
with flap accent
C pop-out banner & gather
Panel groups: front, bridges 1-2, back
Outer wall accent shapes: D front; E sides
F front tag
G "in" word cuts (3 for dimensional build up)
straight edge at tab, align and glue seam.
and attach the larger fence shape, pumpkin
and stem shapes over silhouette where edges
match. Position and attach the straight vine/leaf
unit behind the fence, swirly vine/leaf on the front.
apply glue to face surface of tabs, then insert
into the open box cavity and attach across the box
frame approx. 1/3 of the way forward from back.
Before the adhesive is fully set, fold the box
assembly flat as shown, allowing the bridge tabs
to self-adjust slightly, then apply pressure
through layers for final attachment.
(Repeat this step after Bridge 1 is attached, too.)
bend edge at guide marks.
NOTE that the banner should fold flat
just like the rest of the box card.
A box main shape front and left side
with flap accents
B box main shape back and right side
with flap accent
C pop-out banner & gather
Panel groups: front, bridges 1-2, back
Outer wall accent shapes: D front; E sides
F front tag
G "in" word cuts (3 for dimensional build up)
2. Prepare the main box assembly by bending
forward at flap perforation lines,
back at side seams, tab lines.
3. Position and attach the flap accent shapes
to corresponding size/shape flaps, with
shaped edges offset approx. .125", top straight
edge even at perforation edge.
3. Form the box assembly into a tube . . .
. . . to bring back corners together, to overlapstraight edge at tab, align and glue seam.
NOTE that the box assembly can be laid flat
to apply finger pressure along the glued-up seam
as shown.
Here is the completed main box assembly
in "open" form.
4. Prepare the behind-the-front-panel assembly
by preparing the pumpkin trio with swirls
and stems.
5. Position and glue the shorter fence section
behind the main silhouette shape. Position
and attach the pumpkin trio over the silhouette
where edges match. Position and attach the vine
over the front of the assembly.
6. Identify the #1 bridge by locating the cut
'1' in the side tab as shown by pointing finger.
Position and attach the pumpkin with stem,
leaf with vine shapes. Position the separate
swirl vine & leaf over the front.
7. Identify the bridge #2 shape, then positionand attach the larger fence shape, pumpkin
and stem shapes over silhouette where edges
match. Position and attach the straight vine/leaf
unit behind the fence, swirly vine/leaf on the front.
8. Prepare the in-front-of-back-panel assembly
by positioning and attaching the trio stack
pumpkins with stem (begin at top, work down),
position and attach larger pumpkin with stem.
Position and attach vine/leaves shape with
stem end under trio stack.
9. During the positioning of the separate shapes
(vines/leaves, small fence, etc.) it may be
helpful to "preview" the visibility of the various
elements to make minor adjustments as needed.
10. Position the back panel assembly in front of
the box back wall on the inside, with "top" edge
of the silhouette's base rectangle aligned with
top of the box back panel. Attach in place.
11. Bend back the side tabs of Bridge 2 assembly,apply glue to face surface of tabs, then insert
into the open box cavity and attach across the box
frame approx. 1/3 of the way forward from back.
Make sure top of bridge base rectangle at
perforation/tab is even with side flap perforation
edge.
Apply pressure at tab to glue in place.Before the adhesive is fully set, fold the box
assembly flat as shown, allowing the bridge tabs
to self-adjust slightly, then apply pressure
through layers for final attachment.
(Repeat this step after Bridge 1 is attached, too.)
12. Prepare Bridge 1 assembly in similar fashion,
insert into box interior and position halfway
between Bridge 2 and box front, and attach in place.
13. Position the front panel assembly behind
the box front panel with panel rectangle
aligned with box flap perforation line.
Viewing the assembly from the underside shows
how the bridges are evenly spaced and
that bridge bottom edge aligns with
bottom edge of side walls.
14. Prepare the pop-up banner by bending
at perforations, outer lines as "valley" folds,
inner lines as "mountain" folds.
Attach the "gather" word cut.
15. Prepare to attach the banner ends to
the front panel flap by locating the position
guides cut into the front flap.
(A sample of the flap cut from plain card stock
is shown to be able to see the dash cuts.)
Apply glue to the backsides of banner ends,
then . . .
. . . position the banner ends on flap withbend edge at guide marks.
NOTE that the banner should fold flat
just like the rest of the box card.
16. Prepare the circle tag by layering the large
and small circles. Layer and attach the "in" word
cuts into a dimensional stack, then position
and attach at the lower portion of the circle tag.
17. Position tag on front of box under the flap.
Here is the finished box card.


No comments:
Post a Comment