Simple shapes present the Holy Family in
a nativity tableau, with guiding star above, available
in two versions: long stitched head gear shapes using
no. 5 or no. 8 perle cotton, (shown above)
or plain paper cut outs, (shown below).
Overlays and insets provide the details, with optional
"print & cut" phrase added: unto us a child is born.
Card measures approx. 6.5"x6.5" when completed
and folded at center. A companion Nativity Star envelope
is also available.
NOTE that stitched version instructions will be
presented first, with non-stitched version alternative
steps following, in Step 13.
ASSEMBLY:
1. Identify and cut the shapes:
A front panel with cut outs for faces, star
prepare with "print & cut" methods to include
printed phrase
B contrast reinforcing under-panel
C insert for different contrast for star
D opt. buffer panel (provides depth for stitching)
E & F card base front and back panels
G Mary face insert and dress overlay
H Joseph face insert, robe overlay, crook
I Baby Jesus face insert, manger overlay
J perle cotton no. 5 for head dress stitching
(Non-stitched version substitutes head dress
cut paper shapes for stitching)
Also obtain a blunt-tipped tapestry hand stitching
needle such as the style shown here, in a slightly
finer size such as 22 (smallest size that selected
cotton "yarn" can be threaded into so that
stitches will fit through cut holes without tearing).
2. Position reinforcing panel behind the front panel,and glue together, taking care . . .
. . . that the stitching holes of each are precisely lined up. This may be accomplished by using
the tapestry needle to push through strategic holes
at tops, bottoms and intermediate holes and
adjusting as needed, before attaching together.
3. On the panel assembly backside, position the star contrast oval into the cutout shape
and glue in place around the star opening.
Also apply glue within the face cut out openings
then insert and attach the corresponding faces shapes
of the three figures.
Immediately place the assembly under a flat heavy object such as this thick book volume
to press the glue-up flat until completely dry,
to avoid warping and curling.
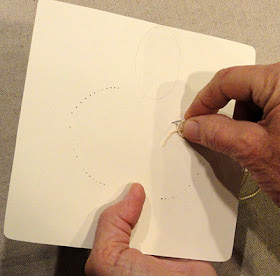
4. Prepare perle cotton (approx. 30-34" length will be sufficient) and thread 2-3 inches onto needle.
The sample begins with Mary's head dress stitching.
Near and below the top inner hole on panel backside,
use a small piece of cello tape to anchor the tail end.
5. Insert needle back-to-front through top front hole . . .
. . . turn the panel face side up, and draw the yarn
through fully.
6. Next, insert needle through inward-most bottom
hole, pull through fully on panel backside, creating
the first long stitch.
7. On panel backside (not seen in this image),
return to the next top hole and insert the needle
back-to-front again and repeat the process to
create the second long stitch.
NOTE: this describes Method A which creates
tension between tops and bottoms of long stitches
for even spacing, with long stitches on backside
that imitate face-side stitching. An alternative
Method B carries yarn between holes on backside
to create short stitches. (See backside in Step 9).
8. Continue to add the long stitches until all are
complete and needle with yarn tail are have exited
the final time to the backside.
Trim the tail to .5 - .75" and anchor with small piece
of cello tape.
9. Repeat the stitching process for Joseph's
head dress.
NOTE: here you can see the differences between
Method A long stitching and Method B short stitching
on backside.
10. Position the opt. buffer panel, backside-down,
over the back of the stitching panel, centered
in from all edges with slight offset so that
the stitching "bulk" fits within window cut outs.
(This provides a minimum added depth for stitches.)
 11. Position and attach front panel to card base front,
with even offset margins all around.
12. On front side of panel, position and attach dress
and robe shapes below head dress stitching so that
front edges align straight below "front" stitching holes,
curved upper edges follow stitching holes,
and bottom edges are parallel to bottom panel edge.
Also position the manger half-egg centered below
baby face with tiny margin between, and crook
in the approx. position shown.
13. Fold back the top flange tab of card base back,
then position and attach top edge of front panel
to tab, with edge aligned at fold/perforation line.
Press seam flat with weight until thoroughly dried.
Here is the completed stitched card version.
NON-STITCHED CARD VERSION
13. Follow portions of Steps 2-3 to attach contrast
reinforcement panel behind front panel, and
inserting star contrast oval behind and face shapes
into front openings.
14. Locate the guide marks near bottom sides
which show where dress and robe bottom corners
will be placed, then . . .
. . . position cut out shapes at the guide marks
and attach in place.
15. Next, position paper head dress shapes snugly
into the corresponding curves and attach.
16. Position and attach manger and crook.
Here is the completed non-stitched card front panel.


