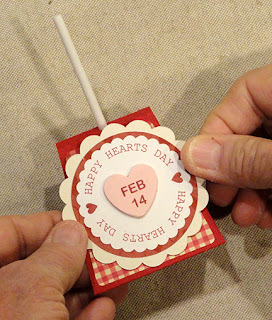
Dress up a hard candy sucker for a Valentine’s
special treat with these cover stands.
Two styles are included with each design:
tent style with
fold-in base flanges to provide
secure positioning rims;
or simpler
sticky-taped pinch-to-close top edges.
Dress up the front panel with the
scalloped discs,
choosing which shapes you want, or
the whole ensemble.
If desired,
substitute “print & cut” scallop front layer.
Three designs available separately:
1) “Happy Hearts
Day”, and “Feb 14” candy heart
that can be stacked for thickness;
2) Be Mine printed disc;
Fourth design that includes cut shapes only
with swoosh heart and faux stitched disc.
Also suitable
to embellish with your own “found”
stickers and jewels, etc.
Tent measure
approx. 2.375” tall x 2.375” wide
at base x 1.5” deep.
Pinch-close style measures
approx. 2.375” tall
x 2” wide x 1.625” deep.
NOTE: the Happy Hearts Day disc "tent" style
design will be described thoroughly first, with
the "pinch" sleeve simple assembly following in Step 14.
(Identifying and cutting steps are both at beginning.)
The other designs are similar enough that the general
assembly steps will can be followed for all other designs.
ASSEMBLY: 1. For the samples shown of the designs
which include the print & cut disc designs, begin by
identifying the shape that will be set up to print
then cut, then follow the standard processes to
accomplish the printing and cutting.
A main tent hull
B front offset accent shape
C medallion scallop base circle
D accent circle
E print & cut scallop circle
Identify and cut the shapes (pinch-top style):
A main tent hull
B front offset accent shape
C medallion scallop base circle
D accent circle
E print & cut scallop circle
F stacked heart with print & cut front, 6 to layer
For either design: 4. Layer the main medallion shapes, centered,
the printed shape on top, taking care to align
all cut edges as precisely as possible,
and glue together

If possible, press the stacked shape with a heavy
flat weight such as this fabric covered weight brick,
and leave in place for several hours until thoroughly
dried.

6. Position the heart shape, centered on the medallion,
and glue in place.
For the side extensions, bend the mid lines into
For the tent style:
7. Prepare the main shape by bending back on
the perforation lines for the center section . . .
. . . including the top "tent" bridge and flange tab.For the side extensions, bend the mid lines into
an inverted 'V' to create the ridge.
8. Apply glue inside the ridge perforations, then . . .
. . . bend and flatten the ridge segments so they
8. Apply glue inside the ridge perforations, then . . .
. . . bend and flatten the ridge segments so they
stack on top of each other and apply thumbnail
pressure back and forth to securely join.
Take care that the end extension does NOT get
to prevent attachment while continuing to apply
pressure until the rim is completely joined.
will meet up with the previous extension
bend the rims into perpendicular position where
they will be ready to help hold the sucker in place.
11. Position the accent shape onto the front panel
11. Position the accent shape onto the front panel
with even offset margins at sides and bottom/top
panel-defining perforation lines.
to overlap the top of back panel, straighten and
glue flange in place.
Here is the completed tent to this point of assembly.
13. Position and attach the medallion.
"PINCH" GLUE TAPE CLOSURE SLEEVE
Here is the completed tent to this point of assembly.
13. Position and attach the medallion.
"PINCH" GLUE TAPE CLOSURE SLEEVE
14. Prepare the main shape by bending back on
the two bottom panel perforation lines.
15. Position and attach the front accent panel.
16. Apply two-sided sticky tape across one end
15. Position and attach the front accent panel.
16. Apply two-sided sticky tape across one end
flange on the inward surface close to cut edge . . .
. . . insert lollipop between and so that it rests
. . . insert lollipop between and so that it rests
centered at half-circle cut out (helps keep lolli
straight), align and pinch the upper edges


No comments:
Post a Comment