Penguin canister character begins with a cardstock vessel
with short lid section where a knit stocking cap
created from a second-hand child's sweater sleeve snugly sits.
Cardstock multi-shape tassel ball tips the cap end over.
Dimensional beak, bright layered eyes, scarf,
layered heart and feet bring him to life.
ASSEMBLY:
1. Identify and cut the shapes:
A canister body
B canister top rim
C canister bottom rim
D canister bottom cover
E head top cap
F cap top cover (rim shape is not needed)
G top cap flanges
H front body
I beak box
J face details, hearts, scarf shapes
K feet shapes
L stocking hat template
M hat tassel main circles
N hat tassel bottom row partial circles
 2. Construct the canister body following the same procedure as used for Scarecrow canister, as shown in tutorial HERE, steps 2-6.
3. Prepare the head cap by folding tabs and sections back on all perforations.
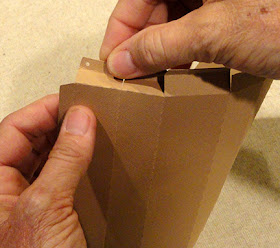
4. Form the cap shape into a tube to bring the side straight edge to line up with the tab perforation line, and glue in place.
5. Glue cap top cover to top tabs (wider notch cuts between tabs). Fold bottom rim tabs up inside cap and glue in place.
6. Identify the cap flange shapes. Star cutout is widest center section flange; circle cutout is for angle sections on each side of center sections; "S" flange is for "side" sections.
Fold flange tabs back and glue in place.
Insert flange that corresponds behind the various sections of the head cap . . .
. . . leaving a generous 1/4" exposed below cap rim edge, and glue in place. Glue all 8 flanges in place.
7. Prepare the dimensional beak by folding all sides back, tabs outward.
 Fold the ends and sides to form box shape with straight end or side edges lined up with tab perforation lines, and glue in place.
Bottom beak end is very narrow, so it may be helpful to use a narrow tip tool such as this spatula handle to insert into the end to press against to join edge and tab.
Here is how the beak box should appear when prepared.
8. Insert tabs into body slots from front,
then . . .
. . . press tabs outward and glue in place.
Bend body shape back slightly on vertical perforation lines.
9. Assemble remaining eyes, beak accents, cheeks, heart, scarf and feet units by layering where necessary, then position and attach to the body front unit.
Feet bottom edge should be flush with body bottom edge.
10. Glue body unit to the front of the canister, with top and bottom edges aligned exactly.
11. Cut stocking hat from existing knit "fabric" using template and following directions included in the cut file.
For the sample project, a nice knit children's sweater is used as the "fabric". It was selected to use one of the sleeve ends with ribbing section as the hat band, because the wrist opening measured to stretch at approx. 8 inches.
Ribbing end was planned to fold back approx. 7/8", so opening template end was aligned at the 7/8" measure mark.
12. Turn the cut shape face side in. Thread a length of heavy thread (or embroidery floss, or, as in the sample case, a piece of unraveled yarn from the cut edge of the remainder of sweater from which the hat piece is cut) onto a large needle. Whip-stitch the "raw" cut edges securely.
NOTE that this sample cap section includes the wrist ribbing that will be band. The original sweater seam in that area was left in tact, and does NOT need to be stitched as part of the new hat side seam.
13. Thread another length of thread or yarn onto the needle. Begin at side seam and approx. 1/2" below top raw edge to stitch a running gather stitch around the top opening.
14. Tie yarn ends into a simple (overhand) knot and cinch up tightly. Knot again to secure gathers.
15. Prepare the tassel paper ball by folding curved edge tabs forward for all whole and partial circles on the triangle perforation lines.
16. Separate the whole circles: 5 for top cap; 10 for middle raw. Remaining 5 partial circles will form bottom "cap".
Assemble top cap, middle row, and bottom by aligning and gluing together the tabs that line up as shown.
This image shows tabs being aligned to be joined. The shapes pictured are partial circles for the bottom "cap" of the tassel ball.
17. Form the middle row into a ring to bring together the opposite curved tabs. Glue together.
18. Glue the top cap to the top of the middle row.

19. Glue the bottom "cap" to the lower edge of the middle row to form the tassel ball.
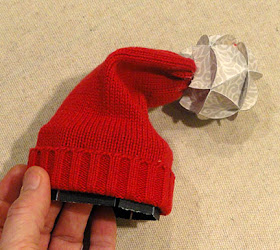
20. Compact the hat tip as much as possible. Apply adhesive to the tip, then insert into the bottom opening of the tassel. Push tassel ball onto the tip until gather stitches are not visible. Hold in place until joint is secure.
21. Slide the hat opening over the head cap . . .
. . . until the crown ribbing fold edge conceals the cap lower edge.
Flanges should still be exposed.
22. Place the cap onto the canister by aligning the canister and cap openings, with cap flanges lined up to slide inside the canister top opening.
23. Flip the hat tip and tassel to fold to the right. Attach the snowflake to the hat brim.
4. Form the cap shape into a tube to bring the side straight edge to line up with the tab perforation line, and glue in place.
5. Glue cap top cover to top tabs (wider notch cuts between tabs). Fold bottom rim tabs up inside cap and glue in place.
6. Identify the cap flange shapes. Star cutout is widest center section flange; circle cutout is for angle sections on each side of center sections; "S" flange is for "side" sections.
Fold flange tabs back and glue in place.
Insert flange that corresponds behind the various sections of the head cap . . .
. . . leaving a generous 1/4" exposed below cap rim edge, and glue in place. Glue all 8 flanges in place.
7. Prepare the dimensional beak by folding all sides back, tabs outward.
 Fold the ends and sides to form box shape with straight end or side edges lined up with tab perforation lines, and glue in place.
Bottom beak end is very narrow, so it may be helpful to use a narrow tip tool such as this spatula handle to insert into the end to press against to join edge and tab.
Here is how the beak box should appear when prepared.
8. Insert tabs into body slots from front,
then . . .
. . . press tabs outward and glue in place.
Bend body shape back slightly on vertical perforation lines.
9. Assemble remaining eyes, beak accents, cheeks, heart, scarf and feet units by layering where necessary, then position and attach to the body front unit.
Feet bottom edge should be flush with body bottom edge.
10. Glue body unit to the front of the canister, with top and bottom edges aligned exactly.
11. Cut stocking hat from existing knit "fabric" using template and following directions included in the cut file.
For the sample project, a nice knit children's sweater is used as the "fabric". It was selected to use one of the sleeve ends with ribbing section as the hat band, because the wrist opening measured to stretch at approx. 8 inches.
Ribbing end was planned to fold back approx. 7/8", so opening template end was aligned at the 7/8" measure mark.
12. Turn the cut shape face side in. Thread a length of heavy thread (or embroidery floss, or, as in the sample case, a piece of unraveled yarn from the cut edge of the remainder of sweater from which the hat piece is cut) onto a large needle. Whip-stitch the "raw" cut edges securely.
NOTE that this sample cap section includes the wrist ribbing that will be band. The original sweater seam in that area was left in tact, and does NOT need to be stitched as part of the new hat side seam.
13. Thread another length of thread or yarn onto the needle. Begin at side seam and approx. 1/2" below top raw edge to stitch a running gather stitch around the top opening.
14. Tie yarn ends into a simple (overhand) knot and cinch up tightly. Knot again to secure gathers.
15. Prepare the tassel paper ball by folding curved edge tabs forward for all whole and partial circles on the triangle perforation lines.
16. Separate the whole circles: 5 for top cap; 10 for middle raw. Remaining 5 partial circles will form bottom "cap".
Assemble top cap, middle row, and bottom by aligning and gluing together the tabs that line up as shown.
This image shows tabs being aligned to be joined. The shapes pictured are partial circles for the bottom "cap" of the tassel ball.
17. Form the middle row into a ring to bring together the opposite curved tabs. Glue together.
18. Glue the top cap to the top of the middle row.

19. Glue the bottom "cap" to the lower edge of the middle row to form the tassel ball.
20. Compact the hat tip as much as possible. Apply adhesive to the tip, then insert into the bottom opening of the tassel. Push tassel ball onto the tip until gather stitches are not visible. Hold in place until joint is secure.
21. Slide the hat opening over the head cap . . .
. . . until the crown ribbing fold edge conceals the cap lower edge.
Flanges should still be exposed.
22. Place the cap onto the canister by aligning the canister and cap openings, with cap flanges lined up to slide inside the canister top opening.
23. Flip the hat tip and tassel to fold to the right. Attach the snowflake to the hat brim.
Here is the finished Penguin canister.


No comments:
Post a Comment