Celebrate the gardening season - or offer a unique gift
to a favorite gardener you know.
This newest addition to the canister character family
is a gracious lady with work overalls,
garden glove, terra cotta pot with seedling,
detailed face and dimensional nose.
Topper is a back-up brim straw-style hat
that includes a flange that fits inside the canister
opening that helps it stay in place.
(This tutorial is under construction.
Please return after 6-22-15 to view the completed guide.)
ASSEMBLY:
1. Identify and cut the shapes:
A canister body
B top rim ring
C bottom rim ring D bottom cover
E front hat wedges (5)
F back hat wedges (left, ctr, right)
G front brim
H front brim rim
I flange platform & cover
J flange strip
K straw hat wedge overlays
L flower & leaf hat accents
M hat band sections (2)
N face and features, hair
O "shirt" panel and overalls
P terra cotta pot, sprig, leaves
Q garden glove base, overlay, wrist ribbing
NOT SHOWN: back brim rim, top button circles, cosmetic crown tab seams cover strip (see step 37)
NOT SHOWN: back brim rim, top button circles, cosmetic crown tab seams cover strip (see step 37)
2. Prepare the canister body shape by folding back slightly on all vertical perforations, also fold top and bottom tab perforation pairs as "valley" (near cut edge) and "mountain" (inner perf lines). NOTE: these folds will create a shelf on which the rim rings will sit.
Unfold the tabs on top and bottom on the side opposite the long edge tab.
3. Fold the edge tabs on upper and lower edges outward at a right angle from the canister body, then glue the second sections of the tabs in place as shown here, keeping the end tab un-glued until subsequent steps.
4. Fold the canister into a tube and bring the long straight edge to overlap the long tab at perforation line. Adjust the upper and lower perf lines so the line up as exactly as possible, then glue the edge in place to the tab.
NOTE: to assist with securing this long tab seam, use a long tool such as a pencil inserted behind the seam as a press-against surface. OR, carefully flatten the canister body to press against the tab.
5. Fold the remaining tabs into position and glue the middle section to the canister backside in the same fashion as was followed for the previous tabs.
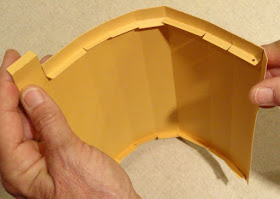
NOTE: the TOP middle section tabs are slightly taller to accommodate the flange from the hat. One of the tabs along the top includes the circle symbol, as can be seen in this image.
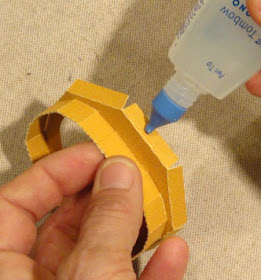
6. Apply glue along the ledge formed by the edge tabs, then "squash" or adjust the canister body shape to match the rim ring, and insert the ring onto the ledge.
Carefully insert fingers around tabs and rim to secure the edges as the glue grabs and cures. Don't let the canister shape un-adjust until the gluing is secure.
7. Repeat the gluing process for the bottom of the canister and rim ring.
8. Apply glue to the BOTTOM rim ring, then position and attach the bottom cover shape.
9. Prepare and assemble the accent elements, including the two-part pot with sprig and leaves pair, hat flower (with two-part center) and leaf, face (eye hole liners, pupils and lashes, cheek circles, mouth and liner/teeth, dimensional nose), garden glove with contrast base shape, glove and wrist ribbing, left hair and right hair with small band.
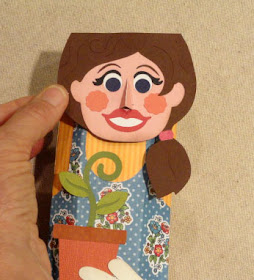
10. Assemble the face as shown, with layered mouth, eye "whites" liners behind hole openings, pupils, lashes and cheeks.
11. Prepare the dimensional nose shape by folding back at the center perf line, folding tabs up.
Unfold side tabs, then insert through slots in face and push in until fully seated against face. On backside, fold tabs toward sides and glue in place.
12. Attach band to pony tail.
Begin to assemble head with hair by inserting the right side (as facing) under the side lock cut until the indent between face edge and ear is snug at the right end of the cut. At the same time . . .
. . . align the chin area with the matching edges at the bottom of the hair shape.
Glue in place.
(NOTE that the contour cut lines that are visible here were removed from the final design file.)
13. Position the left hair shape over the previous hair/head assembly, lining up the top and left edges and the face/ear edges. Glue in place.
(NOTE that the eyebrow contrast now shows through from the hair shape beneath.)
14. Assemble the glove, pot with spring and apron shapes by layering and gluing into appropriate units.
Bend the shirt base rectangle and overalls shapes back slightly on their vertical perforation lines. Attach overalls to base rectangle (centered with bottom edges lined up). Arrange and attach pot unit and glove units to the center portion of the overalls/base rectangle ONLY so that when the base shape follows the contour of the canister, the side edges will be free to extend in their flat plane.

15. Apply adhesive to the backside of the base shape, then center on the front of the canister with bottom edges lined up, and attach in place.
16. Position the head unit, centered, at the top of the canister, and glue in place.
17. Prepare to assemble the 5 hat crown by arranging the front crown wedges.
Also arrange the back crown wedges - which include brim shapes attached. NOTE that the center wedge includes a circle symbol in the tab.
To identify the side wedges, NOTE that the bottom curved edges that attach to center wedges curve downward slightly.
18. Prepare the wedges by folding back slightly on the horizontal perforation lines, folding tabs back.
19. Line up the straight edge (left) and the tab perf line (right) of the bottom strata to be joined. Apply glue to the tab face, then align the edge to the perf line, adjust top and bottom so horizontal perf lines are continuous across both pieces, then join.
20. Bend the edge and perf line of the next strata up until they align (with adhesive applied), then adjust and join. Repeat for the remaining two strata edges and tabs.
21. Join all five wedges into one unit following the same process described in steps 19 and 20.
22. Join the back three wedges in their correct positions in a similar manner, lining up and joining the top four strata, leaving the bottom brim section edges and tabs free.
23. Bend the brim section straight edge upward along with the adjacent brim tab and perf line - with the tab on top - until the edge underneath lines up at perf line. Adjust if necessary so that brim curved edge corners line up, then attach.

24. Repeat the process to join and complete both attached brim seams.
25. Join the front wedges assembly to the back. Align the appropriate strata tabs, and join one at a time as done previously to attach one side seam and then the other.
26. Position the front brim shape by slotting it into position over the exposed bottom tabs of front wedge array . . .

. . . overlapping the straight edge end to the perforation line of the left back brim wedge bottom tab, and underlapping the tab end under the straight edge of the corresponding back wedge.
Glue in place.
27. Position and attach:

28. Prepare each of the 8 crown overlays by bending back slightly on the pair of perforation lines on each.
Position each (centered) over each crown wedge, bottom edge resting on top of the hat band.
29. Assemble top button by layering hollow circle, other circles in descending size order, then position and attach at top of crown to cover convergence of seams.
30. If desired, attach colored studs over the punch holes on the hat band.
31. Prepare the flange strip by folding in half on the long center perf line (face sides together). Also fold each of the back tabs up. Unfold the back tab that is on the end opposite the strip end tab. Glue folded-upward tabs in place.
32. Form the flange strip into a ring to bring the straight end to overlap the end tab opposite (with the back tab still unfolded as seen here). Glue the tab under the straight edge, then . . .
. . . fold the final back tab up into position and glue in place.
33. Determine the long section of the flange ring that is the front (away from ring seam), orient it to the front of the platform. Insert each of the flange tabs into their corresponding slots in the platform, then . . .
. . . fold the tabs either outward, or inward, according to how they best fit between the oval finger hole and the platform edge perforation lines. (Outward is best when you have the choice.)
Glue each tab in place.
34. Prepare to insert the platform into the bottom of the hat by bending edge tabs perpendicular and applying adhesive.
35. Orient the platform again so that the front long flange section matches up to the hat front, then slide it into place with the tabs on the inside of the crown.
It may be useful to use a blade-type tool such as this spatula to help guide the tabs into proper position, and otherwise adjust the platform tabs until it is flush with the bottom of the brim.
Insert fingers into the hat interior through the finger hole to apply pressure to ensure that each platform tab attaches to the inside of the crown.
36. Apply glue to underside edges of platform hole cover, then position and attach within the flange area.
37. To provide a cosmetic cover for the 5 front brim-to-crown seam tabs, position and attach the seam cover shape at the edge of the octagon of the platform.
38. Position and attach the flower and leaf accent shapes as desired. (NOTE: to allow the flower to sit lower against the crown height, the bottom of the flower was trimmed flat for the sample project.)
39. To place the hat on the top of the canister, insert the flange into the canister top opening.
Here is the completed gardener gal canister character box.
10. Assemble the face as shown, with layered mouth, eye "whites" liners behind hole openings, pupils, lashes and cheeks.
11. Prepare the dimensional nose shape by folding back at the center perf line, folding tabs up.
Unfold side tabs, then insert through slots in face and push in until fully seated against face. On backside, fold tabs toward sides and glue in place.
12. Attach band to pony tail.
Begin to assemble head with hair by inserting the right side (as facing) under the side lock cut until the indent between face edge and ear is snug at the right end of the cut. At the same time . . .
. . . align the chin area with the matching edges at the bottom of the hair shape.
Glue in place.
(NOTE that the contour cut lines that are visible here were removed from the final design file.)
13. Position the left hair shape over the previous hair/head assembly, lining up the top and left edges and the face/ear edges. Glue in place.
(NOTE that the eyebrow contrast now shows through from the hair shape beneath.)
14. Assemble the glove, pot with spring and apron shapes by layering and gluing into appropriate units.
Bend the shirt base rectangle and overalls shapes back slightly on their vertical perforation lines. Attach overalls to base rectangle (centered with bottom edges lined up). Arrange and attach pot unit and glove units to the center portion of the overalls/base rectangle ONLY so that when the base shape follows the contour of the canister, the side edges will be free to extend in their flat plane.

15. Apply adhesive to the backside of the base shape, then center on the front of the canister with bottom edges lined up, and attach in place.
16. Position the head unit, centered, at the top of the canister, and glue in place.
17. Prepare to assemble the 5 hat crown by arranging the front crown wedges.
Also arrange the back crown wedges - which include brim shapes attached. NOTE that the center wedge includes a circle symbol in the tab.
To identify the side wedges, NOTE that the bottom curved edges that attach to center wedges curve downward slightly.
18. Prepare the wedges by folding back slightly on the horizontal perforation lines, folding tabs back.
19. Line up the straight edge (left) and the tab perf line (right) of the bottom strata to be joined. Apply glue to the tab face, then align the edge to the perf line, adjust top and bottom so horizontal perf lines are continuous across both pieces, then join.
20. Bend the edge and perf line of the next strata up until they align (with adhesive applied), then adjust and join. Repeat for the remaining two strata edges and tabs.
21. Join all five wedges into one unit following the same process described in steps 19 and 20.
22. Join the back three wedges in their correct positions in a similar manner, lining up and joining the top four strata, leaving the bottom brim section edges and tabs free.
23. Bend the brim section straight edge upward along with the adjacent brim tab and perf line - with the tab on top - until the edge underneath lines up at perf line. Adjust if necessary so that brim curved edge corners line up, then attach.

24. Repeat the process to join and complete both attached brim seams.
25. Join the front wedges assembly to the back. Align the appropriate strata tabs, and join one at a time as done previously to attach one side seam and then the other.
26. Position the front brim shape by slotting it into position over the exposed bottom tabs of front wedge array . . .

. . . overlapping the straight edge end to the perforation line of the left back brim wedge bottom tab, and underlapping the tab end under the straight edge of the corresponding back wedge.
Glue in place.
27. Position and attach:
- hat band strips joined into a ring, positioned so that stud hole punches are aligned at each side wedge
- front brim rim arch & back brim rim arch

28. Prepare each of the 8 crown overlays by bending back slightly on the pair of perforation lines on each.
Position each (centered) over each crown wedge, bottom edge resting on top of the hat band.
29. Assemble top button by layering hollow circle, other circles in descending size order, then position and attach at top of crown to cover convergence of seams.
30. If desired, attach colored studs over the punch holes on the hat band.
31. Prepare the flange strip by folding in half on the long center perf line (face sides together). Also fold each of the back tabs up. Unfold the back tab that is on the end opposite the strip end tab. Glue folded-upward tabs in place.
32. Form the flange strip into a ring to bring the straight end to overlap the end tab opposite (with the back tab still unfolded as seen here). Glue the tab under the straight edge, then . . .
. . . fold the final back tab up into position and glue in place.
33. Determine the long section of the flange ring that is the front (away from ring seam), orient it to the front of the platform. Insert each of the flange tabs into their corresponding slots in the platform, then . . .
. . . fold the tabs either outward, or inward, according to how they best fit between the oval finger hole and the platform edge perforation lines. (Outward is best when you have the choice.)
Glue each tab in place.
34. Prepare to insert the platform into the bottom of the hat by bending edge tabs perpendicular and applying adhesive.
35. Orient the platform again so that the front long flange section matches up to the hat front, then slide it into place with the tabs on the inside of the crown.
It may be useful to use a blade-type tool such as this spatula to help guide the tabs into proper position, and otherwise adjust the platform tabs until it is flush with the bottom of the brim.
Insert fingers into the hat interior through the finger hole to apply pressure to ensure that each platform tab attaches to the inside of the crown.
36. Apply glue to underside edges of platform hole cover, then position and attach within the flange area.
37. To provide a cosmetic cover for the 5 front brim-to-crown seam tabs, position and attach the seam cover shape at the edge of the octagon of the platform.
38. Position and attach the flower and leaf accent shapes as desired. (NOTE: to allow the flower to sit lower against the crown height, the bottom of the flower was trimmed flat for the sample project.)
39. To place the hat on the top of the canister, insert the flange into the canister top opening.
Here is the completed gardener gal canister character box.


No comments:
Post a Comment