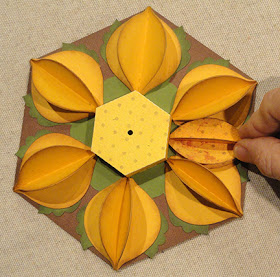
Sunny hexagon shaped gift box composed of lid
and base with dimensional sunflower blossom
on top built of two sizes of
slice-form petals.
Layered rosette and center design embellish the top.
Great
as a treasures box or gift box to celebrate
the sun-flowery days of summer,
or
many other great occasions.
Or, simply use as cheery decor.
Measures approx.
5.5" tall x 6.5" wide
x 2.2" tall (plus top decoration).
ASSEMBLY: 1. Identify and cut the shapes:
A main LID shape with accent rectangles
B main BASE shape with accent rectangles
C base "liner" to reinforce & strengthen base
D lid accent shape (with slots for E riser)
E riser to provide platform for sunflower center
F rosette pleated strips (2)
G rosette front and back stabilizing centers (2)
H large petal units (6 sets)
I small petal units (6 sets)
J leaf units (6) K flower center layers
2. Prepare the riser shape by bending back on
all the panel perforation and tab lines,
except bend the end tabs forward.
3. Bend the sides back to join the corner seams:
bring the straight side edge to overlap the opposite
tab to the perforation line, and glue in place.
Complete all 6 corner seams.
This is the completed riser unit.4. Position the riser in the center face side
of the lid accent, and insert the tabs into
the slots. Then push completely in . . .
. . . and bend tabs outward. Glue each tab in place.
On the face side, apply pressure through the lid
accent to make sure that the tabs are secured.
5. Prepare each of 6 LARGE petal units by bending
three perforated petal shapes with the right side
of paper bent face to face (valley fold).
Each unit also can include the optional
plain (un-perforated and un-bent) petal base.
To ensure that the tips will be uniformand crisp, crease along the fold with thumbnail
extending all the way to the tip on each petal.
6. Join the first two of the "slices" by lining them
up side by side, identifying the backs of each
that correspond, then gluing those two backs together.
Take care to line up the fold edges as preciselyas possible, with the tip and inward ends
also aligned precisely.
Press the stack flat to ensure that the connection
between the two slides being joined is complete
and secure.
7. Position the third slice in similar fashion,then join the back surfaces that correspond,
repeating the accurate adjustment and pressure
on the stack steps.
8. If using the plain base back shape, apply
adhesive to the back faces of the slide unit,
then position and attach the two.
NOTE that the base shape may not reach
completely to the edges of the slice unit underside.
Prepare 6 large petal units.
9. These are the shapes for each of the 6
smaller petal units: four slice shapes plus
optional base plain shape.
Prepare the perforated shapes by
bending in half with face sides together,
and thumbnail crease all the way to tips.
10. Position and join the 4 slices in a manner
similar to the large petal process . . .
. . . joining slice back halves to adjoining
and corresponding slice shapes until all four
are joined.
NOTE that it is possible to spread the slice
fins to be able to apply pressure to the slices
being joined to ensure secure joining.
Add the optional base plain shape if desired.
Complete 6 small petal units.
Here are the completed small and large petal units.
11. Position (center base edge against riser side)
each leaf shape on the lid accent,
and attach in place.
12. Position each large petal unit onto the lideaccent, with base touching the corner of the riser,
and tip aligned at the hex corner, and glue
underside in place securely.
13. Position each small petal unit between
the large petal units, overlapping the bottom
slice layer of the large neighboring petals.
Petal should be centered along riser side edge
and touching, with point bisecting the outer hex edge.
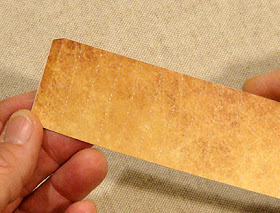
14. Identify the tab end of each of the 2
pleated medallion strips, then . . .
. . . prepare each by bending the perforations
in accordion fashion, beginning with a valley fold
at the tab end first perforation, then alternating
mountain-valley-mountain across the strip.
15. Join the pleated strips by overlappingthe straight (left in this image) side edge over
the opposite strip's tab to perforation.
Make sure top and bottom cut edges align,
and join the seam.
16. Form the strips into a ring tube (face side outward)
and complete the second seam in the same way.
(Heat up the glue gun before the next steps.)
17. Begin to form the pleated strips ring into
its flattened form by gathering the pleats together. . .
the top inward . . .
. . . until the pleats are flattened.
Continue to hold this form, pressing inward
from all sides toward the center.
18. Apply hot glue around the pleats at the
middle opening, then quickly position the front
cover circle, centered . . .
. . . and glue in place. Continue to force
the medallion into its smallest diameter
while the hot glue cools and solidifies
to ensure that the pleating is uniform all around.
19. Position and attach the back cover.
20. Layer the bottom two center shapes (large scalloped
shape with hole-punched decorative overlay,
center, and join.
21. Position and join (centered) over the front
of the pleated medallion.
To help center the unit over the riser box,
use a pointed piercing tool such as this awl
to punch a hole through the center of the front
and back cover circles of the medallion.
22. Position the medallion unit over the petalassembly, using the center guide hole to
align the two.
(to hide the guide hole).
24. Prepare the LID and BASE main shapes
by bending back on all panel perforation lines,
side seam tabs and rim flanges all around.
25. Unfold LID side walls, then position and
attach each of the side accent rectangles
offset within the creased lines.
26. Bring two adjacent sides into positionto overlap the straight edge to the adjacent
tab perf line, and glue the seam. Complete
each of the six side seams.
27. Bend the rim flanges inward and glue in place
to the backside of the side wall.
28. Repeat for the BASE: the attachment of
the accent rectangles, the shape the wall alignment
and seaming, and the rim folding
inward and attaching.
29. Position and attach the BASE interior
hexagon reinforcement shape inside the base.
30. Position the lid sunflower unit, with the accent
hexagon shape slightly offset within the lid's
top edges, and attach in place.
(NOTE: it may be helpful to use a quick grab
glue such as Fabri-Tack or hot glue.)
31. To close the gift box, carefully fit the lidover the base.
NOTE that this may be a snug fit.
Here is the completed sunflower box.


Your new sunflower designs are really lovely.
ReplyDeleteThank you for the kind words. It means a lot that you would comment.
DeleteWow beautiful. Well worth the effort of the time spent making it
ReplyDeleteThis is an absolutely beautiful box! Thank you for all the care you put into the many details!
ReplyDeleteMy friend and I made these boxes together. As we progressed we’d look at it and be amazed. It’s stunning!! I’m making 2 more for my daughters. My shading has been done with Oxide inks, it makes such a huge difference. Thanks for your amazing skill in creating this.
ReplyDeleteBuongiorno from Italy !!!!
ReplyDeleteDove posso trovare Free template this work ????
Thank you!!!!!