Transform the ornament tree from a separate design file
into a Valentine tree display for February holiday decorating
with this Cupid finial.
Measures approx. 3.5" tall x 4.875" wide.
Decorate with mix-and-match heart or
Valentine-themed
ornaments from separate cut files
available for purchase and download.
This assembly guide will describe finial assembly
and attachment to main tree display,
and Dove, Ric Rac and Zigzag
ornaments assembly.
ASSEMBLY: A. Complete the tree display stand
following the assembly steps as shown
in a previous ornament tree tutorial by following
this LINK. Substitute the Cupid Fan finial
assembly and attach shown in the following steps:
1. Identify and cut the shapes:
A Cupid base B Cupid body
C wings pair D left arm
E arrow (2-3 for build up strength)
F fan finial base G fan accent overlay
H substitute tree arm with guide punch hole
I attachment bracket J front accent bracket
Not shown: pole top hexagon
with shoulder pivot punch hole, rotated upward
so that top wing edge is just below head edge
as shown, and attach where body overlaps.
4. Position front wing in similar manner,
rotated downward so that bottom edge is
just above body edge, and attach where
wing overlaps wing and body.
7. Layer fan base and accent shapes.
8. Position Cupid assembly over fan assembly,
aligning bottom straight edges
and guide punch holes, and glue in place.
9. Position finial assembly behind the special,
substitute upper tree arm layer with guide holes
aligned.
10. Layer upper tree arm unit as described in the
Egg Display tree (linked above), then
attach finial arm behind the tree arm build up shape.
11. Position and attach replacement finial
on top of pole as instructed in tree assembly guide.
is below tail edge as shown, and attach in place.
16. Tie ribbon into knot and bow, trim ends.
HEART OVERLAYS: Ric Rac & Zigzag
17. Cut the shapes, including the overlay framework
for each.
18. Place overlay over half heart shape
and adjust positioning for desired striping
effect. Watch for stripe intersection with
half heart edges.
When desired position is achieved,
hold in position while applying glue onto
back surface of overlay strips only.
This assembly guide will describe finial assembly
and attachment to main tree display,
and Dove, Ric Rac and Zigzag
ornaments assembly.
ASSEMBLY: A. Complete the tree display stand
following the assembly steps as shown
in a previous ornament tree tutorial by following
this LINK. Substitute the Cupid Fan finial
assembly and attach shown in the following steps:
1. Identify and cut the shapes:
A Cupid base B Cupid body
C wings pair D left arm
E arrow (2-3 for build up strength)
F fan finial base G fan accent overlay
H substitute tree arm with guide punch hole
I attachment bracket J front accent bracket
Not shown: pole top hexagon
2. Position and attach body over base,
matching up edges that should align.
3. Position back wing under body assemblywith shoulder pivot punch hole, rotated upward
so that top wing edge is just below head edge
as shown, and attach where body overlaps.
4. Position front wing in similar manner,
rotated downward so that bottom edge is
just above body edge, and attach where
wing overlaps wing and body.
5. Position left arm with pivot hole aligned,
while at the same time position arrow over
lower hand and under top hand, then glue
to attach all in place.
6. Insert mini brad through shoulder punch hole.7. Layer fan base and accent shapes.
8. Position Cupid assembly over fan assembly,
aligning bottom straight edges
and guide punch holes, and glue in place.
9. Position finial assembly behind the special,
substitute upper tree arm layer with guide holes
aligned.
10. Layer upper tree arm unit as described in the
Egg Display tree (linked above), then
attach finial arm behind the tree arm build up shape.
11. Position and attach replacement finial
on top of pole as instructed in tree assembly guide.
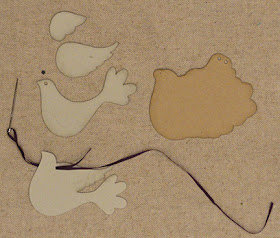
DOVE ORNAMENT
12. Cut the ornament shapes shown.
Use a large-eye needle to thread narrow ribbon
or twine through the slash cut on the body base
shape, and behind as shown.
13. Position and attach the body shape overlay.
14. Position and attach upper wing onto
wing base. Attach eye circle.
15. Identify the dash guide line on the body
that shows where wing overlay will be
positioned, then . . .
. . . position wing unit, rotated so that end tipis below tail edge as shown, and attach in place.
16. Tie ribbon into knot and bow, trim ends.
HEART OVERLAYS: Ric Rac & Zigzag
17. Cut the shapes, including the overlay framework
for each.
18. Place overlay over half heart shape
and adjust positioning for desired striping
effect. Watch for stripe intersection with
half heart edges.
When desired position is achieved,
hold in position while applying glue onto
back surface of overlay strips only.
19. Trim stripe edges even with
half heart shape, then . . .
. . . complete the heart ornament assembly.


do you need to make a stand for each of the seasonal trees? or can the different finials be exchanged on one stand?
ReplyDeleteThe finials are meant to be "interchangeable", but each would need to be attached with some kind of strong but temporary adhesive, such as Scotch tape glider tape. You may be able to devise a means of attaching and detaching the finials that makes sense in your particular situation and application.
DeleteSaw this in the silhouette store today and LOVE the idea of having a tree for the different seasons like I see you have. I'm going to try this. I would love to be able to sign up for email notifications when you have new blog posts. Please consider adding that to your sidebar so I don't miss any of the tutorials. Thanks!
ReplyDelete