
Treat
holder or table favor box “base” fits into
a dimensional “rim” tray with a layered
stars
and stripes shield emblem decorating each
of the four box faces.

Add
studs or brads at punch holes for flair.
Great for July 4th, a patriotic
gathering or
to celebrate military service, and more.
Measures approx. 3” wide
x 3” deep x 4” tall
when fully assembled.
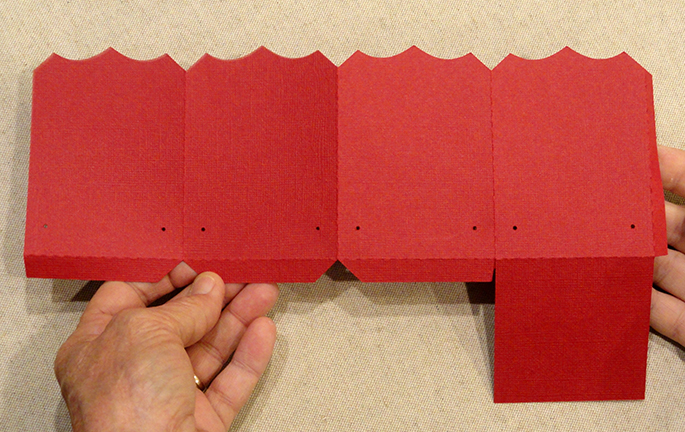
ASSEMBLY: 1. Identify and cut the shapes:
A main box hull with attached bottom panel
B interior reinforcement for box hull floor
C bottom rim "tray"
D shield foundation (4) E stripes (4)
F stars crest (4) G shield edge accent (4)
Not shown: optional accent hole covers (8)


bottom edges, crest at base upper edges . . .
 . . . and edge "rim" accent over the top of

the layers with all edges a precisely aligned
as possible.
 If using liquid adhesive to assemble, place each

glued-up shield unit under a flat heavy weight until
completely dried, for at lease a hour or more.
This will help prevent or minimize warping or
curling of the glued-up shape.
 3. Prepare the main hull shape by bending back on

all perforation lines for walls and flanges.
 4. Form the hull walls section into a box tube to align
and overlap the plain wall edge across the side seam
flange to perf line, adjust for top and bottom alignment,
then join the seam. NOTE that . . .
 . . . since the hull is a symmetrical shape, it can

be flattened to apply fingertip pressure evenly
along the seam until secure.
 5. Pop out the hull into its cube form, then fold and

push the bottom panel up inside the walls, then . . .
 . . . bend the bottom flanges into position

and glue in place to the bottom panel outside
surface. Take care that the box form is squared.
It may be helpful to place the box bottom-down on
flat work surface and reach fingertips or tool inside
the box to apply pressure along all three seams.
 6. Apply adhesive (dry double side tape preferred) to

underside of reinforcement panel, then insert into
the box form and push into place at bottom.
Apply pressure to attach in place.
 7. Prepare the rim tray shape by bending back on

each of the inward 3 perforation lines in the series
at each of the tray edges, except bend forward on
the final, outer perforation for the attachment flange.
 Also bend back the tabs at the ends of two rim

perforation series.
 8. Complete the very short corner seam at each

of the four corners by bending back (or up as is shown
here) two adjacent short outer wall segments, with
the tab behind the opposite plain edge, with edge
aligning at the tab's perf cut, and join the seam.
 9. Identify the non-miter side walls for tray by

locating the "bite" notch at the center of each
opposite wall. These are the first walls to be
folded inward.
 Apply adhesive to the underside of

the edge segment, then . . .

rim shape created by the perforation series.
Push the edge attachment flange back toward
the outer wall until the inner wall is vertical and at
a perpendicular angle to the tray floor.

NOTE it may be helpful to use something like
a small block of wood or a match box gently pushed
inward along the angle to help set the wall at
the perpendicular angle. Repeat for the opposite wall.

10. Repeat the process to bend the remaining two
"miter" corner sides inward, taking care at the corners
to make sure that the rim top segment angle edge
wraps over the previously-positioned corner. Then
continue to position inner wall and attachment flange
as was previously done, pushing into the perpendicular
positioning. Apply pressure to secure all flanges in place.

11. Position and attach each shield accent onto

11. Position and attach each shield accent onto
one of the box walls, matching the upper edges.
 12. Apply adhesive along the tray inner attachment

flange faces (and center of floor panel if desired),
then insert the bottom of the box into the tray
and push down to fully seat in place.
Insert fingertips or tools into box to apply pressure
inside along edges to secure.

the shield rim) to cover the punch holes.
Fill with loose treats, etc.


No comments:
Post a Comment