Add a special "wrap" to conversation
hearts
.9 oz box package with this simple tote.
End corners base tray is
attached inside bottom
to hold box neatly inside.
Punch holes front and back
allow for
ribbon tie closure and embellishment.
Decorate the fronts with two different variations
.
Attach simple name twine-tied tag.
Each measures approx.
5" x 3.875" x .875".
ASSEMBLY: 1. Identify and cut the shapes:
Each tote includes the main body shape
with handles at top and bottom,
(I beam form) tray shape, front decoration
(either interlinked hearts/Valentine, or
be mine scallop medallion), and tag.
Shown here is the interlinked hearts:
Center and glue the large heart in place
on the rectangle base near the top,
leaving the area unattached where the
small heart ends will need to tuck.
"Break" open the cut on the small hearts . . .
. . . then tuck the ends under the larger heart,
and glue in place.
Add the "Valentine" word cut to the rectangle.
4. Position the decoration on the "front" panel,
centered, and glue in place.
and glue tabs in place to the underside
of the tray.
TAKE CARE that the ends and sides
are perpendicular and squared up.
and insert bottom into tray.
This should be a snug fit.
If desired, you can temp adhesive strip or dot
it in place.
Fold the handles up to meet and thread
ribbon through the lined-up punch holes,
and tie a neat double knot (or knot and bow).
Each tote includes the main body shape
with handles at top and bottom,
(I beam form) tray shape, front decoration
(either interlinked hearts/Valentine, or
be mine scallop medallion), and tag.
2. Prepare the body shape by bending back
at the to "center" perforations.
3. Prepare the decoration.Shown here is the interlinked hearts:
Center and glue the large heart in place
on the rectangle base near the top,
leaving the area unattached where the
small heart ends will need to tuck.
"Break" open the cut on the small hearts . . .
. . . then tuck the ends under the larger heart,
and glue in place.
4. Position the decoration on the "front" panel,
centered, and glue in place.
5. Assemble the medallion by centering
the plain circle onto the scallop circle and attaching.
Attach the heart rim to the heart base, then
center and attach it.
Position and attach the "be mine" word cuts.
Shown here, the "waste" cut is used as
a positioning guide to help center and space
the two parts. Either hold/temp tape it in place
and glue the shapes in place
through the openings . . .
. . . or use light pencil guide marks.
Position and attach the medallion in place.
6. Prepare the tray shape by bending back on
all perforation lines and tabs.
7. Bend the ends up, the tabs under,and glue tabs in place to the underside
of the tray.
TAKE CARE that the ends and sides
are perpendicular and squared up.
This is the tray component finished.
8. Position the tray on the inside of the main
tote body, between the perforation lines,
centered both top to bottom and side to side,
and glue bottom in place.
Before gluing, you may want to bend the
front and back panels up into position
to make sure the tray does not interfere.
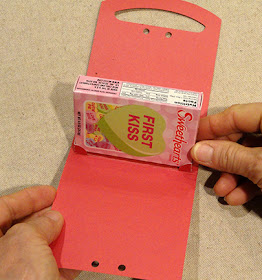
9. To load the candy box, turn it on its sideand insert bottom into tray.
This should be a snug fit.
If desired, you can temp adhesive strip or dot
it in place.
Fold the handles up to meet and thread
ribbon through the lined-up punch holes,
and tie a neat double knot (or knot and bow).
Here is the completed tote, with optional
tag tied on through handle.


This will be my first attempt at a little box, I love this one so I'm diving in.
ReplyDeleteGood luck and have fun!
Delete