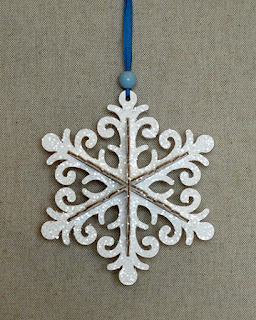
Dimensional
snowflake hanging ornament has swirly arms.
Composed of six-point base with
converging slots that hold
center "double" arm and four shorter arm
cross pieces,
all made thick by layering multiple (8 or more)
identical cut
shapes to resemble die-cut wood. T
op punch hole included for hanging ribbon -
add a 1/2" diam. painted wood bead for extra accent.
Measures approx.
4.3" wide x 5.6" tall x 1.75" deep.
Slot guide included to help
determine
how many build-up layers should be cut.
ASSEMBLY: 1. Identify and cut the shapes:
(NOTE: slight modifications may have been
made in shape during the
* test then cut quantity to create thickness
that fits in slot; see Step 2
A whole snowflake 'body' cut 8*
B whole center arm shape cut 8*
C diagonal half arm: cut 4 sets of 2 for front layer,
2 for back layer, 4* with nib for center layers
D slot for layers thickness measuring guide
2. To test the quantity of layers that will be best
for this snowflake, layer the suggested quantity -
eight (including contrast front and back layers
for the model being constructed in this tutorial) -
then layer (but DON'T glue) them.
With even edges, fit the end of the layered shapeinto the cut slot of the measuring guide.
If it is somewhat snug, the 8 quantity will be best.
If too snug, remove one interior layer, and re-test.
If not snug enough, add an additional layer
and re-test.
Once the best thickness quantity is determined,
cut all the shapes needed.
3. Layer and glue together (use lightest coating
of liquid glue that will achieve good connection
of layers) the stacks for each shape:
1 whole main, 1 whole center arm,
*4 half diagonal arms.
(*see step 4)
Take care while gluing up that all edges are aligned
and matched up as precisely as possible.
Pay particular attention to the slot openings
edge match.
NOTE: it may be good practice to layer and glue up
the shapes a portion at a time, such as half,
then press and let dry, then proceed to stack
any remaining shapes and glue together.
Use a flat weight placed on top of the layered shape,such as this fabric-covered re-purposed free weight,
to press the stack flat until the glue as dried
completely, which could take a few hours.
The pressing with a flat weight will help avoid
warping of curling caused by drying glue, and
should be considered essential.
4. For the half arm stacks, make sure that the center
shapes include the nib that will fit into the center
whole arm slot and help with positioning.
5. When the shapes are stacked and completely
dry and flat, fit the whole arm into the center slot
of the main snowflake shape, and center it and
glue in place.
6. Insert the first diagonal half arm into one of
the diagonal slots and . . .
. . . nudge the center nib
into the whole arm center slot, center up
and glue in place, both where it fits in its own slot,
as well as . . .
. . . where the perpendicular edges touch.
(This image shows all of the diagonal half arms
in position, with glue being applied to touching edges.)
Here is the completed snowflake.
7. To finish the ornament, consider threading a
length of soft ribbon through the top punch hole,
then both ends through a 1/2" diam. bead
(this one was painted), then knot the ribbon ends.
It has also been sprayed with adhesive mist,
and sprinkled liberally with clear crystal glitter.


No comments:
Post a Comment