Back-to-school themed gift cartons can hold a
treat
for educator or student.
Two sections join at side seams with
interlocking bottom panels for quick assembly.
Bend along diagonal side top
panels for
the classic milk carton look.
Thread 1/2" or slightly narrower ribbon
through top shaped flange slots that
line up on front and back.
Choose from three assembled front
decorations that bend to align with
carton contour.
Each measures approx. 3” wide x 3” deep
x 5” tall when closed.
(This tutorial is under construction.
Please return soon to view
the completed assembly guide.)
ASSEMBLY: 1. Identify and cut the shapes:
A and B carton shapes
Pencil decoration shapes:
C pencil base with D eraser & E carbon tip
F shaft shape, G band base and accent bars
alignment and overlapping, then join side seam #2.
ASSEMBLY: 1. Identify and cut the shapes:
A and B carton shapes
Pencil decoration shapes:
C pencil base with D eraser & E carbon tip
F shaft shape, G band base and accent bars
2. Prepare each of the hull shapes by bending on
the perforations as shown, as "mountain" folds
for all except the diagonal roof folds,
and the top flange perforations, which
are folded as valley folds.
To fold the diagonal folds, it may be necessary
to turn the shape face down, and isolate
the diagonal folds away from the rest of hull.
3. Position and align the two hull shapes side by side
to overlap the straight side edge of one (on left here)
over the adjacent side tabs, adjust for top-to-bottom
alignment, then attach to join the side seam.
4. Form the hull into a box tube to repeat the side seamalignment and overlapping, then join side seam #2.
NOTE that the hull can be flattened to allow
fingertip pressure to be applied along the length
of the side seam if desired.
5. Identify the tiny numbers cut into the bottom
flanges of the hull (shown here before the side
seams are joined). These will assist in the configuration
of the bottom interlocking arrangement.
A. Fold the front/back #1 flange under.
B. Fold the side #2 flanges in toward center.
C. Fold the #3 front/back flange under and . . .
. . . distend the flanges inward until . . .
. . . the #3 tab end clears the #1 slot edge,
then allow the flanges to re-adjust to be flat.
6. To prepare the top for closing, push the diagonal
side panels inward, then push the front/back flange
panels inward so that the flanges and slots
line up. Re-open to place contents inside,
then re-close and apply temp adhesive to
one flange to join them securely together.
Thread ribbon through slots.
7. For the Pencil decoration, bend the base
back slightly along the perforation as shown.
Attach the eraser and carbon tips shapes.
8. Attach the bands to the base, then position
between the perforation line and the bottom
of the eraser shape.
9. Position and attach the shaft shape belowthe band shape, allowing the perforation to
continue to bend to match the angle of the carton.
10. Position over the bend of the carton, and attach.
Here is the completed pencil decoration version.
11. For the Apple decoration, prepare the leaf
and flesh half heart units by layering and attaching
the components as shown.
12. Bend the apple main shape and the slice shape
back slightly on the perforation lines.
13. Position and attach the main shape and sliceshapes by aligning the perforation lines,
while lining up the inner cut edge on the vertical
center line.
14. Position and attach the half heart accent shape.
15. Attach the other shapes, then position
and attach to the carton front by aligning the perf
lines.
Here is the completed apple decoration carton.
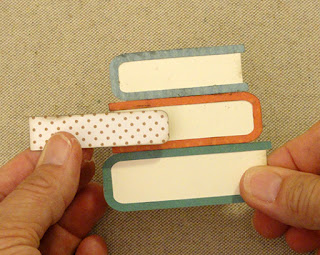
16. For the Books Stack decoration, cut the shapes:
A offset base alignment guide B books stack base
C bottom book "cover"
D middle book "cover" with E opt. contrast pages shape
F upper book "cover"
G apple with lower perf line
H leaf base and lower contrast shape
I stem J letter A
17. Position and attach the apple over the offset
base with bent perf lines aligned.
18. Position and attach the accent "cover" shapes
over the books stack base.
19. Position, insert and attach optional contrast pages shape
in between the middle "cover" shape arms.
20. Position and attach the books stack unitover the offset base, below apple, with offset
margins even all around.
21. Position and attach the accent shape over
the front of the carton, lining up the bends of
the perforation lines.
Here is the completed books stack version.


No comments:
Post a Comment