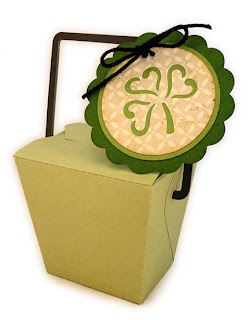
Classic Chinese food carry-out box
(approx. 3” tall without handle) makes
a perfect choice for not-too-heavy
holiday treats.
Easy assembly with overlapped side flaps,
with choice of slot
or circle handle openings where
stacked-for-thickness handle ends can be
inserted.
(Two hull styles included: slot opening hull will keep
handle
upright; circle opening will allow handle
to pivot down and up.)
Two shamrock
disc decoration options included:
hang-hole style can tie onto handle;
slightly
smaller version without hand holes is sized
to attach to front.
Requires 12x12 cutting capacity and cardstock sheet.
ASSEMBLY: 1.Identify and cut the shapes:
A box hull
B handle shapes (6-7 for thickened
strength as determined by slot test, Step 2)
C test slot and 6-7 strips to test layering quantity
D handle end "lock discs"
2. Layer the test strips into a stack, then . . .
. . . insert into the slot to see how many thicknesses
. . . insert into the slot to see how many thicknesses
of the selected stock for handle will fit into the slot.
Use that quantity determination to as target cut
quantity for handle shapes.
front upward into position so that side flap overlaps
adjacent side panel, and handle holes align.
swinging into position so that the punch holes
align again, then glue in place.
NOTE that fingertip pressure can be applied
best if the assembly is placed with the side
panel face down on work surface and fingertips
inserted into the interior of box as shown.
6. Reverse the assembly and repeat steps 4-5for the opposite ends flaps and side panel.
7. Stack and attach the handles, one by one,taking care to align cut edges as precisely as possible.
Use a heavy flat object placed on top of the handles
(which are on a flat surface) to press the handles
until completely dried, which may require several
hours or overnight. Pressing helps prevent or reduce
warping or curling when using liquid adhesive.
Use a thick book, wood plank, or similar item to press.
8. To attach the handle, insert the first end into
8. To attach the handle, insert the first end into
the side hole (top flaps will need to be bent
NOTE that with using the box hull with slot holes
instead of round insertion holes, the handle will
remain upright permanently; lock discs can be
attached to inside hull wall as well as tabs
forward, then applying glue to the TABS only
(for round hole where handle can pivot).
Slide the disc over the handle end . . .
Slide the disc over the handle end . . .
. . . push the disc back so that it touches wall
inside surface (maintain centered handle position
where equal space is between hull and handle on
each side) then press and attach disc tabs to handle.
If tabs attach only to the handle, the handle willfollowing by hook flap. Flex hook slightly then
slide it into the slot and move slightly side to side
so that hook will catch.
11. Layer the shamrock disc, with each smaller disc
centered inside the next size, with punched hang
holes aligned, and glue each in place.
12. Thread twine end through front hole,
around handle, then back-to-front through
second hang hole, then tie knot and bow.
Here is the completed treat box with medallion.


No comments:
Post a Comment