Coordinate
4 prints and solids for this sophisticated
(or playful) card. Assemble half
circles on front panel
of top-fold card, tuck “print and cut” phrase strip
(Happy Father's Day, Grandpa we love you,
Congratulations, Grad) under whole circle,
then mount accent shape (mini bowtie, mustache
or grad cap). Plain phrase
strip included for stamping
a different sentiment, if desired.
Card measures
approx. 5” tall x 7” wide when closed.
NOTE that the three card designs featured here are
very similar in assembly, with only slight changes
between print & cut sentiment strips and
decoration shapes placed on the whole circles.
The "Grandpa" bowtie card will be described.
ASSEMBLY: 1. Identify and cut the shapes:
A card base with top fold perforation
B card front with "arrow" (upward) and cross perf
guide marks
C lower left half circles array
D upper right half circles array
E whole circle
F accent shape: 3D bowtie, knot shape
G print & cut sentiment phrase strip
2. Assemble the lower left half circles array
by positioning and attaching each successively-smaller
shape on top of the stack, with ALL top straight edges
aligned precisely, and with left-most "corners"
also aligned.

Here are the assembled left half circles unit
with whole circle (here shown as faux stitched option).
3. Repeat the process for the upper right half circles
unit.
4. Identify and end marks and the centerline perforation
on the front accent panel.
(Also NOTE that the arrow cut out mark should be 'up'.)
with upper straight edge along the dash guide line,
with the left tip aligned at (to barely cover)
the left end guide mark.
6. Next, position and attach the upper right unit
with bottom right-most tip at (barely cover) right
end guide mark, with straight edge along dash line
circle units straight edges are centered beneath,
with left end approx. 1/4" in from right front panel edge.
8. Position and attach whole circle accent as shown.
9. Position and attach front panel assembly over
9. Position and attach front panel assembly over
front of folded card base with even margins all around.
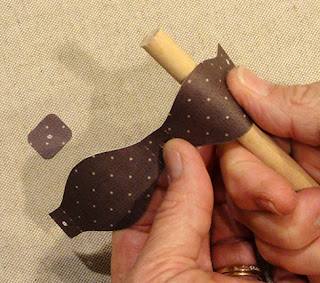
10. For 3D bowtie decoration, first add some back
10. For 3D bowtie decoration, first add some back
curl to the main shape only at the center of
the "loop" portion where the bulge edges are widest.
11. Gently bend (to avoid folding) loop ends inward
11. Gently bend (to avoid folding) loop ends inward
to position ends one on top of the other, with punch
with holes aligned, and attach in place.
NOTE that the "knot" shape was designed to go
lengthwise across the tie front, but it works
insert a mini brad through all holes layers and
bend prongs to secure. Or position and attach
a stud over hole.
14. For the Happy Father's Day card, follow
assembly steps 2-9, then position and attach
the mustache shape over circle a shown.
15. For the Congratulations, Grad card, follow
assembly steps 2-9, then position and attach
the mortar board two shapes over circle a shown.


No comments:
Post a Comment