Miniaturized gardening tool
replica is composed of
double layer shaped blade, handle tube that connects
blade
with shaped grip structure with cutout overlay.
Measures approx. 7” tall
x 2” wide when assembled.
Adorn a special gift or package for a gardening
enthusiast.
Include as a decorative element on
the BLOOM 3D Letter Box
Ensemble.
ASSEMBLY: 1. Identify and cut the shapes:
A blade front (face) B blade back
C shaft D handle E grip F accent band for shaft
2. Prepare the two blade shapes by bending along
perforations:
FRONT - bend upper section of center line as MOUNTAIN;
all remaining lines as VALLEY.
BACK - bend center line as MOUNTAIN
that will accent the bottom end of the shaft.
Swing the side rims so that the tabs will under-lap the top
straight edges, and glue in place (tabs underneath)
4. Prepare to attach the back blade to the front by
4. Prepare to attach the back blade to the front by
applying glue to the side portions of the front blade's
backside (leave the triangle hollow areas free of glue)
blade's backside, and . . .
. . . align each upper side edge and top
edges, working to adjust and push front sides inward
to form the triangle hollow . . .
. . . then quickly work downward around bottom tipto ensure that edges align as exactly as possible.
(If necessary, trim slightly any under blade
margins that don't align.)
on each side that should abut snugly to shape
the underside of the blade.
5. Prepare the shaft shape by bending back on all
perforation lines for triangular tube, and for extra-wide
flange.

6. Form the shaft shape into a triangle tube, tucking
the wide side flange under the "back" wall,
pushing inward until flange's perforation line
matches up to the back panel's straight edge,
and glue in place.
7. Prepare the handle shape by bending back on
all wall panel and tab perforation lines.
(NOTE that the selected paper for this shape
has been substituted in the final sample project.)

9. Form the front part of handle into a trapezoidal
tube, then bend and tuck the side tabs under
the upper front angled end wall, and join the seam.
Repeat for the opposite tab seam.
10. Bend the back wall into position to complete
the tube shaping, then tuck the long flange tab
under the corresponding straight side edge
and glue the seam.
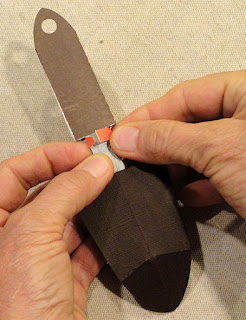
NOTE that it may be helpful to insert a "press-against"
tool such as this wooden skewer, placed behind
the seam, to help in applying pressure to secure seam.
11. Bend the bottom end tabs into position, then
bend the end panel up to align edges with tab
perforations, and glue in place.
12. Prepare the grip accent shape by bending back
on the intermittent perforation vertical lines.
Position the grip over the front and side panels,
perforation bends lined up, and centered from top to bottom
leaving a narrow margin of handle showing,
and glue in place.
13. Begin the final spade assembly by inserting
bottom tip of the shaft into top opening between
handle layers with punch hang holes, and down
through the triangular opening at bottom.
Fully insert the shaft until the top holes line up
as precisely as possible (shaft hole is slightly larger
to allow that layer to be completely hidden), then
apply glue to all layers that touch, and complete
the angled side edge seams and "flat" hang hole
panel in one operation.
14. Apply adhesive to the shaft tip end panels
below the cut guide marks, then insert the tip into
the triangle hollow of blade, taking care to orient
the FRONT of the handle and the FRONT of blade.
Push into position until the dash guide marks
line up with the top of the blade, then apply
pressure to help shaft and blade surfaces to attach.
15. Prepare the shaft accent band by bending back
on all perforation lines.
16. Place the band directly under the handle,
and wrap around from front to back so that
the tab end tucks under the opposite segment
at the back of the shaft, and glue in place.
17. As desired, attach a decorative cord or leather strips
through the hang holes (the detail shown includes
a twine wrapping). Also position and attach stud "rivets"
over the holes at front blade "hollow".
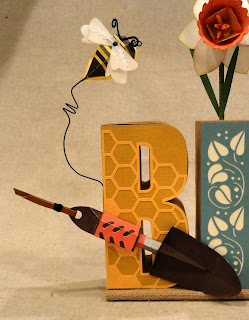
Here is the completed miniature Garden Spade.
Shown attached to the B letter block, there are
multiple places it could be added to enhance
the "BLOOM" Letter Box Ensemble.


No comments:
Post a Comment