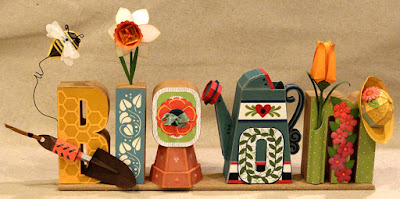
Build
dimensional letter O composed of LID and BASE,
each with an interior opening
form that facilitates fitting
the curved boxing along the edge.
Decorate the
front with the patterned or contrast
front ‘O’ overlay which contains tip and
tail location guide marks
for positioning the two leafy arcs with overlapping leaf tips.
Also includes an alternate front decoration offset O
with flower and 3D button.
Measures approx. 3” wide x 3.75” tall x 1.75” deep assembled.
Designed
specifically as one of the 3D letter boxes
that create the BLOOM Ensemble.
Measures approx. 3” wide x 3.75” tall x 1.75” deep assembled.
ASSEMBLY: Identify and cut the shapes.
A LID O main shape B-C LID boxing strips
D LID interior cutout guide shape
E LID interior cutout boxing strip
F BASE O main shape G-H BASE boxing strips
I BASE interior cutout guide shape
J BASE interior cutout boxing strip
K accent shapes for leafy O variation
L accent shapes for button flower variation
M two-layer flower with scallop base (button flower)
N button shapes: rim rings (3-4); button circle (3-4)
and interior cutout guide.
the LID and BASE main shape edges to assist
with positioning of the straight portions of boxing strips.
2. Prepare the boxing strips by bending back on
2. Prepare the boxing strips by bending back on
end tabs.
Also bend slightly at cross perforations.
Also bend slightly at cross perforations.
3. Position and join the shorter boxing strip to
the longer at end seam.
4. Add back curl along the segments with multiple wedge tabsthat will attach along the curve edges of the O main shapes
using a rod tool such as the 5/16" dowel shown here.
This shows how the main shape boxing should be shaped.
5. Position, align and attach the tab of first straight
This shows how the main shape boxing should be shaped.
5. Position, align and attach the tab of first straight
segment (longer) at the top of the main O shape,
adjust ends to align at guide marks, and glue in place.
6. Move along the strip to align and attach the next
6. Move along the strip to align and attach the next
straight segment at guide marks, and attach. Then . . .
. . . adjust and shape the curve portion of strip
. . . adjust and shape the curve portion of strip
at guide marks, glue in place, then adjust and glue
curved portion between straights, in same manner
slightly at cross perforations, then adding tight forward
curl at the segments with multiple wedge tabs that will
fit along interior opening top and bottom curve edges.
Use a rod tool (dowel) to tightly roll the strip in
the appropriate area and apply pressure to shape strip.
to align and secure end seam, with tab on the outer surface
corresponding guide shape opening edges.
Adjust and glue edges to confirm as closely as
possible to the opening edge . . .
with main shape opening, adjust and glue in place.

12. Repeat steps 2-7 to assemble the BASE main
shape box, and steps 8-10 to assemble the BASE
interior guide. Repeat step 11 to position and join
the two.
13. Insert the BASE box inside the LID, and push
partway in, then apply glue to the exposed inward BASE
walls before pushing fully together. Or . . .

. . . push fully together, then flex LID walls outward
slightly to insert glue applicator between walls. Then
use fingertip or palm pressure to attach walls
to create tightly joined letter box.
14. To assemble the button flower decoration for O front,
center and join inner O onto larger O; layer flower petals
together, then on top of scallop shape with holes aligned;
layer button circles together, rings together, then stack
on top of each other with outer edges and inner holes aligned.
(HINT: press multiple glued shapes under a heavy flat weight
while glue is drying to avoid warping and curling.)
15. Tie ribbon or twine through button holes,
then position and attach, centered, over accent opening.
16. To assemble the leafy arcs accent O, position
first arc over inner accent, locating the stem tip
guide mark, and leaf tip guide mark, and attaching
(leave leaf tip unglued for a moment).
17. Position second arc with stem tip at guide mark
and tucked under the first leaf tip, and overlap
leaf tip over first stem tip, and glue all remaining
leaf vine surfaces in place.
18. Position and attach the top layer onto the offset
base accent O.
(HINT: press multiple glued shapes under a heavy flat weight
while glue is drying to avoid warping and curling.)
19. Position and attach either prepared O accent
assembly on the front of LID.
20. For the BLOOM ensemble, the button flower version
O letter box is centered on the inverted bottom of
terra cotta 3D pot (long points side-to-side under O bottom)
the quick-grab glued in place.


No comments:
Post a Comment