Angular and dimensional, these closed tulip
blossoms
convey an origami styling.
Straight four-sided stem tube fits tightly
around a 3/16" wooden dowel for strength,
then anchors inside the blossom
with a recess "collar".
Fit stem bottom end through decorative crate
platform
that has openings for three different height blossoms,
side split
slats, and front and back layered,
built-up heart decoration.
Shaped leaf is
attached at stem bottom
at platform level.
Tulip blossom measures approx.
1.875" wide x 3" tall,
with tallest stem 12.5" tall.
Crate
measures approx 5" x 5" x 3".
A similar, single stem tulip in crate base
is also available.
ASSEMBLY: 1. Identify and cut the shapes:
A platform box main shape B accent top panel
C platform (under) insert reinforcement
D crate sides (2) E crate front and back (2)
F heart accent and (5) layers for build up
G tulip head main shape (3)
H stem post top anchor (3)
I top anchor hole-punch inserts (5 each for 3 blooms)
J calyx collar shapes (4 each for 3 blooms))
K stem post shapes for tall, med., short
L leaf shapes for tall, med., short
M over petals (4 each for 3 blooms)
2. Prepare the tulip main bloom shape by bending back
on all panel edge perforation lines, tab flanges.
3. Add a little outward curl to the top bloom tips.4. Form the top of the main bloom shape into
a pyramid to overlap straight edge to
flange perforation line opposite and join the seam.
NOTE that it is possible to compress the bloom
shape flat to assist with the gluing of this seam.
5. Prepare the interior stem post collar anchor build up
by stacking and joining 5 shapes together,
taking care to align all cut edges as precisely
as possible, paying particular attention to
the interior square opening.
NOTE: it may prove helpful to press the stack
under a heavy flat weight during the glue drying.
6. Prepare the top post anchor shape
by bending the side panels forward, then . . .
. . . position and attach a collar build up stack
centered on the center square.
7. Apply glue to the under/outer side surfacesof the insert, then place it inside the bloom hull,
and move it straight inward until it fits snugly . . .
. . . approx. 5/8" from tips end, and attach in place.
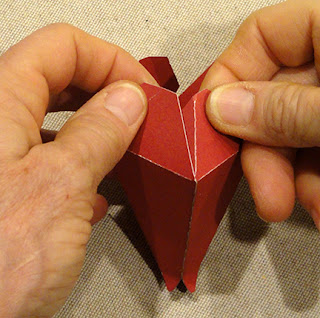
9. Bend the bottom panels inward slightly to bring
the straight edge to overlap the adjacent flange tab
to complete the seam. Complete all four
bottom seams . . .
. . . until the final panel is positioned with
straight edge overlapping, flange tab being
tucked under in one motion.
NOTE: it will be helpful to insert a narrow
"press-against" tool such as the skewer used here
to help join these final two seams.
10. Prepare the four over petals by bending
on the center perforation line only to
where the line ends, also bending on
the other panel and tab perf lines as shown.
11. Add some curl to the tip of the petalabove the end of the center perf line.
12. Bring the bottom angled straight edge
to overlap the adjacent tab perf line
to complete the seam.
Prepare four petals for each bloom.
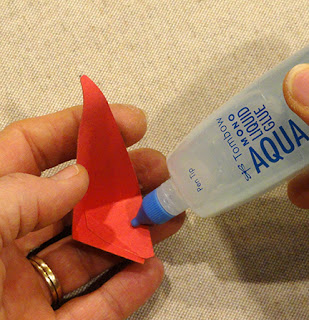
13. Apply adhesive to the underside "cup"
bottom panels of the over petal, then . . .
. . . slide into position onto one corner of the bloom
with the bottom panels fit snugly to the main
bloom shape and the upper portions
less snugly, or slightly away from bloom surface.
At the bottom stem opening, the over petal shapematches up to the hole edges as shown.
14. Continue adding the 3 remaining over petals
which will match up at main bloom shape
side centers as shown here.
15. Prepare the calyx collar shapes by bending
bottom tabs outward, side tabs back.
16. Join a pair of shapes along one edge . . .
. . . then continue adding three more shapes
into the collar unit, then form the assembly
into a ring and complete the fourth seam.
17. Apply glue to the underneath surfacesof entire collar, except leave the tiny tabs
glue free. Fit the collar onto the bottom
of the bloom, with seams along the diagonal
angles, matching up the "tube" with
the bloom opening, and attach in place.
18. Identify the stem tube lengths by noting
that the tall stem has NO symbol cut,
the medium stem has a semi circle notch
near top, and the short stem has a triangle notch.
(Or, when they are all together, just compare lengths.)
19. Prepare the stem length by carefully folding
(valley) on all vertical perforation lines.
20. Form the stem shape into a square tube
using the 3/16" wooden dowel as a press-against
form inside, then lap the straight edge to
the perf line of opposite long tab flange opposite
and glue the seam, moving finger pressure
along the joint to ensure complete attachment,
forcing the edge into position tightly around dowel.
21. At one end, make the dowel even with
the paper cover, then mark the opposite
excess dowel end with pencil.
Remove dowel and cut to length.
22. Re-insert the dowel until 1/2" or so is still
exposed. Apply glue to the exposed end,
also into the empty tube on opposite end.
Slide dowel fully in and apply pressure
to attach at glued ends.
23. Apply glue to the top end, then insert
into the bottom of the bloom,
slide inward, adjust until the post "seats" into
the square recess of the collar cutouts, and
hold in place until securely joined.
24. Prepare the box platform by first joining
the extra side wall panel, if that is how it was
cut due to cutting mat size limitation,
then bending back on all side panel perf lines
and tabs.
25. Position and attach the accent panel
in the center/top panel.
26. Bend the side walls downward to
position, align and attach at corner seams.
Repeat for remaining 3 corner seams.
27. Prepare the underneath reinforcement insert
by bending the side flanges forward,
also bending the stem opening 'X' cut tabs
in the same direction by pushing a rounded point
end tool such as this spatula through until
tabs bend at tiny perf lines.
28. Position the reinforcement into the bottom
of the platform box tray, taking care that
the hole arrangement of both line up,
with flanges extending outward,
then slide into position and adjust . . .
. . . so that flange straight edges align as
exactly as possible with the platform box
side edges. Apply pressure to attach flanges.
29. Prepare the crate side panels by
bending the side flange tabs back.
30. NOTE the heart positioning marks(pencil-traced here for visibility)
on the front and back panels.
31. Prepare the (optional) heart accent
build up shapes by layering and gluing
5 "extra" cut shapes, with the face heart shape
on top. NOTE: use a heavy flat weight
placed on top of the stack during glue drying.
32. Identify the FRONT of the platform by
noting the single stem opening is nearest
the front edge. Position and attach
the crate side panels onto platform side faces,
with bottom edges of each even.
NOTE that the final cut shape has narrower
slat cut openings than this prototype.
33. Bend the side tabs around the platform corners
and glue in place where they overlap platform.
34. Position and attach the front and back
crate panels, lining up bottom cut edges,
also attaching panels to side panel tabs.
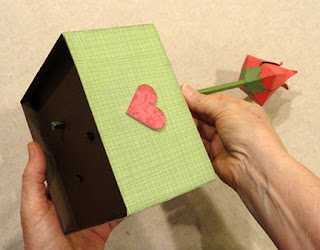
36. Position and attach heart accents ontofront and back panels at guide marks.
37. Insert the bottom stem end through
platform opening, then "fish" around inside
until end also can be pushed through
the corresponding opening in the insert.
Place crate on a flat surface and push
the stem fully down into position with
end resting on flat surface.
38. Apply glue under the tiny platform tabsand glue in place to hold stem.
-OR-
let the snug fit of the platform hold the stem(s)
in place so that it can be dissassembled
for storage.
39. Prepare the leaf shape by bending back along
the center perforation line, also bending back
on the lower side flanges.
Also add some abundant back curl to tip.
40. Position the leaf at the base of stem
above platform level, fitting a side angle of
stem into the center leaf perf line, and
wrapping side flanges around stem faces,
Adjust leaf so that it tips slightly away from
stem (aligning bottom edges at platform level
will assist this), and glue just the bottom 1/4"
margin of leaf to stem.
41. If you wish, it may be possible to adda second leaf to the stem opposite the first:
Cut an extra leaf shape, prepare folds and
add curl, then trim away side flanges,
position and attach on stem side opposite
to the first leaf.
Here is the finished project.
Follow the same construction stems
for the single stem, using slightly different
crate assembly for the smaller project.


