Saturday, December 29, 2012

WINTER Tag Swag

Re-awakening my creativity after 
the hustle and clutter of a passing Christmas, I styled and created 
a paper and ribbon swag with my brand new Cameo from Silhouette
Since it is always a little melancholy to dismantle the holiday decor, 
having something new brings a fresh batch of cheer.

It measures about 36" from "nail to nail", and about 12" at the longest "drop" point.

To request a detailed list of the shapes used, size modifications, 
embellishment suggestions, etc., 
email Jodi at hearthsewnpatterns(at)yahoo(dot)com.


 Here you can see more detail. The WINTER layered tags(in 3 sets) plus "winter" phrase are from Snapdragon Snippets designer Kenzie Daley, as well as the 3d drop ornament "icicles" and jingle bells. Other 3d embellishments include the 3d snowflake at the center (converted by me into a "slice form", front half only), and the pinecone that was recently offered as a free shape from Silhouette America.


Another snowflake design highlights the E tag with its added oval of corrugated brown paper, with fanfold cut paper rosettes giving dimension to the W & T tags. White and silver netting are sewn and gathered into rosettes for N & R. Plastic snowflakes, multiple size circles are glued onto sheer and satin ribbons.


 I couldn't resist adding here a few photos to show more details. Lots of ribbons, surface textures, glitter, and interesting added findings (fancy word for things that I have in my studio waiting to be used). Here you can see the paper rosette, wood bead bauble, and slice-form-ized 3d snowflake.

Ribbon textures add so much: silver bead cord, woven "tape" cord, metalics, twill, shimmer sheers, brown jute. Never can add too much ribbon, do you think?!
 A closeup of the W end shows off the shiny cardstock used to cut the letters, along with a snowflake row that I sized, duplicated, overlapped the arms and then welded into a shape just for this project. A bookmark shape was also drawn and cut to place behind the rosette for a hang-hole and another tassel.

You can also see the jingle bell and pinecone better.


Here you can see the wonderful 3d drop ornament that made me think "icicle" the first time I saw it in the online store. To reinforce that notion, I created my own icicle shapes to hang along side. 

First I glued a miniature wood spindle shape to a round bead, attached a tassel in the bead end hole, and painted. Then I wrapped silver jewelry wire around the spindle, through a drill hole at the top and shaped it into a loop. 


You can see how "new" and interesting my paper and ribbon swag makes my usual "January" decorations seem. 
I love the red & green of the Christmas season. But having this much fun with aqua, milk chocolate & gray makes me want to re-decorate through the entire house!

You may think this a little bit "over the top" with so many details and embellishments. Just scale your own creation back and leave out elements you consider "extra".

Wednesday, December 19, 2012

Stockings to Hang by the Chimney

Just a week 'til Christmas, and I am still finding time to have some paper crafting fun. 
This post is sharing three different stockings with lots of fun details and embellishments.
Cut files for the complete stockings are now (or soon) available as purchased downloads
from SnapDragonSnippets.com, SVG Attic, or Silhouette America, 


All stocking designs have a main base shape, a larger scalloped edge base shape with lacing holes. A template is included so that the back layer can be cut from wool felt. An eyelet hole is punched through layers that corresponds to the hanging "loop" shape which can be folded over and attached. 


The first one is "Teddy & Train". You can find a closeup of the teddy in a later photo in this post. It has the most shapes and the most detail. The locomotive is assembled on a whole base, with details and button embellishments on wheels, etc. Bear tucks into a pocket that has punch holes for optional eyelets, needle holes that align with holes in the next layer base to attach pocket with twine or thick thread like perle cotton.


Here is the second stocking, "Reindeer & Holly". 

Hopefully you can tell that the card stock and printed paper layers are adhered and laced to a backing of cream wool felt. This makes it possible to actually put something inside, though not quite as comfortably as could be done if they were all fabric.


The third is "Cardinal & Christmas Birdhouse".


Here you can see some of the details of the teddy bear. He is made of 5 layers of lightweight card stock so he can be "played with". A short length of chain attaches him to the paper pocket, so he won't get lost.


Saturday, December 15, 2012

Christmas Photo Card 2012


A photo of a recent 3d letter box project becomes the focal point
for a simple Christmas postcard.
Embellishments are Silhouette America cut designs:
flourish star, plus Christmas silhouette set holly leaf (double shape created 
by copying a reversed image, overlapping the ends, then welding)
with a tiny red button berry embellishment.
Narrow sheer ribbon is threaded through cut slits or circle punches.
My greeting and sentiment has been printed onto vellum
and sticky-dot adhered on the backside

Perhaps you have a fun project that can't be tucked into an envelope
that you would like to share as your Christmas card.
This setup may inspire you to prepare your own to send.
And don't limit yourself to Christmas!
What about Happy New Year cards, or Valentine's Day greetings?

Saturday, December 8, 2012

Mrs. Santa's Boot container project

 Here is a fun re-styling of a previous Halloween project using one of Kenzie Daley's 3d designs (Snapdragon Snippets) from Silhouette America. She originally created it as a Witch's Boot, and it was wonderfully inspiring that way. I am always trying to find ways to work Santa's "better half" into the Christmas picture, so I started mentally playing with the idea that the boot could easily be red & green and terrific that way, too.


 Here it is, with customized green front lacing placket and painted green bead lace ends. The ankle opening has fur trim glued at the edge, and the pointy toe holds a paper "3d jingle bell" and holly with berry detail. I made a shiny black heel piece (filled with doll pellets for some added weight), and glittered designs on boot uppers (double sided adhesive paper is so much fun to cut and embellish with).
Here you can see the back and the glitter designs. I also glued red/green stripe narrow ribbon down the center of the fur trimming.

My boot is shown here with Christmas candy, tinsel shreds and green shiny metallic and clear cello paper with "pic'd" candy peppermints, chocolate squares, marshmallow sants, etc., as prepared by a local candy bouquet basket business.

You could fill it with salt water taffy, peppermint swirls, favorite cookies, wrapped chocolates, etc. Or even put it on that prominent office desk edge with a tent sign inviting pocket-change donations from all who pass, to be directed to the local charity drive at Christmas.

Just in case you are thinking about it, this boot was enlarged at 150% to begin with. That is about as large as I can make it and still have it fit on my screen.

Happy holiday crafting, & Merry Christmas to all.

Thursday, December 6, 2012

Reindeer & Wreath Pillow from Cut Stencil

Finished Reindeer pillow
in a Christmas decor ensemble

This simple yet graphic pillow seemed the perfect IDEA to 
coordinate with my other seasonal  "stuffies". 
A vinyl stenciling inspiration was offered recently on the Silhouette blog. 
After seeing that, I was hoping to recreate instead 
the rustic feed sack Pottery Barn look for myself. 
As I searched my Silhouette  library, suddenly it clicked
 that by combining a couple of designs, I could stencil something 
that would be "practically perfect".


Taped-up design, adhesive-sprayed and positioned
Designs I selected are "reindeer" by Snapdragon Snippets and "olive branch wreath" (can't find the designer to give attribution). Text was created with the text tool, then I stencil-ized the words by erasing parts. 


Next, I manipulated the designs on my Studio screen by enlarging, reversing the image, rearranging, etc. Since I am still working on the smaller mat Silhouette-1 machine, I could NOT assemble the complete layout on-screen. 


Also,  I could only cut part of the wreath design in the scale I wanted to fit around the reindeer. So instead of cutting a vinyl stencil, I cut card stock parts, played around with the "cutouts" until I got the arrangement I wanted, then laid the stencil "negative" areas back over the cutouts and taped them together well. I sprayed adhesive on the backside, then positioned and "rolled" it well to make sure all edges were sealed down. I also masked off the entire piece of fabric so that there would be no over-spray paint where it wasn't wanted.


Next I sprayed with acrylic brown paint. Because I want the "worn" look, I used light but even coverage.

(You may notice that I used a small cut circle, temp-glued in place for the reindeer eye.)


When the paint was dry, I peeled away the stencil. Being a card stock stencil, it was still in great shape and I used it to stencil more pillow fronts. This is something that a stencil cut from vinyl can't accomplish very well.


Here is the completed pillow front (though in this shot, I have not yet removed the eye "dot").


And finally, the finished pillow, with added red flange edge accent.

Tuesday, December 4, 2012

'NoeL" 3d Letter Box Ensemble


Here is another 3d Letter Box project. 
This one is for Christmas, with a religious theme and more elegant, vintage color scheme. Besides the Letter Boxes from Snapdragon Snippets with Silhouette America, the display is embellished with 3d angel, flourished star, 3d star ornament, 3d jingle bells, and 3d manger. The lower case 'e' was not available when this project was envisioned, so I modified the 'O' shape on the grid design mat, then drafted a custom "bridge" piece. 
If you decide you want to try this project, I will send you the bridge and modified 'e' fronts. 
A details list page is also available, both by emailing a request to Jodi at hearthsewnpatterns@yahoo.com . 


A tutorial for creating the 'e' is also available on this blog.


Here is a closeup of the Angel (and the holly cluster) that I changed and embellished. The original paper halo and wings were trimmed away, substituted with paper pleated rosette and shaped jute string loops. 


The Baby Jesus is a piece of dowel with wooden bead, painted and burlap-wrapped.


This is a closeup of the jingle bell balls representing the "umlaute" which is the name of the two dots that go above the 'e' in 'Noel'. Those silly little dots are intended to help us know that there is a distinctive pronunciation between the 'o' and 'eh' vowel sounds.

(Did you know those dots were called "umlaute"?)


Hope you have fun with this project. 
Or perhaps you've seen something that'll give you inspiration for your own creative fun. 

Please watch for more 3d letter box ensemble projects in the coming months.
Already in the planning stages are: SNOW, LOVE, LUCKY, SPRING, USA.
And I'm just getting started!

(If you have a great idea, and would like me to develop it into a project,
send me an email, or make a comment on this blog.)

NoeL Project Tutorial: 'e' from 'o' cut file


If you're hoping to construct the NoeL 3d Letter Box Ensemble, this tutorial will help with the customized 'e'. For other tutorials on the boxes construction, visit 3under3andmore.

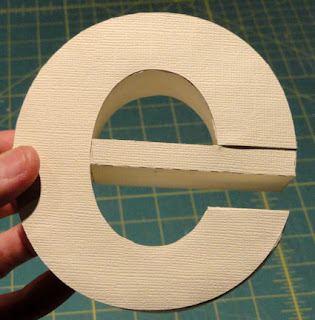
Here is the finished letter box. 
It begins life as 'O'. 

OVERVIEW of the construction steps:
1. Boxing sections are cut as they appear in the original file, then extra length trimmed away. 
2. A LID and a BASE are each created, then base inserted behind lid and glued. 
3. A custom bridge box (created by Jodi) is glued into place.


STEP 1. Cut the letter O Lid & Base face and boxing shapes as usual, enlarged to 125%. (The hand-written instructions indicate a different ratio of "135%"). 

Use the modified O shape (now it looks like 'C') from the attachment obtained by emailing Jodi at hearthsewnpatterns@yahoo.com 
to mark the LID shape. 


STEP 2. Rotary cut or scissor cut the new shape. 

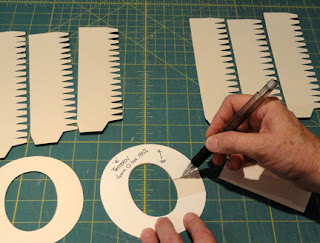
Also in this image you can see the shapes required for the O or new 'e'. There is a LID face shape (being trimmed), a BASE O shape (under the cutting template shape), 
3 BASE boxing strips and 3 LID boxing shapes. The boxing strips have cut "notations" to show which 2 ends will join together for the outer curve. Inner curve requires only one strip alone.

Trim LID boxing strips to 1 1/2" wide and BASE boxing strips to 1 3/8" wide.


STEP 3. Use the newly cut LID shape, layered on top of the BASE 'O' shape to cut  the new BASE shape. Trim the upper and lower cut edges 1/16" shorter so BASE will fit into LID.


STEP 4. Bend the flanges back into position as they will be used to glue to LID or BASE face backside surfaces.

Curl the boxing shapes into roughly the curves that will be needed. This imitates the curling of ribbon, only use the roundness of a forefinger as the strip is drawn slowly and gently, but with enough pressure to create the curve.

Outer boxing strips curl as shown.
Inner boxing strips curl opposite, with flanges extending upward.


 STEP 5. Identify the inner curve boxing strip. Glue flanges to backside of inner edge of face shape, beginning at one short cut edge. Apply glue to only 2-3 notches at a time, shape and position fold edge at face edge and hold in place until dry. Continue around until entire inner edge is glued in place. Carefully trim away excess boxing, taking care that cut is PERPENDICULAR and squared up.
STEP 6. Follow the same process for the LID outer curve edge. Glue in place one boxing section. When it is secure, join the other box strip end by under-lapping the flange, then continue attaching. As with inner edge, trim excess boxing strip even with face shape cut edge, taking care to make perpendicular squared cut.


 STEP 7. Fold and glue the lower "end" piece into place.
STEP 8. Repeat the boxing construction process for the BASE shapes. 

When completed, insert the BASE into the LID shape. Glue to secure (use hot glue, if necessary). 


STEP 9. Fold the provided custom "bridge" box into its rectangular, thin form. Only one side has a boxing tab. Glue both ends.

NOTE that there is a top layer boxing tab on the right end and an upper right extending tab. Fold the side tab into position and glue.

DO NOT bend the tabs over; they need to remain extended upward to fit into the 'e' opening.


STEP 10. Apply glue to the tab extensions.


STEP 11. Slide the tabs into place under the front and side edges respectively until it is as far as it can go. Bridge's horizontal top edge should be snug against straight cut edge of LID face. Hold securely until glue is dried.

Also note how the opposite short end of the bridge is now flush with the inside curve of the LID boxing.


STEP 12. Flex the bridge slightly to expose the inside edge. Apply hot glue carefully, then un-flex and reposition.

Make SURE that the LID face and BRIDGE face edges present a flat and continuous surface on the front, and that the bridge is parallel across the opening. Hold until glue cools.

Take care not to apply too much glue causing it to show to the front of the letter in an unsightly manner.


FINISHED!
And here it is, shown again, ready to decorate and fit into the ensemble!


Saturday, November 24, 2012

'JOY' 3d Letter Box Ensemble Project

Presenting a jolly bunch of Silhouette papercraft designs 
that are combining to wish you a Merry Christmas! 


The main players are enlarged 3d letter boxes from Snapdragon Snippets and designer Kenzie Daley. (You may note that I "created" a different 'J' than Kenzie's so that I would have a base "stage" for the slice form Christmas tree. My 'J' began life as 'U'.) 


Other elements include the 3d star, intricate Christmas wreath sized to fit the 'O', plus berry buttons, 3d box with 3d bow, 3d star ornaments that are sized small and end-glued to 
bring to mind fairy light bulbs. The elf hat is stitched from fabric with a wool felt pointy brim.


Following you will find a brief tutorial for modifying the 'U' unto the 'J'.


If you would like to receive details about which design files were used along with the size modifications I used, email me with that request: hearthsewnpatterns(at)yahoo(dot)com.


TUTORIAL

This image shows the original U cutout enlarged at the prescribed 200%.
In red is the 'J' that has the left arm trimmed 4 1/2" shorter.


Modifying the J shapes for Lid and Base by marking, cutting
1. Cut the full 'U' Lid and Base shapes. 
2. Use a measuring tool to mark the trimming position on the arm to be modified. Make sure trim line is perpendicular to upright edges. Also make sure that BASE is  reversed from LID.
3. Use rotary cutting tools or scissors to trim to size..

Modify the J shapes for Lid and Base by adjusting points
1. Open the 3d letter box 'U'.
2. Select and ungroup all shapes. (This may require two 'ungroup' steps.)
3. Delete all accent shapes. 
4. Move all parts away from design canvas.
5. Select 'grid tool', select 'show grid' and 'snap to' boxes. 

6. Move 'J' shape onto canvas in upright position with the LEFT vertical boundary line of the left "arm" and the top straight edge ON a grid lines. Zoom in to see better.
7. Select the 'J' shape, then click until the Edit Points mode appears.
8. Use the pointer tool to select the upper left arm corner point.

9. While selected, pull/drag it downward to re-position it 4 1/2" shorter; you will also need to remove an extra point. Release point.
(Use the grid to determine this position. As the change is made, the shape will distort as shown below.)


10. Repeat step 6A, except place the right line of the left "arm" on a grid line.


11. Repeat steps 7 through 9 to grab, drag the upper right corner point down
to the 4 1/2" shorter position. Save your work.

Cut-out shapes for Lid
MODIFYING THE BOXING SHAPES FOR THE NEW 'J'
You can easily identify the 'J' LID shape and the two small boxing ENDS.
Boxing OUTER EDGE (to be glued to right edge) will be cut out in two pieces, upper shape without notches for the curve, and the lower shape with the notch cutout "teeth".
Boxing INNER EDGE (to be glued to the left edge) already includes un-notched portion.

When enlarged at 200%, the boxing side strips will be too long to fit on the cutting area. Modify these either by changing the design file, or by strategic positioning 
on the mat when preparing to cut.

UNDERSTANDING THE SHAPES
A. For both the INNER and OUTER edges, the plain section without the tab "teeth" that correspond to the eliminated part of the left "arm" can be eliminated as well.
B. For the INNER EDGE piece, the plain section at top remains in place as part of boxing shape.
C. For the OUTER EDGE piece, the plain section at top must be cut separately, then joined. 
D. Make sure you can identify the design file shapes that appear on the screen. The INNER EDGE boxing piece is the shorter of the two.


CHOICE 1: STRATEGIC POSITIONING WHEN CUTTING

A. Arrange the long boxing shapes to be able to cut the pieces needed. When the cutting operation is complete, carefully remove the incompletely cut shape from cutting mat, then cut straight end edges needed using rotary tools or a traced line and scissors.
B. When boxing plain and "teeth" sections need to be joined, allow length on one piece to act as a tab to over- or under-lap and glue in place. (Perforations are not needed.)
C. Rotate and position INNER edge so that the shape remains on the mat to be cut, with the unneeded portion off the mat. INNER strip will be cut as shown in one section.

D. Rotate and position OUTER edge to cut the center "teeth" section.


E. Re-position OUTER edge to cut just the upper "plain" section. NOTE that OUTER boxing will be cut as 2 sections that will need to be glue-joined.


CHOICE 2: MODIFYING THE DESIGN FILE
Prepare the Inner Edge Boxing
Step 1. Drag a box around the Inner boxing to select it and un-group.
Step 2. Double click to make the design point squares appear.
Step 3. Point and drag the left end corner point inward to align opposite the last "tooth" of the tab cutouts. Release.


Step 4. Point and drag the other left end points inward to create the remainder of this new cutting edge. You may need to eliminate a couple of the extra points and some of the perforation line segments that are left hanging in space.
Step 5. Once the desired new shape is achieved, drag a box around everything to re-group and SAVE the changes. Use the text tool to identify this shape as the Inner Edge Boxing.

Prepare the Outer Edge Boxing
Step 1. Drag a box around the Outer boxing to select it. Copy one shape. Designate original as the lower portion and the copy as the upper portion.
Step 2. Drag a box around each to un-group. 


Step 3. Repeat Steps 2-5 of the original, selecting and moving or eliminating the points at both ends so just the "teeth" portion remains. Identify this shape as Outer Edge Boxing 1.
Step 4. Refer to the screen shot above step E, then repeat Steps 2-5 on the copy, selecting and moving or eliminating the points at one end so that just the upper end "plain" section remains. Identify this shape as the Outer Edge Boxing 2.


While you are at it. . .The 'JOY' Ensemble project requires a 1/4" hole (or custom-cut to your stem wire size) punched or cut in the center of the upper end boxing piece. As you are re-designing the pieces on screen, you can use the 'draw a circle' tool to add one to both Lid and Base pieces in corresponding position.


Base Modifications
Follow the preparation method selected previously to repeat the process for the Base J boxing sections.
This image shows the shapes for the J Base.
Note that they are reversed from the Lid layout, with the INNER edge boxing now shown on the right, and the OUTER edge boxing now shown on the left.

CONTINUE THE CONSTRUCTION PROCESS
With the enlargement, the tabs sections of the boxing pieces are too long. Trim them by scissors or rotary cutter to 1/2" beyond the perforations, as shown.


JOINING THE BOXING TO FRONT & BACK: TRIMMING TO LENGTH
Follow the prescribed process (demonstrated in tutorials at www.3under3andmore.blogspot.com ) to join the inner, then outer, then end pieces. Trim away excess notched tab portions of boxing even with the newly-cut edge. Use ruler or other tool to make sure this cut is perpendicular.

'JOY ENSEMBLE' DETAIL: Elf Hat Brim template shape
You can prepare your own pattern and cut it as a template to trace by drawing
on the Studio page with the "show grid" and "snap to" grid features ON.
Study this screen shot for spacing, then re-create it yourself.


Hope this has been helpful and empowering!