Showing posts with label Christmas. Show all posts

Wednesday, August 4, 2021

Tag Tree Cross Stitch

Layered combo tag features simple triangle tree with 
reinforced cross stitching panel, front window cutout, 
solid back panels which are assembled then mounted 
on a classic rectangle tag. 
Stick tree “stripes” stitching panel can be modified as desired 
(see Card Kit A6 Christmas Trees Cross Stitch 
separate design for one option). 
Measures approx. 2.625” wide (bottom of tree) 
x 4” (tag) when assembled. 

ASSEMBLY: 1. Identify and cut the shapes:
A tree stitching shapes with stitching holes (2)
B stitching buffer layer
C tree front frame layer
D tree back solid layer
E tag (2 for front and back)
F header accent shape (2)
G reinforcement oval ring (2)
2. Prepare the stitching shapes by poking through holes
to make sure any "crumbs" detach and can be
brushed away and removed. Easiest tool may be
a bent-open standard paperclip.
3. Layer and attach the stitching shapes, taking care
that all outer cut edges and stitching holes are
as precisely aligned as possible.
Once the stitching shapes are glued together,
place on a flat surface and press flat with a heavy,
flat weight such as a thick book, until thoroughly
dried, several hours or over night.
4. Assemble the supplies and tools for the embroidery
cross stitch, including red and ivory/cream 6-ply floss,
tapestry needle 24/26 size.
5. Cut a 36-40 inch length of floss, then separate
two single plies from the cut length.
6. Place the two plies together, then bend in half
to bring the four cut ends together, taking care
to even out the center loop where folded.

Thread the loops through the eye of the needle, then . . .
. . . pull the loop long, to leave 4-5" of the cut tails
beyond the needle eye. The loop is the long end.
7. Refer to the stitching diagram, either on screen
of from a printed copy, to identify the left end of
the bottom row, where the first set of four "corner"
holes will hold the first cross stitch of that row,
on diagram and on stitching shape.
8. Study the following diagram to learn how the cross stitches
are formed with a row of LEFT SLANT stitches across
the row, followed by the RIGHT SLANT stitches
coming back across the row. Always create the stitches
in the same fashion, to give the work a consistent
appearance. This may require changing the order
or placement of the numbered insertions.

9.  (NOTE the following few images are showing cream floss from
a different, similar project.)
 A) Insert the loaded needle UP from backside through
the top left of the four bottom left set of stitch holes.
B) Pull the the thread through, leaving approx. 5-6 inches
of the loop end still beyond the stitching surface.
C) Create the first RIGHT SLANT stitch by inserting
 the needle down through right bottom hole of the first
four of the first stitch set, then . . . 
. . . on the backside, insert the needle through
the loop and . . . 
. . . pull up tight.
10. Continue to create the RIGHT SLANT stitches
working across the row.
When the stitching reaches the location of
the "trunk" pair of vertical stitches, pause 
the horizontal stitching to move downward
to complete the two trunk cross stitches.
Then continue up to the bottom row and work
the remaining stitches across
11. Complete the "red" alternate row stitching
plus the trunk up the center of the tree.
12. When the current thread load is used up,
or when stitching needs to be ended, move needle
through to the backside, insert needle under 3-4
stitch loops,  push/pull needle through . . .
. . . and pull thread fully through. Trim thread excess
even with backside shape surface.
13. Tie on the contrast (cream) 4 ply needle load
and stitch the alternate rows bottom to top. 
14. Position and attach the buffer cut out shape
on the backside of the stitched panel.
(This shape provides a place for the thread thickness
to lie without distorting the tree edges too much.)
15. Position and attach the stitched assembly on the front
of the offset accent tree shape.
16. Position and attach the whole back shape.
17. Prepare the tag base layers by positioning
and attaching the header accent shapes at the top
of front and back tag. Also position and attach
the slot oval "ring" reinforcement shapes
onto front and back.
18. Place the front and back tag base assembly back-to-back
and glue together.
19. Position and attach the stitched tree assembly
onto the front of the tag.
20. Add one or two lengths of ribbon,
threaded through slot, tied with twine
to finish tag.

Saturday, June 29, 2019

Stick 3D Star Decoration

Five dimensional, flat-bottom “stick” posts interconnect 
with end “tab” punch holes aligning to form 
a traditional pentagram star decoration 
to stand on a shelf or hang from nail or peg. 
Add your own decorative touches, including 
adhesive enamel dots at end tabs, 
twine wraps at intersections, purchased berry sprigs, 
ribbon and flowers. 
Measures approx. 10.8” wide x 10.37” tall. 

ASSEMBLY: 1. Identify and cut the shapes:
A stick "post" shapes (2)
B long half-length strut inserts for A (4)
C stick "post" shape (1)
D short strut insert for C (1)
E long half-length strut inserts for C (1)
F stick "post" shapes (2)
G short strut inserts for F (4)
2. Prepare the A sticks by bending back carefully on 
each of the long perforation lines and crease . . . 
. . . including the narrow margin lines toward
the center of the series of perforation lines.
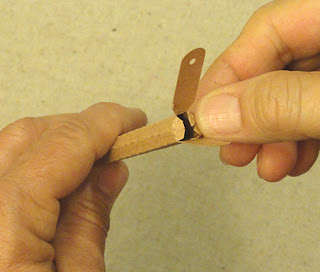
3. TABS at ends need special care:
the BOTTOM tab indicated in the following image
 is not bent (no perforations), whereas . . . 
. . . the TOP tab is bent back at the inward perforation
and forward at the outward perforation.
4. Form the post shape into a tube to overlap
the side cut edge over the opposite long flange tab
to perforation line, and glue in place.
Take care that the tube does not twist during
this process.
NOTE: it may be helpful to use a wooden dowel
of approx. 5/16" diam. inserted inside tube as it is
formed to provide a "press against" surface
to help join the seam.
5. Prepare 2 long struts for each A stick "post"
by bending forward on the outer perforation lines, 
then alternate bending direction toward center
from each side, forming a 'W' configuration . . . 

. . . as shown in this diagram.


6. Compress the folds accordion fashion, and . . . 
. . . press and crease all along the length of strut.
7. Apply adhesive in the valleys between the narrow
folds, then repeat the pressing shown
in the preceding frame, applying pressure
until the glue is cured and the creases are secured.
(NOTE use this process for ALL strut lengths.)
8. Once dried, open up the strut so that it is
in this configuration, with two short "arms" at top,
and two longer "arms" toward side bottom.
9. Carefully insert the "long" half-strut into one end
of the post tube, with short "arm" extensions fitting
up into the top bends of the tube opening, with
the bottom two "arm" extensions fitting into
the bottom/base side angles.
10. Repeat the insertion of the other long strut
into the opposite end of tube in similar fashion.
11. With the struts pushed fully in from each end,
bend the mini side tabs in toward center at
a right angle . . . 
. . . apply glue to mini tabs, then . . . 
. . . apply glue to the underside of the upper tab, and . . . 
. . . bend the upper tab into position . . . 
. . . to attach to mini tabs underneath post opening,
adjusting so that walls and perforations line up
attractively, and align tab edges and punch holes.
Apply pressure to the tabs until secure.
Repeat for both post ends.
12. Repeat steps 2-4 to crease and prepare the post
stick shapes for C and F posts which each have . . .
. . . one or more "tunnels" to allow interlocking of sticks.
Form the post shapes as for A sticks,
taking care at "tunnel" areas to overlap
and join the wall straight edge with flange tab.
13. Prepare the various length struts for each
stick tube as described in steps 5-8.
14. Insert the appropriate length strut into
the tubes so that struts will fill the tube but not
interfere with the tunnel openings.
15. For the F sticks, insert the short center strut
from one tube end, then . . .
. . .use a dowel or pencil to
push the strut past the first tunnel to rest in
the center of the tube. Then insert the end strut.
 Bend mini tabs, upper end tab and glue in place
as previously described for A stick.
16. Prepare the sticks with tunnels by bending
the mini tabs inward with a blade style tool
such as this spatula.
Here are the five stick posts completed.
16. Lay out the specific posts in this
pentagram configuration to become accustomed
to the way they will fit together.
17. There is more than one correct way to assembly
the star. Begin inserting the sticks through the openings
of the sticks they may overlap in the preliminary layout . . . 
. . . such as inserting left end of B through C
as shown here, then . . . 
. . . repeating to insert A through the other tunnel
and also through the lower tunnel of the other C.
Continue inserting A through C and B until . . . 
. . . all sticks are in place.
18. It may be helpful to use a temporary tape
such as this masking tape to align and hold end tabs
together. Then remove tape on one end connection,
apply glue to join the flat tabs together, overlapping
ends and lining up punch holes as accurately as possible.
Here is the completed star structure.
19. If desired, use decorative twine, such as
Red/Cream color from TrendyTwine shown here,
to wrap 3-4 times around the short direction of
each intersection, then 3-4 times around long
direction (invisibly tie off or glue clipped ends on back).
This will help conceal the tunnel openings.
Add decorations and accents as desired.