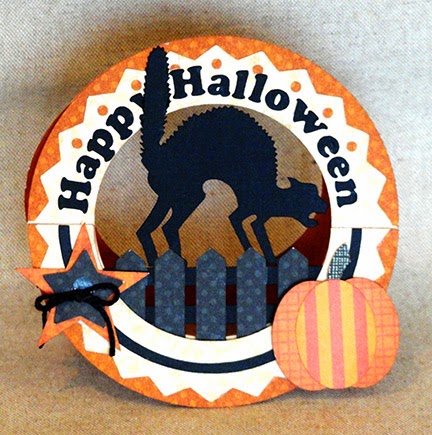
Make Halloween rock with this special dimensional card
with curved bottom so it tips from side to side.
Back and front whole rings support and allow card to stand,
with middle cat on fence layer,
and half-circle front layers with pumpkin and star button add-ons.
Measures approx. 5x5 inches.
Sophisticated appearance is surprisingly easy.
ASSEMBLY:
 1. Identify and cut the shapes.
Three grouping "columns" shown here correspond to the back (left), middle, and front layerings of the finished card.
Review the assembly guide to answer questions about which shapes are used in which positions, if needed.
2. Pre-assemble the layers.
Here, the shadow base shape for the lettering (cut to match the shape it will attach to and thus be somewhat invisible) is used to position the letters.
Shown here, the back whole ring has it's sawtooth decor shape aligned and attached with lower round edge lined up, phrase centered and attached above.
Middle layer will consist of the fence/cat and pickets, which are layered and joined.
Front layer will consist of the half circle base shape (orange in this model), with sawtooth decor shape and narrow semi-circle strip. Small star is attached over larger star button, with punch holes lined up. For more dimension, add clear dimensional tabs to star layers, and behind. (Pumpkin center and base shape with tiny stem are also layered, and attached in place with dimensional tabs, later in the assembly process.)
3. Position the middle layer assembly over the back assembly, taking care to align and center.
Add dimensional tabs behind the rail ends, pickets middle and lower.
(I found out later and removed the higher center picket tab, because there is nothing behind it when positioned over the back!)
Also add dimensional tabs behind the front layer base shape as shown here.

4. Position, center and attach the front layer, and also attach the star buttons (threaded with twine or perle cotton, etc., if desired), and pumpkin at this point.
5. Prepare the back "stand" ring shape by bending the upper section back slightly. This portion will attach behind the top of the card assembly whole ring (back layer). Apply adhesive to the portion above the perf line.
6. Position and center on the backside of the card assembly, then apply pressure to attach.
7. Stand your finished creation up, then give it a nudge and watch it rock!
 1. Identify and cut the shapes.
Three grouping "columns" shown here correspond to the back (left), middle, and front layerings of the finished card.
Review the assembly guide to answer questions about which shapes are used in which positions, if needed.
2. Pre-assemble the layers.
Here, the shadow base shape for the lettering (cut to match the shape it will attach to and thus be somewhat invisible) is used to position the letters.
Shown here, the back whole ring has it's sawtooth decor shape aligned and attached with lower round edge lined up, phrase centered and attached above.
Middle layer will consist of the fence/cat and pickets, which are layered and joined.
Front layer will consist of the half circle base shape (orange in this model), with sawtooth decor shape and narrow semi-circle strip. Small star is attached over larger star button, with punch holes lined up. For more dimension, add clear dimensional tabs to star layers, and behind. (Pumpkin center and base shape with tiny stem are also layered, and attached in place with dimensional tabs, later in the assembly process.)
3. Position the middle layer assembly over the back assembly, taking care to align and center.
Add dimensional tabs behind the rail ends, pickets middle and lower.
(I found out later and removed the higher center picket tab, because there is nothing behind it when positioned over the back!)
Also add dimensional tabs behind the front layer base shape as shown here.

4. Position, center and attach the front layer, and also attach the star buttons (threaded with twine or perle cotton, etc., if desired), and pumpkin at this point.
5. Prepare the back "stand" ring shape by bending the upper section back slightly. This portion will attach behind the top of the card assembly whole ring (back layer). Apply adhesive to the portion above the perf line.
6. Position and center on the backside of the card assembly, then apply pressure to attach.
7. Stand your finished creation up, then give it a nudge and watch it rock!


Very fun, Jodi! I’m going to try one of these!
ReplyDelete