into a thick stack so it appears as a painted laser
wood
or iron cut out. Construct the “plank” box lid,
then add built-up bottom
platform for thickness and weight
to add to base.
Square tube “posts” extend
from plank to attach
to backside of word letters.
Word display measures approx.
11.7” long (word)
x 2.5” deep (plank) x 6” tall.
(Requires 12x12 cutting capacity and 4-5 sheets
of cardstock plus accent paper.)
NOTE: This project is one of several "Word on Post and Plank"
display pieces. For America Word, only the placement
of the detached heart "dot" for the 'i' needs differing explanation,
along with the positioning of the glued-up word onto posts.
Please refer to assembly guide steps for
"Thanksgiving" which are essentially identical
for those needed for this project.
ASSEMBLY: 1. Identify and cut the shapes:
A America word cut out - *separate heart sample selection (7)
B separate heart layers (2 solid; 5 with pin slot)
C plank lid with accent rectangles overlaid
D plank base E collar reinforcements (2 sets of 4-5 ea.)
F base layers for thickness (4)
G post (2)
H interior strut interlocking strip (down slot sections)
I interior strut interlocking strip (up slot sections)
to help with orientation of the plank and post alignment.
Base includes the 'B' cut, which should be at the left
end when America is in normal, readable position
assembly completion.
Lid includes tiny arrow head in tab, which should be
in position shown (left front) at assembly completion.
*NOTE that there are 2 options for cutting and
assembling the 'America' word cut out: one with separate
tiny heart which is pinned in place;
one with tiny heart attached -- or welded in place.
The sample shown here has separate heart.
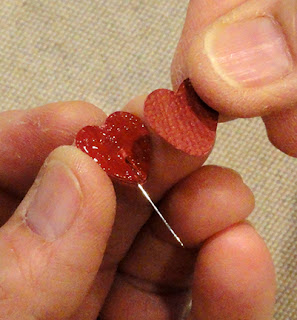
3. A) Prepare the separate heart by layering and gluing
together a plain heart for the backside,
with 5 slot hearts on top
(retain the final plain heart for the face).
B) Cut off the head of a regular sewing straight pin,
add a dab of quick-grab glue such as Fabri-Tack
to pin top tip, then position into the slot and push up
fully into place.
C) Position the final front plain heart over the top
and glue in place to enclose the pin shaft.
4. Later, when the word cut layers have been fully
assembled and allowed to fully dry, use a thicker shaft
pin such as a 'T' pin shown to poke a tunnel into
the top of the 'i' top thickness, then . . .
. . .insert and glue the heart pin in place.
5. Click on the LINK to view and complete assembly
steps 2-19 from that project which are identical to
those for this project. Then review Step 20 and
refer to this positioning of the posts behind
the lead cap 'A' and the near-end 'c',
and complete the project.


No comments:
Post a Comment