Showing posts with label Christmas star ornament. Show all posts

Sunday, December 1, 2019

Star 3D Box Ornament with Patchwork Accents

Multiple crease lines of the single piece hull 
create this shaped ornament.
Assembly includes folding in half, overlapping 
half diamond “flanges” and “puffing” out 
to form its dimensional shape. Fill with gift contents 
through unattached bottom angle edge, 
then close with a tab inserted into slot. 
Top point has circle cutout to insert 
a knotted ribbon hanging loop. 
Add mixed or matched geometric “patch” shapes 
on front and back as accents. 
Measures approx. 4.75” tall x 4.5” wide x 
1.5” deep when assembled, puffed and closed. 

ASSEMBLY: 
1. Identify and cut the shapes: 
A main star box hull
B patchwork accent shapes, 2 sets (pentagon - 1;
star points - 5)
2. Prepare the main hull shape by bending forward
 (valley folds) on the perforation lines marked in RED 
in this diagram, and back (mountain folds) on 
all other perforations.


One good way to do this is to place the shape
face side down on the work surface then fold
the edges where the full diamond side panels are,
(shown shaded in the diagram above) . . .
. . . also folding back on the center seam.
Next, bend on the short perf lines within 
the side diamonds.
Finally, bend on all the star point lines and . . .
. . . around the center pentagon.
Here is the completed hull with bending completed.
3. Locate and be familiar with the closure tab, and . . .
. . . slot opposite, and . . .
. . . where the top center hole cut out is.
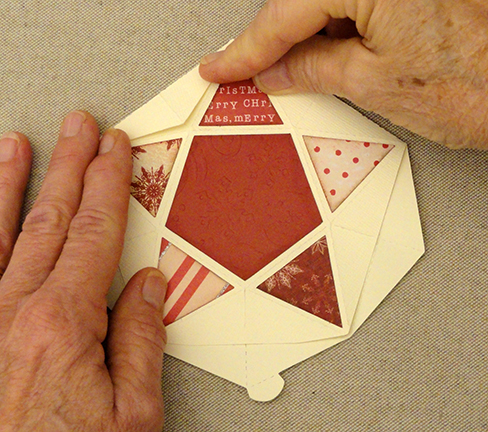
4. Position and attach the accent "patchwork"
shapes onto the face of the hull for both front
and back. 
5. Fold the hull in half on the center perforation,
then fold the side diamond center line . . .
. . . so that it wraps over the back edge,
and glue the half diamond "tab" in place.
Repeat for the other two half diamond tabs.
 6. Puff the star box open by inserting a finger
inside through the un-attached half diamond tab,
and "pop" the side diamond shape inward.
7. Repeat this for all of the sides, including . . .
. . . the side where the closure tab is located.
8. To close the box, bend the tab back
and insert it into the slot.
Open up the box to continue . . . 
. . . to finish the ornament with a ribbon loop.
9. Prepare a ribbon loop with ends knotted together.
10. Prepare a "threading loop" tool of doubled
floral style wire as shown.
11. Hook the wire threader around the ribbon loop  . .
. . . then insert the end of wire threader into the box
hull, across, and out the top circle opening.
Carefully pull the ribbon loop through the top
opening until . . .
. . . it is stopped by the knot at ends.
Glue in place if desired.
Here is the completed ornament with the ribbon hanger.
If additional embellishment is desired,
consider using this 2D Cedar Mini Sprig
that is shown in a different project tutorial with

Friday, November 18, 2016

Penn Folded Star Ornament

Traditional paper folding eight-pointed star, 
this version with four "front-only" peaks
due to strip length restrictions of letter size stock. 
Measures approx. 3.5" wide. 
Attach center square to back to provide 
a ribbon hole hanger with added 10mm wood bead. 
Add offset "label" to back to personalize 
as a gift ornament. 
For a front & back dimensional star, 
prepare a second star and glue back to back 
with hanger in between. 
Use copy weight paper (as opposed to card stock)
or other "soft" and flexible medium, and since
this style paper often is available only
as letter size, strips must be joined
before beginning.
This model uses hand-made paper.

The illustrations and explanations which follow
will assist in preparing strips and folding
to form the star.
Another excellent tutorial with line drawing
illustrations can be found at
http://www.origami-resource-center.com/german-star.html .
Step numbering in this blog roughly follows
the same steps numbering thru step 18.
Follow steps 2-18 only, then return
to this tutorial for tag and ribbon finishing.

FOLDING & ASSEMBLY:
A. Identify and cut the shapes:
(4) long strips A-D
(4) short strips a-d
E back hang tag
Not shown: optional message "label"
NOTE: slightly more than ONE star's
strips can be cut from an 8.5x11 sheet.
1. Bend short strip end tabs back, then position
and attach straight end of a long strip over
the tab. Join 4 strips pairs, then fold in half
at perforation, short strip on the bottom.
2. Weave together the four strips as shown,
so that strip B ends are both inserted between
A layers, C between B layers, A between D layers,
and D ends inserted between C layers.
Adjust all strips so that they are tightened
to form a central square,
and the "hole" at center is eliminated.
 3. Form a second square by bending 
strip A down . . .
. . . strip B to the right . . .
. . . strip C upward, and strip D to the left.
As final step, weave strip D under strip A.
4. Rotate so that strip A is at top right position.
Bend A behind and to the right at a 45 degree
angle that slants as tightly as possible
next to the top of strip B, and make crisp crease.
5. Bend the same strip downward at a
45 degree angle exactly next to the top of
angled fold in step 4, and make crisp crease.
6. Fold the strip so that it lies
on top of itself.
7. It should look like this.
8. Hold the stacked points in position,
then insert the tip of strip under the top strip . . .
 . . . and carefully pull through until the strip
is flat.
9. Rotate the assembly one-quarter turn right,
and begin the point folding process as shown,
then follow steps 4-8 for this strip to
create point 2.
Rotate and repeat for points 3, and . . .
 . . . for point 4. At the end of point 4 preparation,
it will be necessary to move strip A out of the way
in order to see the place under which the final strip
will be inserted.
10. Flip the assembly over . . .
 . . . into this position.
 11. Repeat steps 4-9 to create a
second set of points.
The final strip for point #8 will be tucked
under to complete a star that has 8 points,
some of which are hidden under front strips.
12. To prepare to create the front peaks,
lift strip A upward and out of the way.
13. Bend strip B down and crease (each in turn), 
followed by strip C left, and strip D upward.
 14. Bend strip A fully to the right, and crease.
15. Fold the top right strip to the right
and fold at a 45 degree angle; crease.
 16. Bend the same strip around and upward,
taking care that the same face or side of
the strip remains outward (not flipped) during
the process . . .
. . . then insert the tip under the adjacent strip . . .
. . . and continue to slide it through.
You will see that it comes out between the
star points on the opposite side.
(The top layer strip is shown bended upward
out of the way in this frame and the next.)
 Carefully continue pulling the strip end through
(shown here using tweezers to assist if necessary)
until the excess is pulled through and a peak
is formed.
17. Rotate the assembly to continue to fold . . .
 . . . curl around to insert tip . . . 
. . . and create peaks as in steps 15 & 16.
18. Create four front peaks as shown here
(strip ends still in place.)
This is the side view of the assembly to this point,
showing ONLY front peaks.
19. Trim away excess tails even with the inward 
fold edge of the points.
This is the completed star.
20. Prepare the hang tag by bending
the top portion tab back,
and gluing in place.
21. Trim away excess back strip ends
or glue in place.
22. Position and attach the tag,
centered on the backside of the star.
Positioned properly, the hang loop will extend
 above the valley of the "top" points.
23. Loop a length of silk or silk-like ribbon
through hang hole, then insert ends
through ribbon loop and tighten up.
A 12" length is what was used for the sample.
Longer length will be required for end bow.
 Optional: slide a 10mm wood bead onto the
ribbon ends and slide down as far as possible
before tying ends in knot.
 Here is the completed ornament.