
Shaped containers for Easter or other goodies giving in two sizes:
large (above) measures approx. 4.25" wide x 2.875" deep x 6" tall;
small (below) 3.5" wide x 2.375" deep x 4.75" tall.

In separate cut files, create dimensional basket with specialized
insert to hold a chocolate Lindt foil-wrapped bunny in place.
Small basket holds 1.7 oz. size and large basket holds 3.5 oz.

Accent panels for basket sides give decorating
options.
Handles are held together with ribbon tie.
Tutorial assembly steps will be shown
for both sizes.
ASSEMBLY: 1. Identify and cut the shapes
for the size basket you are constructing.
Small Basket
A main basket shape
B accent shapes for all side segments
C front decor blossoms
D insert (this one holds the small choc bunny)
NOT SHOWN: leaf accent shape
 Large Basket
E & F main basket and side addition panel
G side accent panels for all side segments
H handles (cut 2 pair for strength)
I-L grass accent layers
M flower accent
N plaque accent & word cut
O insert (this one is for large choc bunny)
 SMALL BASKET ASSEMBLY:
2. Prepare the main basket shape by bending
back on all perforation lines between side and
bottom panels and tabs.
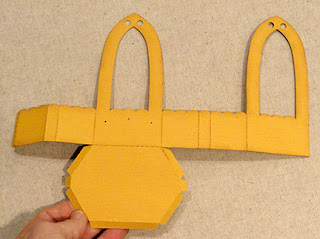 3. Position and attach the side panel accent shapes.
Position and attach the leaf accent shape
with the end punch holes aligned over
corresponding punch holes on basket front.
(Flowers will be attached a bit later.)

 NOTE that the symmetry of the shape allows
to press it flat while joining the side seam.

 . . . and join tabs to

 8. Position and attach the side and then center
blossoms over the punch holes on the basket front.


 11. To complete the assembly, slide the insert over
the top of the foil-wrapped choc bunny . . .
 . . . then place the unit into the basket, tucking
side panel segments inside the basket walls.


 Here you can see the completed basket
with the plain insert "platform" in place.

 12. Join the wall extension to the main shape
by overlapping the plain side edge over the
corresponding side edge tab.


 15. Position and attach the grass accent on
front panel.
 15. Follow steps 5 & 6 above for the small basket
to form the basket.
16. Layer the handle and reinforcement handle
shapes together, matching all cut edges.
 17. Position handle ends behind the basket side
to line up punch holes, and glue in place.
Insert decorative mini brads through holes.


for the size basket you are constructing.
Small Basket
A main basket shape
B accent shapes for all side segments
C front decor blossoms
D insert (this one holds the small choc bunny)
NOT SHOWN: leaf accent shape

E & F main basket and side addition panel
G side accent panels for all side segments
H handles (cut 2 pair for strength)
I-L grass accent layers
M flower accent
N plaque accent & word cut
O insert (this one is for large choc bunny)

2. Prepare the main basket shape by bending
back on all perforation lines between side and
bottom panels and tabs.

Position and attach the leaf accent shape
with the end punch holes aligned over
corresponding punch holes on basket front.
(Flowers will be attached a bit later.)

5. Form the basket by forming the shape into
a tube to bring the straight side edge to overlap
the opposite tab to perforation line and glue in place.

to press it flat while joining the side seam.

6. Push the bottom panel into place with the edge
tabs tucked in behind the side walls until
tab perforation lines align at bottom edges of
side panels, apply glue . . .

backside of walls.

7. Prepare blossom shapes, if desired, by pressing
the individual petals on a soft surface (stiff foam pad)
using a large ball-end stylus.
(The set shown is by McGill.)

blossoms over the punch holes on the basket front.

9. Prepare the insert by bending back all side
extensions, and tabs.

NOTE that the end panel that includes the tiny
arrow triangle is the front for the purposes of
orienting the chocolate bunnies into the cutout.

10. Bend the end side segments into position
to overlap the adjacent tab and glue the seam.
Repeat to complete four total tab seams.

the top of the foil-wrapped choc bunny . . .

side panel segments inside the basket walls.

Apply gentle pressure to assist the insert
wall bottom edges to seat all the way down
inside the basket (they may tend to get caught
on the bottom tab edges).

11. Bring the handles together to align
the ribbon holes . . .

. . . insert ribbon length, and tie knot and bow.

with the plain insert "platform" in place.

LARGE BASKET ASSEMBLY
11. Prepare the main basket shapes by bending
back on all the side wall segment divisions and tabs.

by overlapping the plain side edge over the
corresponding side edge tab.

13. Position and attach the side accent shapes.

14. Layer the grass accent shapes by first
identifying the order number cut into the shape.
Then . . .

. . . layer the shape without a number (this is #1)
on top of #2, lining up the side and bottom straight
edges, and glue together.
Repeat with the #3 and then #4 shapes to create
one unit.

front panel.

to form the basket.
16. Layer the handle and reinforcement handle
shapes together, matching all cut edges.

to line up punch holes, and glue in place.
Insert decorative mini brads through holes.

18. Follow step 11 to add ribbon bow to top
of handles. Follow steps 9 thru 10 to prepare the insert,
and insert with choc bunny.
19. Position and attach assembled word plaque,
with prepared blossom on the front panel.

Here is the completed large basket.


