Showing posts with label Easter tag. Show all posts

Friday, April 8, 2022

Tag Easter Corrugated Egg Decorated

Multiple folds create a vertical corrugated surface 
for the egg in this Easter arrangement, attached by tiny 
positioning tabs and end crescents on the whole egg “front”. 
Other whole egg shapes are layered and attached behind 
the pleated front assembly for thickness and strength.
 Egg is decorated with small heart and cross band. 
Base tag and accent front hold other elements:
 “E A S T E R” print & cut tiles, love welded word, 
dimensional rolled flower, long & short leafy sprigs. 
Completed tag can be attached to 
a hostess gift bouquet (or other gifts), 
or simply as a seasonal decoration. 
Tag measures approx. 3.28” wide x 6.25” tall 
when assembled. 

ASSEMBLY: 1. Identify and cut the shapes:
A tag base front panel accent   B tag base
C pleated (corrugated) egg shape
D base for egg shape with slots
E base egg build up shape for thickness (4-6)
F cross band   G accent heart  H accent 'love" word cut
I sprigs with leaves and berries accents tall & med.
J "E A S T E R" letter tiles to print & cut
K spiral blossom with circle base
2. Layer and glue together the base egg shapes
for thickened egg, taking care to align all outer edges
as precisely as possible. Press under a flat heavy weight
for several hours or overnight to ensure flatness and
prevent warping or curling.
3. Beginning at the center perforation line for the pleated
egg shape, making a 'mountain' fold at center.
Working toward each side edge, fold remaining perforation
lines in alternating 'valley' then 'mountain' folds.
NOTE that the side-most folds will be 'valley' folds.
Also note that the small tabs at intermediate fold lines
('valley" should be allowed to pop free from the folded edge.)
Once perforation folding is completed, compress
the shape so that all the folds get "stacked", then . . .
. . . apply strong pressure all along the stack to ensure
that all the fold lines are thoroughly creased.
This is help the fanning of pleats to happen in
a consistent pattern.
4. Position the pleated egg shape backside down
onto egg base, apply glue to tabs, then insert
into the slots on corresponding side (right side shown).
On the underside of assembly, bend the tabs outward
and press in place to attach to base egg.
5. When tabs from previous step are secure in place,
lift the outer portion of pleated egg and apply glue
to the edge, and also in a zig zag across
the rest of exposed base panel. Then . . .
. . . reposition the outer portion of pleated egg to
align the final segment flat against the base's surface
and secure in place. At the same time . . .
. . . allow or assist the pleat sequence between tabs
and edge to even out to consistent configuration,
then apply pressure to secure the inward ridges in place.
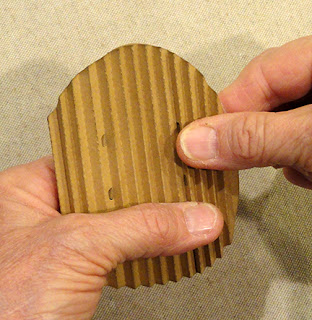
6. Repeat the process for the opposite side of pleated
egg and tabs, first lifting the center portion and applying
a zigzag of glue from top to bottom.
Insert the tabs into slots and glue in place,
while at the same time assisting/allowing pleats to
adjust to regular, evenly-spaced arrangement
across middle.
7. Repeat step 5 for the left side of pleated egg
and edge.
NOTE that the pleating across the whole egg should
be assisted to be even and regularly-spaced
as can be seen in the following edge-view image.
Also, at edges, while glue is still workable, push/ease
the pleating inward to align as closely as possible
with the base oval edges, then hold in place
until glue dries.
8. Position and attach the pleated egg assembly onto
the front of the layered for thickness egg base,
with outer edges aligned. 
9. Position the cross band accent across egg assembly,
with straight edges placed at perpendicular to pleats,
and adjust up or down until shaped side edges of band
and egg match up, and attach in place.
10. Position the accent heart, centered over egg
at the position where the tiny tab "irregularities"
will be hidden just below the top curved edges
of heart, and glue in place.
11. Position the egg assembly onto the joined
tag base layers, centered, and with margin below
bottom edge that matches the side margin space,
and attach in place.
12. Follow "Print & Cut" procedures to print
and cut out the letter tiles that spell EASTER.
Position above egg and below punch ribbon hole,
and justified toward the right edge of front
tag layer, and attach in place.
Also position the welded word centered
on top of the cross band, overlapping the heart.
13. If desired to add jute string around egg edge,
apply glue at edge, then . . .
. . . wrap string snugly at egg edge, with the beginning
"splice" positioned at center left edge.
Trim string ends so that they abut.
14. To create the spiral blossom accent, follow this LINK
to a previous tutorial for a different project,
referring to steps 15-19. Then return to this post.
15. Arrange the sprigs at the left edge of the egg,
with spiral blossom on top concealing
the overlapping stems.
Embellish as desired. Sample project includes:
fine jute string bow loops cluster at left edge
(under sprigs), purchased and trimmed silk blossom,
berry short sprigs (white), wide slat-end ribbon
threaded through top center hole and tied with
narrow contrast ribbon in knot and bow.


Tuesday, March 9, 2021

Bunny Side View Medium Cross Stitch Tag

Traditionally shaped gift tag has top panel with ribbon slot 
(accepts .375 wide flat) and reinforcement ring, with pair of accent 
eyelet  punch holes (shapes also included without eyelet holes). 
Cut and glue together two cardstock cross-stitching layers for strength. 
Cross-stitch pattern needle holes are stitched following included 
CHART to create a simpler bunny design with 
(NOTE: only design stitching holes are included). 
Complete the EASY cross-stitch design using 2 ply embroidery floss 
with fine blunt no. 24 tapestry needle with floss colors: 
blue body, dark gray eye, light gray tail, pink nose. 
A stitchery area silhouette cutout buffer layer and solid layer are
also included as optional backside layers for a more finished final project. 
Cross-stitch count: 82. Tag finished size 2.25” wide x 3.5” long.

ASSEMBLY: 1. Identify and cut the shapes:
A main tag with stitching holes (2)
B stitching area cutout backside tag layer
C plain backside tag layer
D contrast tag top panels (2)   E slit reinforcements (2)
2. Make sure the stitching hole openings are free
from cutout waste (chads). One way to do this is
to use the end of a paperclip to push through to backside
then rub/scrape tiny "confetti" pieces away.
(This image is from the larger bunny project.)
3. Position and glue together the two stitching layers,
taking care that all cut edges align as precisely
as possible, including stitching holes, eyelet holes,
slot and tag edges.
Press the glued-up tags under a flat heavy weight
such as this thick book or equivalent wood plank,
flat weights, etc. and allow to dry thoroughly
(for several hours or over night).
4. Position and attach the reinforcement accent shapes
onto the tag top accents, aligning the slot cut outs
of each as precisely as possible.
(This image is from the larger bunny tag.)
5. Prepare to begin stitching by assembling needles
and floss. This is the recommended needle type
and size: tapestry no. 24.
DMC floss was used for the model; select colors
of choice to coordinate with your paper choices.
Model colors: body 807 ; tail 3024; nose 3712, eye 413.
6. Cut a 26-28" length of 6-ply floss, then separate
a single strand.
Print out the stitching CHART or have ready access on screen.
Locate the first stitch on the bunny's bottom row - 
this is where the stitching will begin.
Then isolate the upper left stitching hole that will produce the first 'X'.
This is the hole where the needle will pass from backside
to frontside as stitching begins.
7. Cut a 26-28" length of 6-ply floss, then separate
a single strand.
Loop the strand in half to bring the cut ends together.
8. Thread the loop end through the eye of 
the tapestry needle, then pull the double strand through 
to leave the cut ends as the 4-5 inch 'tail', 
with the loop as the 'end' of the stitching length.
9. FIRST RULE OF CROSS-STITCHING:
create ALL stitches in same order direction.
That is, the "legs" of the 'X' need to be stitched
in the same manner throughout. For these instructions,
this will be: FIRST the 'right' slant
and SECOND the 'left' slant.


NOTE that the order presented in the above illustration
is optimum and may change slightly as stitching progresses
in order NOT to 'unstitch' previous stitches.

10. Insert the needle back-to-front in the hole identified in Step 9,
pull the floss through for just 5-6 inches, then . . . 
. . . immediately insert the needle front-to-back into
the bottom right hole of the first 'X', and pull the needle
through to the backside, then . . . 
. . . pass the needle through the end loop . . .
. . . and pull the floss through the remainder of
the length, allowing the loop to slide into place
against the tag's backside and anchor the floss.
(This is how to begin each NEW length of floss,
and is referred to as "tying on".)
11. Regular stitching can now proceed.
Insert needle up in the next X stitch's top-left hole
(#3 in the illustration in Step 9), pull floss through
completely - taut but NOT tight.
12. Complete the second X right slant stitch by inserting
needle down through hole #4, then up through
hole #5 and so forth, completing ALL the 
 right slant stitches ACROSS the first row.
Complete all the left slant stitches for bottom row.
13. Move UP to the next row, work across the right slant stitches.
Refer to the CHART to make sure the SPACES are skipped
appropriately.
14. Continue to work upward to complete all the BODY
colored cross stitches. "Tie off" when stitching is complete,
or when floss length is used up.

Be sure to leave tail, eye and nose areas free 
from stitching until later.

15. NOSE DETAIL:
An extra stitch hole has been included in the center of
the 'X' for the NOSE. When beginning the row for body stitches
that aligns with the nose stitch, complete only the half right slant
body stitch. Then complete the remainder of 
whole right & left body slant stitches for the row.
For NOSE stitch, complete the half right slant nose stitch,
then the whole left slant nose stitch, on top of the body stitch
that already occupies the body holes.
(Step 18 will describe additional straight stitches
that can be added for better definition.)


16. Tying off: with the needle on the backside of the work,
slide the needle under a few stitches of an adjacent row,
pull floss through completely, then clip even with tag surface.
NOTE: this is the same tying off procedure for 
any time stitching color is changed, 
or a new length of floss is required.
17. Add the eye cross stitch - for more definition,
stitch the right slant leg twice, then stitch
the left slant stitch twice, they tie off.
18. Complete the nose half and whole slant stitches
as described in Step 15 Nose Detail. Then . . .
. . . add a vertical stitch along the left side of the nose's
'X' stitch, and a horizontal stitch along the top.
Here is the finished tag cross stitching.
19. To make the tag's backside look nice, and buffer
the thickness of the stitching to avoid rippling at edges
where the layers need to come together when joining,
use the stitching shape which is glued to the backside of stitched
assembly, with outer cut edges, punch holes and slot edges
matched precisely.
20. Position and attach the plain tag with openings
and side edges matched up precisely.
(Consider pressing under a flat heavy weight until dry.)
21. Position and attach the top accent assemblies,
one on front and optionally one on back.
Here is the completed tag, with eyelets,
ribbon threaded through slot,
tied with twine.