Showing posts with label candy bar wrap. Show all posts

Sunday, May 25, 2014

Golf Club Candy Bar Wrap Construction

Wrap a giant candy bar (Hersheys varieties
and perhaps others) in a paper box wrapper
as a gift for a Dad in your life, or any golf enthusiast.
Decorative shapes are assembled onto a bag silhouette base shape,
a separate front and back cut-away back base shape
sandwich a box compartment to hold the bar.
Goes together quickly, but does require a 12x12 cutting mat size.
Design file available soon from SnapDragon Snippets
through Silhouette America online store.

CONSTRUCTION:
1. Identify and cut the shapes:
clockwise from left, decor shapes base (shown pre-assembled with all of decor shapes already on top of it), box assembly front base shape, boxing body, box assembly back base shape with layered tag.

NOTE: Box assembly front base shape is shown reversed in this layout, to more easily see how it relates to the decor assembled front. When reversed during the assembly, the face side of the shape will be seen around the placed boxing body shape, and the backside covered by the decor shapes base.

2. Fold boxing shape with all edges folding inward, including end flap tabs.

NOTE: An improvement has been made to the boxing shape to include an additional long edge tab at bottom. If you have purchased and downloaded the shape through the Silhouete America online store before this improvement was available, please re-download the design.
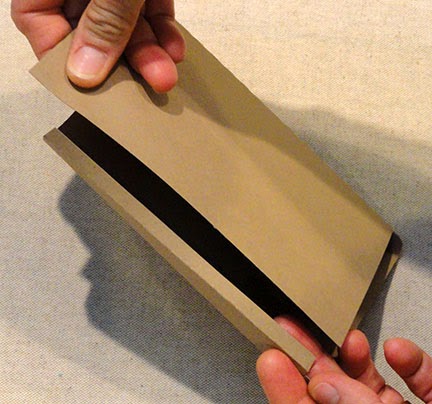


3. Fold the box into a "tube" to bring side edge and tab together. Align bottom edges of each and glue the seam.

NOTE: the tab is shorter than the front boxing edge to allow for the back box and base cut-away shaping.


4.  Fold end tabs back and insert into boxing end, glue in place. Also fold long tab over on outside of box and glue in place.


5. Position back base shape (shown here with "DAD" tag already attached) over boxing back, center side to side and align shaped upper base shape with boxing shaped edges exactly, and glue in place.


6. Position front base shape over boxing front, centering side to side, and using perforation guideline to align bottom of boxing, matching edges of front with those of back base shape.


7. Assemble all decor shapes onto the decor base shape.

8. Attach wrap front over the boxing front base shape with all edges aligned.


9. Slide giant size candy bar into the boxing to complete the gift.

Many giant bars may fit the boxing. Just check to see which of your choices will work. Those checked during the designing process include the Hershey's varieties, such as the Symphony, regular and almond chocolate, dark chocolate bars, etc.


And here is another look at the finished wrap.


Sunday, May 18, 2014

Wrench Candy Bar Wrap Card

Have fun creating this unique occasion "card",
even before you see the looks of surprise and delight 
on the face of your gift recipient.
Crescent wrench design has front and back base shapes
with an open-ended box in between that is sized to hold
a tall candy bar style (shown here with "Snickers"; 
See the list of bars  in Step 9 that also work well.)
Next, construct the detailed front design on a separate base shape,
attach it to the front "boxing" base shape, 
add a name-inscribed two-layer tag,
insert bar into box, and give it to your special someone!

CONSTRUCTION:
1. Identify and cut the shapes.


2. Fold the box inward at all perforations.

3. Join side tab to opposite long box edge. It may be helpful to insert a pencil or rod to provide something to apply pressure against during the gluing of this tab. 

4. Insert box end tabs inside the box, then fold front tab down and glue in place.


5. Center and attach the box to the backside of the front wrench base shape, using perforation lines as end placement guides.


It may be helpful, once again, to insert a pencil or rod inside the box to help apply pressure to the edges that are being glued together. Move the pencil around inside the box interior, keeping it as flat as possible to help the adhesive grab at all parts of the attachment surfaces.


6. Turn the assembly over and repeat the process of aligning and gluing the box bottom to the backside of the back wrench base shape.


7.  Assemble the decorative shapes onto the separate wrench front base shape. Here, just the first body layer is being placed. Refer to the next image to complete placement and attachment of all decorative shapes.

NOTE that the wrench front base shape color will show through the worm screw hole.


Here are the completed decorative wrench shape and the two-layer tag.


8. Position and glue the decorative assembly front over the front base/box shape. Apply pressure to ensure that all surfaces of both pieces attach well.


9. When completed, insert the candy bar of choice into the "head" opening and into box.

Other bars that work in the original size include: 100 Grand, Butterfinger, Whatchamacallit, Almond Joy, Cadbury Caramello, Milkyway (several flavor variations), Snickers Almond, 3 Musketeers.

Slight enlargement of the ENTIRE cut file (excluding tag, perhaps) may provide a size that would fit other, larger, bars.