Showing posts with label fisherman. Show all posts

Monday, June 8, 2015

Fisherman's Bucket Hat Favor Box

Cut and build this sporty 3d bucket hat favor box
for your favorite fisherman or dad.
Easier than you might think, with six-section crown & brim,
base box that slides into the cavity below,
with straps that hold the box in place.
Decorate with hat band that has eyelet accents,
hooks, fly, lure and bobber.


ASSEMBLY: 
1. Identify and cut the shapes:
A hat crown/brim sections (6)
B hat band sections (2)
C hat band accent front plates (6) shown with eyelets in place
D brim edge trim arches (6)
E hat top with slots for top "button"
F top button and loop band
G base box (NOTE this shape has been changed to be one piece with shorter sides in the final cut file, as will be shown in tutorial steps posted here.)
H decorations: bobber, hooks, lure, fly
NOT SHOWN: latch hook strips to hold box in place (see step 23)


2. Prepare the main hat sections by folding as shown: side tabs back, top section back, bottom section forward.


3. Apply glue to the top tab, bring the corresponding straight edge of the next section to be joined in line with the top section's perf line, adjust so that top of hats line up, as well as perforation lines for the top sections then apply pressure to join.


4. Repeat the alignment process for the middle section of the shapes being joined, adjusting so that the middle section straight edge lines up exactly at the tab perforation line opposite. Hold in place until joined.


5. Repeat the alignment and gluing process for the bottom (brim) section of both shapes being joined. Make sure that the bottom curved edges line up as precisely as possible.


6. Repeat the prep, alignment and joining process to join a third section of the hat to the first two assembled.

7. Continue to add the fourth, fifth and sixth sections in the same manner.

When the final (6th) section has been joined to the assembly, bring the straight edges of the first section in line with the tab perf lines of the sixth section and join in similar manner to create a "tube" that is the hat.

8. Glue each of the 6 crown rim arch strips at the corresponding face edge of each section. Take care that arches are aligned/centered from side to side, and that the curved edges line up as precisely as possible.


9. Prepare the two hat band sections by folding back on the three perforations on each strip.

10. Join the two strips together to form a ring by overlapping the straight end edge over the corresponding end tab perforation of the other strip. Glue edge to tab. (Do this for both ends.)


11. Position and attach one accent face place to each segment of the hat band ring.

12. Attach a small grommet/eyelet at each hole punch.
(NOTE: the hat segments also include hole punches, but it may be too difficult to attach the grommets with a hammer or tongs applicator when the band is in place. Hat holes would make brad fastener "studs" possible in place of eyelets.


13. Slide the hat band ring over the crown, lining up segments of each for a good fit. Slide band down until it seats at the valley defining crown and brim. Glue bottom edge in place (this allows for decorations to be "tucked" into or behind the top edge).


14. Prepare the top "button" by folding sides down slightly at center hexagon perforations. Fold loop strip in half, and insert through the top slit of the button to the end "tab" perf marks. Fold loop ends outward and glue in place on the underside of the button "roof".

15. Insert button end tabs into corresponding slots on hat top, then . . . 


. . . fold each tab outward and glue in place.


16. Fold the edge flanges of the hat top upward. Apply adhesive to the undersides of each flange, then . . .


. . . slide into place at the top of the crown opening.

Adjust so that top cut edges of hat top flanges and crown top line up as precisely as possible. (Push outward from inside if the top settles too far downward.)

Apply "pinching" pressure along flange edges until each is secure.


17. Arrange and attach decorations by tucking slightly behind hat band.


18. Layer the tag shapes and glue to attach. Cut a short length of your favorite coordinating twine, insert through hat button's loop, then tie the tag in place at top of hat.

This model uses Krafty Red Trendy Twine. 


Follow this link http://shop.anniespaperboutique.com/Krafty-Red-Trendy-Twine-Kraft-Red-Bakers-Twine-TT-173.htm?categoryId=-1 if you are interested in this product.


Here is the 3d hat portion completed.


19. Prepare the base box by folding the single shape at the center hexagon perforation lines to bring each of the six sides upward. Fold side tabs inward and top tabs back.

20. Join each side tab under the adjacent straight side edge, adjusting to make sure that the top tab perf lines line up as precisely as possible. Complete all six side seams.


21. Apply adhesive to each tab backside, then fold downward to the interior of the hex box and hold in place until each is secure.

You may find it helpful to place the face of the box that is having the tab folded back and glued in place flat on a table surface to be able to apply direct pressure along the tab's length.

Rotate for each of the six sides top press and hold for all tabs.


22. Insert the box, open end first, into the underside of the hat, and push in completely.


23. Prepare the latch strips by folding the end taps upward slightly, and folding back slightly at the mid perforation line.

24. Hook the ends at the cross slot, as shown, extend the strips across box bottom so that the mid perfs fall approximately at the bottom's edges of two parallel sides, and adjust . . .


. . . so that the end tab short edge line up at the center of brim curved edge. 

Glue the tabs in place on the underside of the brims in these positions. Hold until secure.


Here you can see how the completed gift box will appear
with the box in place and the straps latched.
Simply slide the latch end hooks apart to remove the box
and fill it, then replace in the same (but reversed) steps.
Here is how our hat box looks completed.

Thursday, June 4, 2015

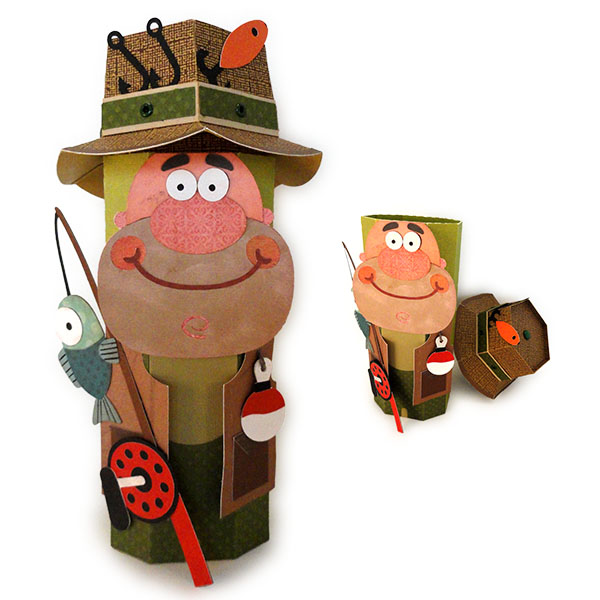
Fisherman Canister Character Assembly Guide

Unique gift box to fill and gift, or display. 
Assemble the tubular "canister" box,
then decorate the box with "tee shirt" base front panel, 
waders, fishing vest fronts with bobber, 
rod & reel and whimsical fish on the line, 
and jolly angler face ready to exaggerate the size of his latest catch. 
Dimensional bucket hat is assembled in six segments,
decorated with hat band and accent shapes,
eyelets and brad top button, hooks, fly and lure.

Another in a series of canister characters.
(Search this blog with "canister" to see others.)

ASSEMBLY:
1. Identify and cut the shapes:
A canister body
B canister bottom ring rim and insert
C canister top ring rim
D "tee shirt" front panel
E wader front panel
F vest fronts, pockets
G face base shape
H face details
I fish shapes
J rod and reel shapes
K bobber shapes
L hat panels (6)
M hat flange strip
N hat base hex
O hat bands (2)
P hat band accents
Q opt. top button circles (5-8)
R hat rim shapes (6)
S hat top
T hat accents: fly, lure, hooks


2. Build the canister box. Follow this link to view canister construction steps 2 through 6, then return for the remaining fisherman canister assembly steps.


3. Prepare the lower front panel (which shows through as the "tee shirt") by bending back on the vertical perforations. Position with bottom canister and panel edges even, perforations lined up, and glue in place.


4. Prepare the "waders" front panel in similar fashion, then position and attach with bottom edges even.


5. Prepare the vest left and right panels by gluing the vest pocket rectangles and triangle flaps in place.

Prepare the bobber decoration by layering the smaller shaped onto the base silhouette. 


6. Attach the bobber to the left upper vest by creating a loop with twine and inserting the ends through the punch hole, then . . .


. . . glue ends in place on the back.


7. Position and attach each vest front on top of the wader panel, aligning the top outer corners of each, and keeping the vertical side edges parallel to the panel edge.


8. Prepare the head/face unit, beginning with the base silhouette (includes the ears that show when all other shapes are in place), then layering on the lower face, upper face, nose. Fit cheek circles into lower face cutouts. Layer eye (pupil) dark shape and top eye (white) shapes. Position and attach mouth, eyes, eye brows.

NOTE that the eyebrows must NOT extend above the top straight edge of the face unit.


9. Position - centered - face unit over the front of the canister assembly, with top straight edges even, and attach in place.


10. Prepare the fish unit by layering the body front and back shapes onto the base silhouette (optional fin and tail shapes may be included in the file). Layer pupil and eye top shapes, then position in the cutout area of upper body.

11. Prepare rod unit by attaching pole and grip to the base silhouette shape.

12. Position top portion of fish unit over the corresponding partial shape at the end of the line, and glue in place.  


13. Assemble the reel unit by layering the circle punch top shape over the plain circle base shape, also layering the handle end shape over the handle and winder base shape.

Position and attach the handle unit to the reel assembly.

14. Position and attach the edge of the reel unit to the grip/rod unit.

(NOTE: when the fish is allowed to take it's natural position, a small portion of the dorsal fin will overlap the pole. Attach fin to pole with a small dab of glue.)


15. If desired, add a series of ink lines to the exposed fins and tail.


16. Position and attach the rod/fish unit to the lower right portion of the canister assembly.

Take care that the bottom of the grip does NOT extend below the bottom edge of the canister, or the canister will not sit properly flat.


17. Assemble the hat. Prepare each of the six segments by folding upper perforation line back, lower perforation forward. Fold side tabs back.

18. Position the straight edge of one segment over the corresponding tab of the adjacent segment, with top and bottom edges or perforation lines lined up, and glue in place. It is recommended to begin at the top section, then bend and align the mid section, then the brim section.


19. Repeat the joining process to add a third segment to the first two assembly, then continue to add remaining segments until all six are attached.
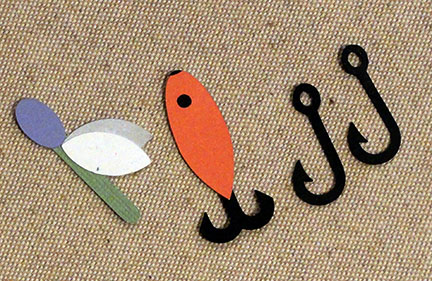
Complete the hat crown/rim ring by joining the final edges and tabs.


20. Prepare the hat band by folding back on all perforation.

Join the two halves into a ring by overlapping the straight end edge of one strip over the tab perforation of the other strip, adjusting top/bottom edges, and attaching. Repeat for the other ends.
 21. Position the accent shapes over each section of the band and attach in place.

Apply the decorative eyelet accents through the two layers of hat band.

(OPT 2: if preferred, small brad fasteners can be inserted through band AND hat layers once the hat band is in position.)


22. Slide the hat band into place over the crown of the hat assembly.

Glue the lower edge of band only in place.


23. Position and attach a rim arc shape at the edge of each brim edge of hat assembly.


24. Prepare the flange strip by bending back on all perforations. Fold bottom tab series up behind the main flange area and glue in place, leaving the end tab opposite the end connector tab flat and not glued back.

(NOTE: it may be helpful to NOT fold back the upper tabs, to assist with insertion into slots in step 22.)

25. Form the flange strip into a ring, overlapping the straight end edge over the tab perforation, and glue in place.

Fold the final bottom tab toward back and glue in place.


26. Prepare base hex shape by folding tabs back.

Rotate flange ring to orient the long tabs with the long slots on the base shape.

Insert tabs into slots . . .


. . . push fully in, fold toward center on the backside of the base shape, and glue in place.


27. Insert the base/flange assembly into the bottom opening of the bat assembly . . .


. . . push in so that the place of the base shape is exactly even with the crown perforation of the hat assembly (indicated by pointing finger) . . .


. . . then apply pressure to the tabs to attach in place. Since the top of the hat is still open, finger pressure can be applied from both inside and outside to complete these joinings.


28. Prepare the hat top panel by folding the edge tabs UP. 

Insert a brad fastener "button", or . . .


. . . if preferred, stack and glue a series of 5 to 8 button circle shapes to create a paper button, then glue it in place over the hole punch.


29. Apply glue to tabs, then insert the top hat panel into the hat assembly opening . . .


. . . push in until top edges are even.


If the top gets pushed too far it, use a tool such as this spatula to work the tab edge back into position.


"Pinch" to apply pressure to edges of hat and top panel to secure.


30. Prepare the fly and lure units by assembling shape(s) onto base shapes.

Arrange these accents on front panels of the hat, inserting bottom edges slightly under the free top edge of the hat band. Glue in place.


31. Place the hat onto the canister by inserting the flange inside the upper opening of the canister.


Here is the completed fisherman canister character.


And a few more images for reference: